

Goober
-
Content Count
1,301 -
Joined
-
Last visited
-
Days Won
4
Posts posted by Goober
-
-
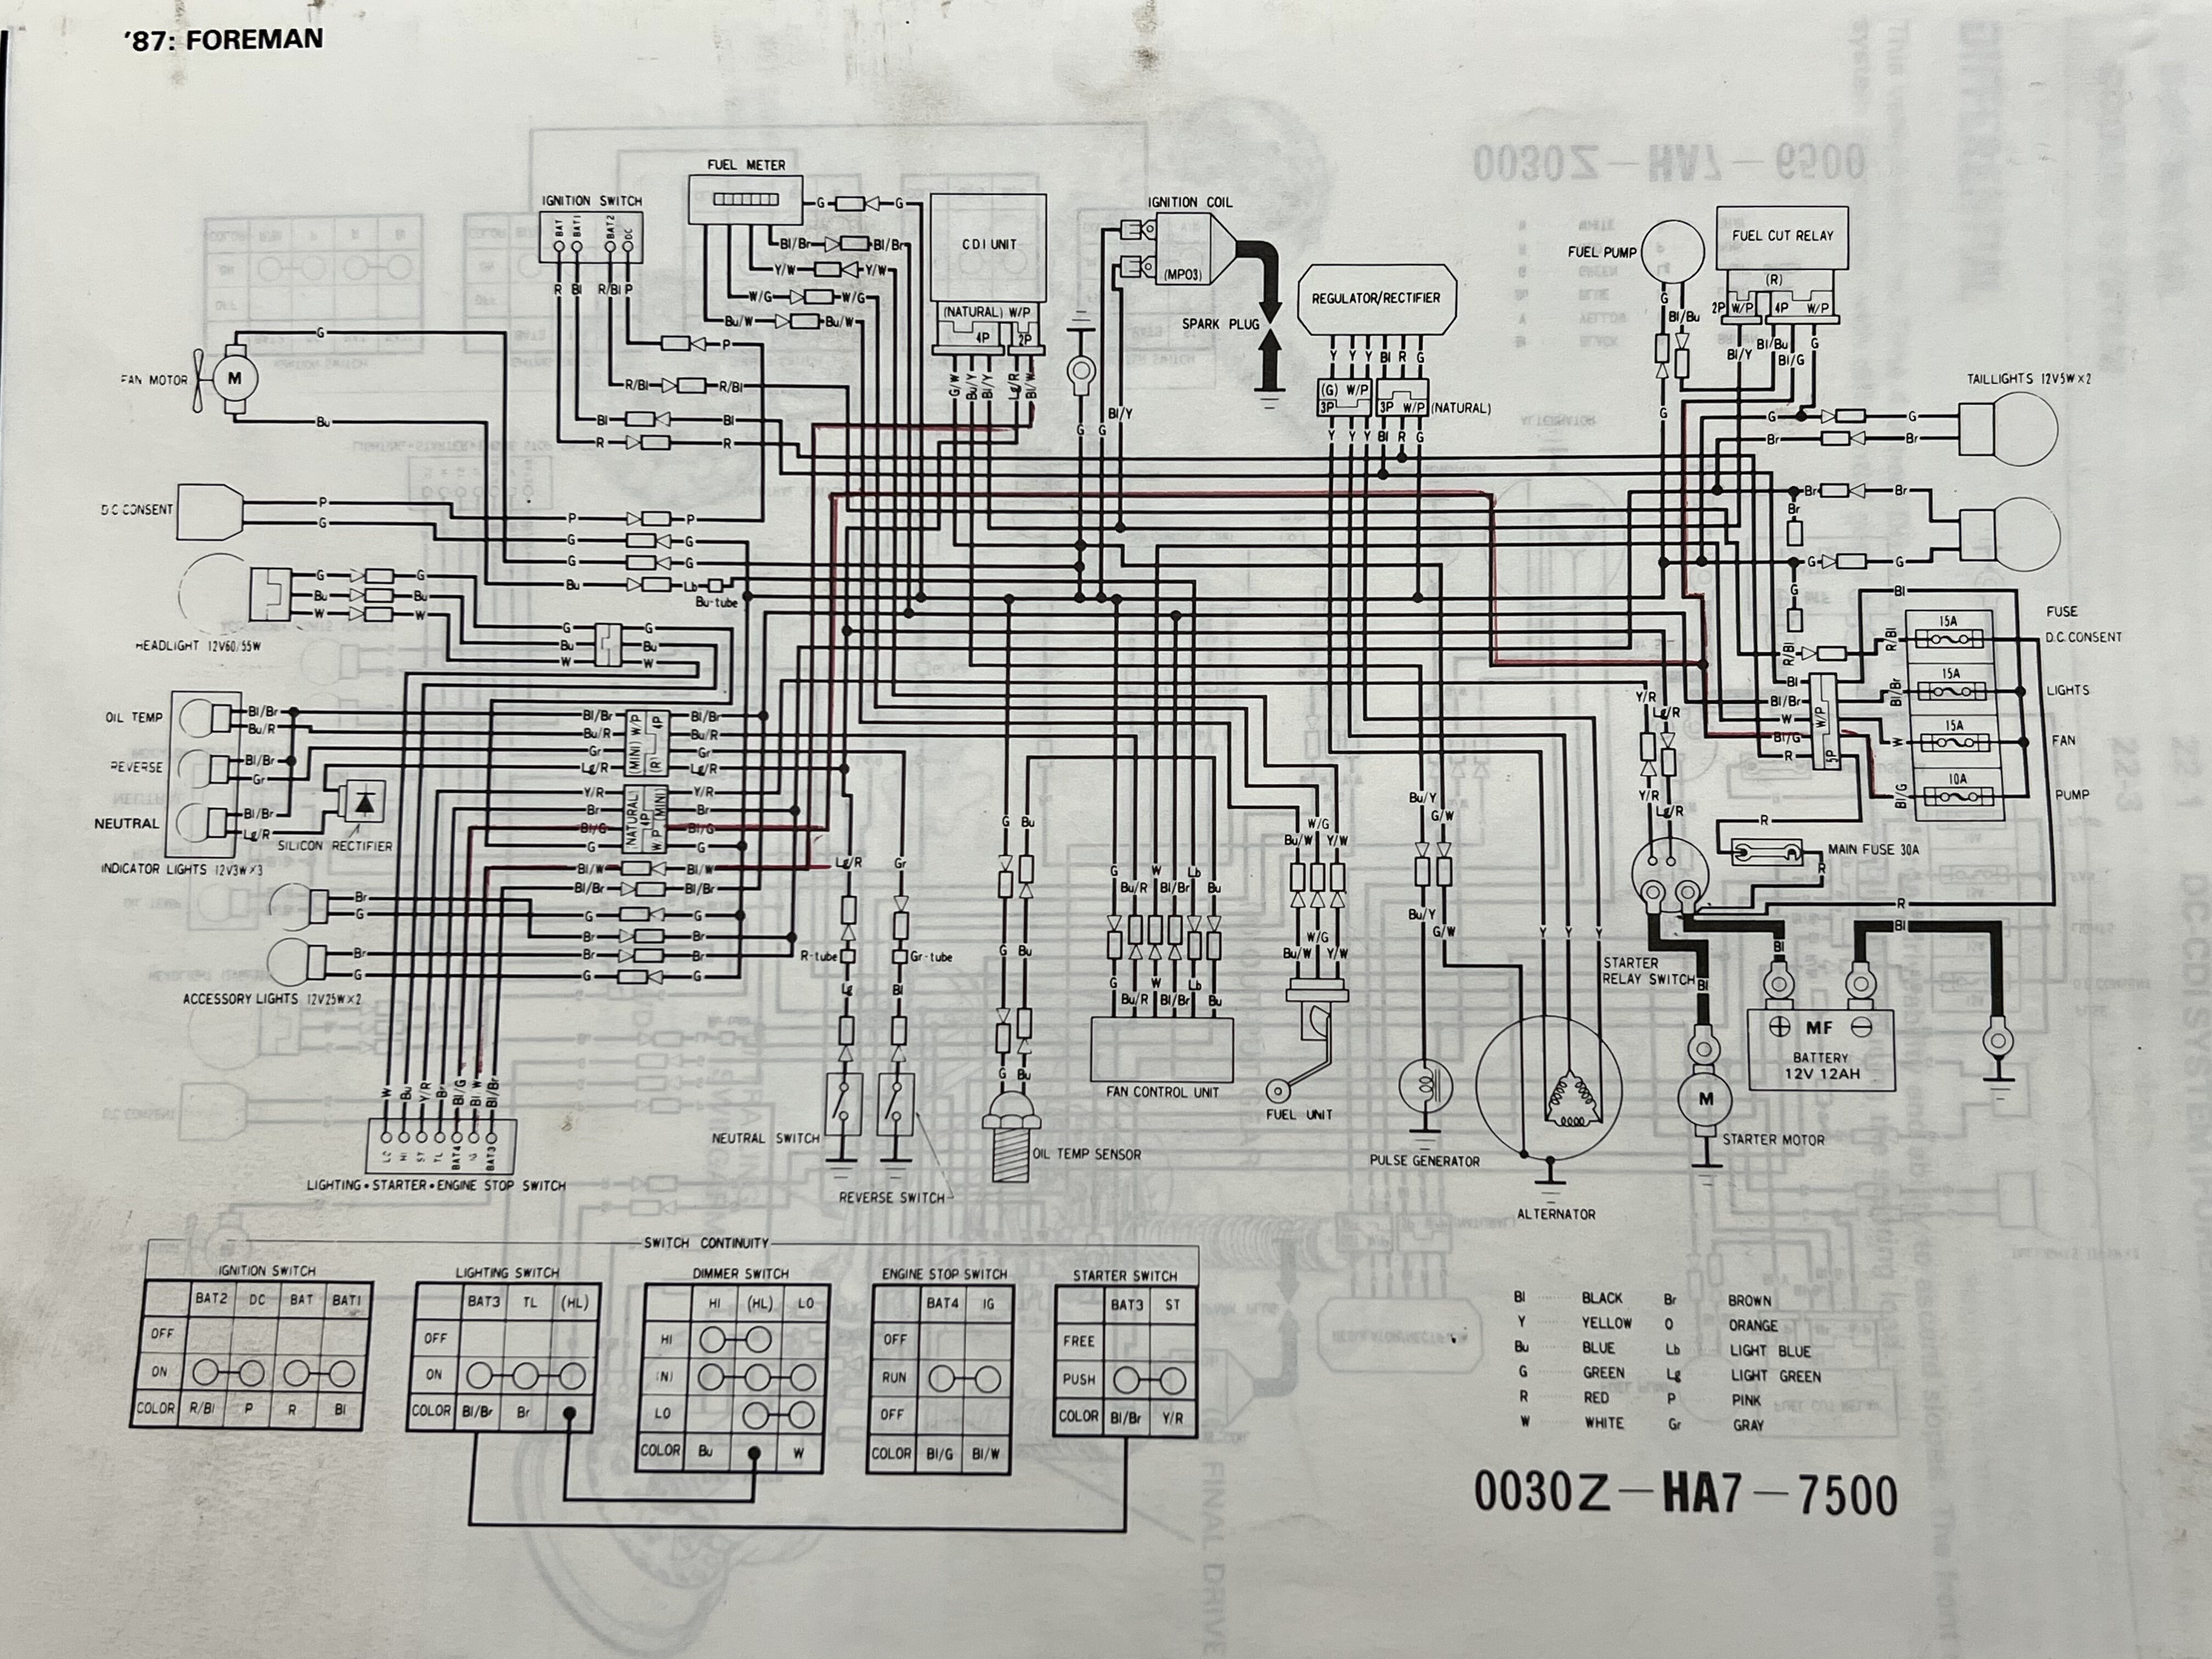
On a TRX350A that Bl/W wire separately (not part of a harness) connects to the engine stop switch and ignition switch. And CDI
On the TRX350D i think it’s part of a 2-wire connector along with Bl/Bn. Directly to CDI
edit main thing check that your stop switch isn’t creating a intermittent connection
-
I try to inspect every connector and wire that’s not wrapped. Most of the time you’ll see damage on unwrapped wires—rarely in the wrapping. But You won’t see loosely wired pins unless you disco the connectors.
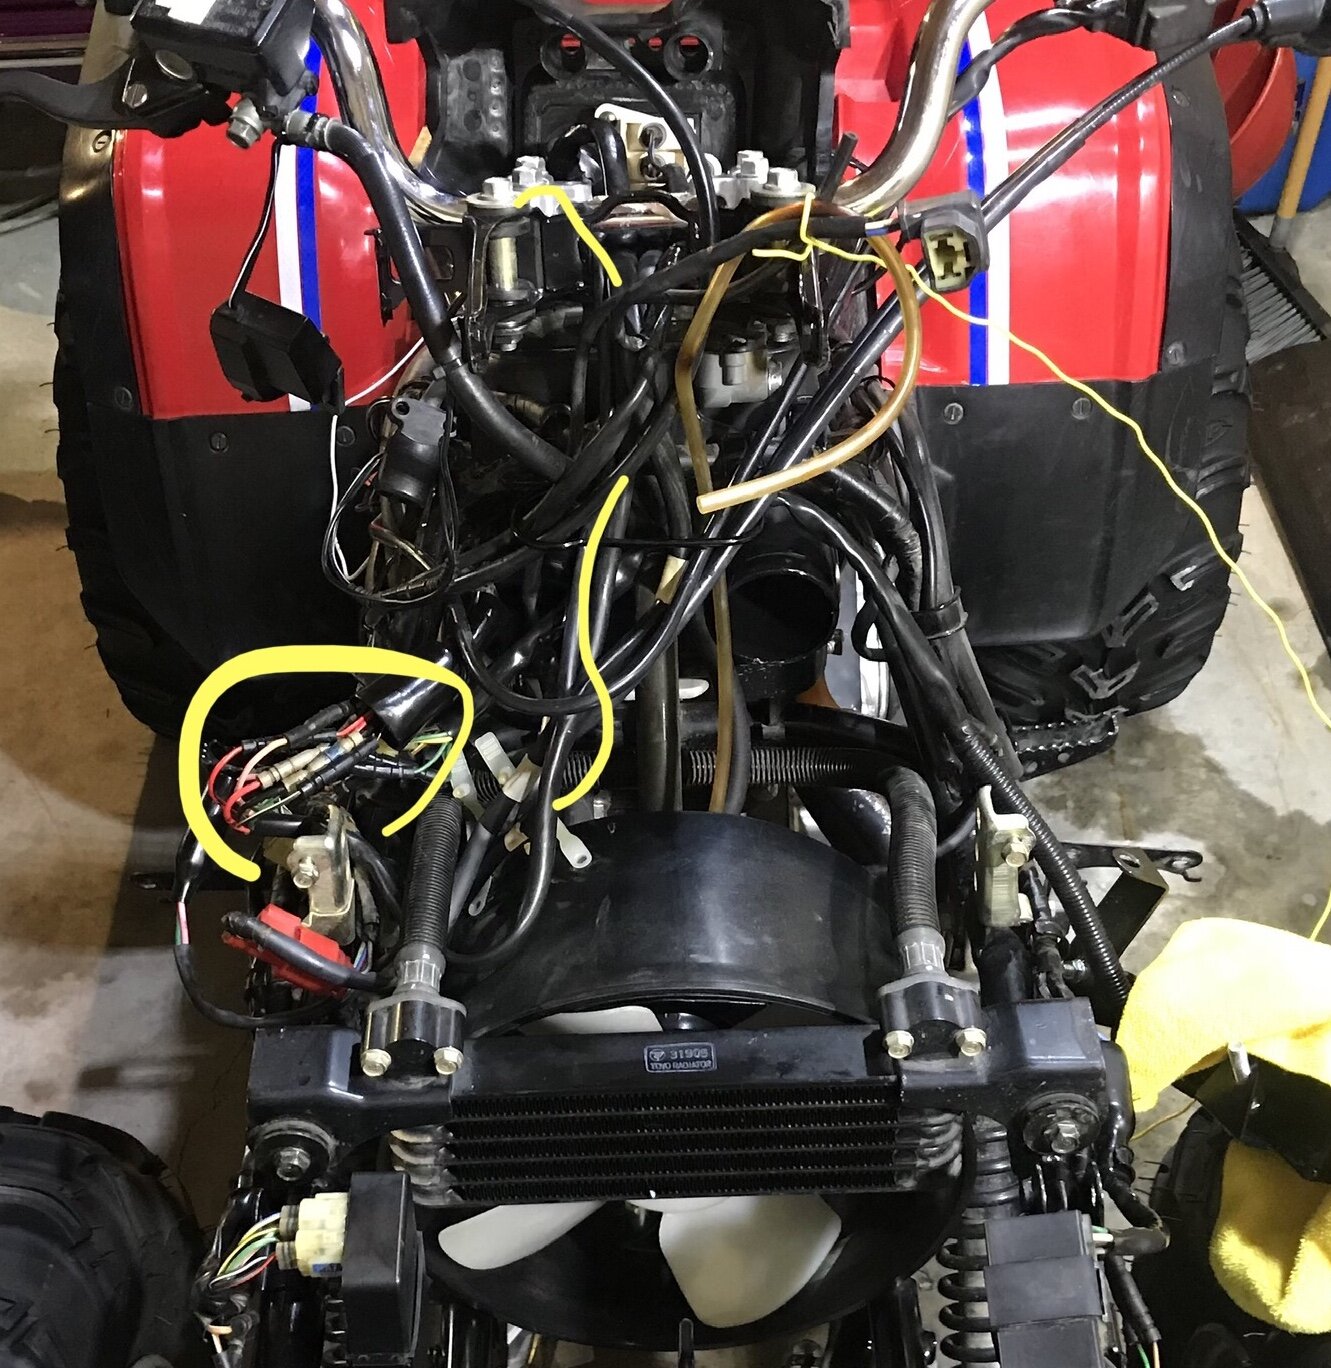
it’s no fun but you can access most of the connectors for this circuit by pulling the front right inner fender. I find it easier to remove the fender.see what i found here?

-
4 minutes ago, Jared k said:Both coils are dead ... and yes I’m following the manuals primary coil test- olms test in plug end and green connector point . I get a reading of 0 and the manual I think says it should be .1-.3 or something. Cdi reads HA7 C1537
and no there is still zero spark long after it has cooled down..
This is worth tracking
-
 1
1
-
-
At this point, I’m thinking wires and connectors, not modules and components. Have you removed the front fender and inspected harnesses?
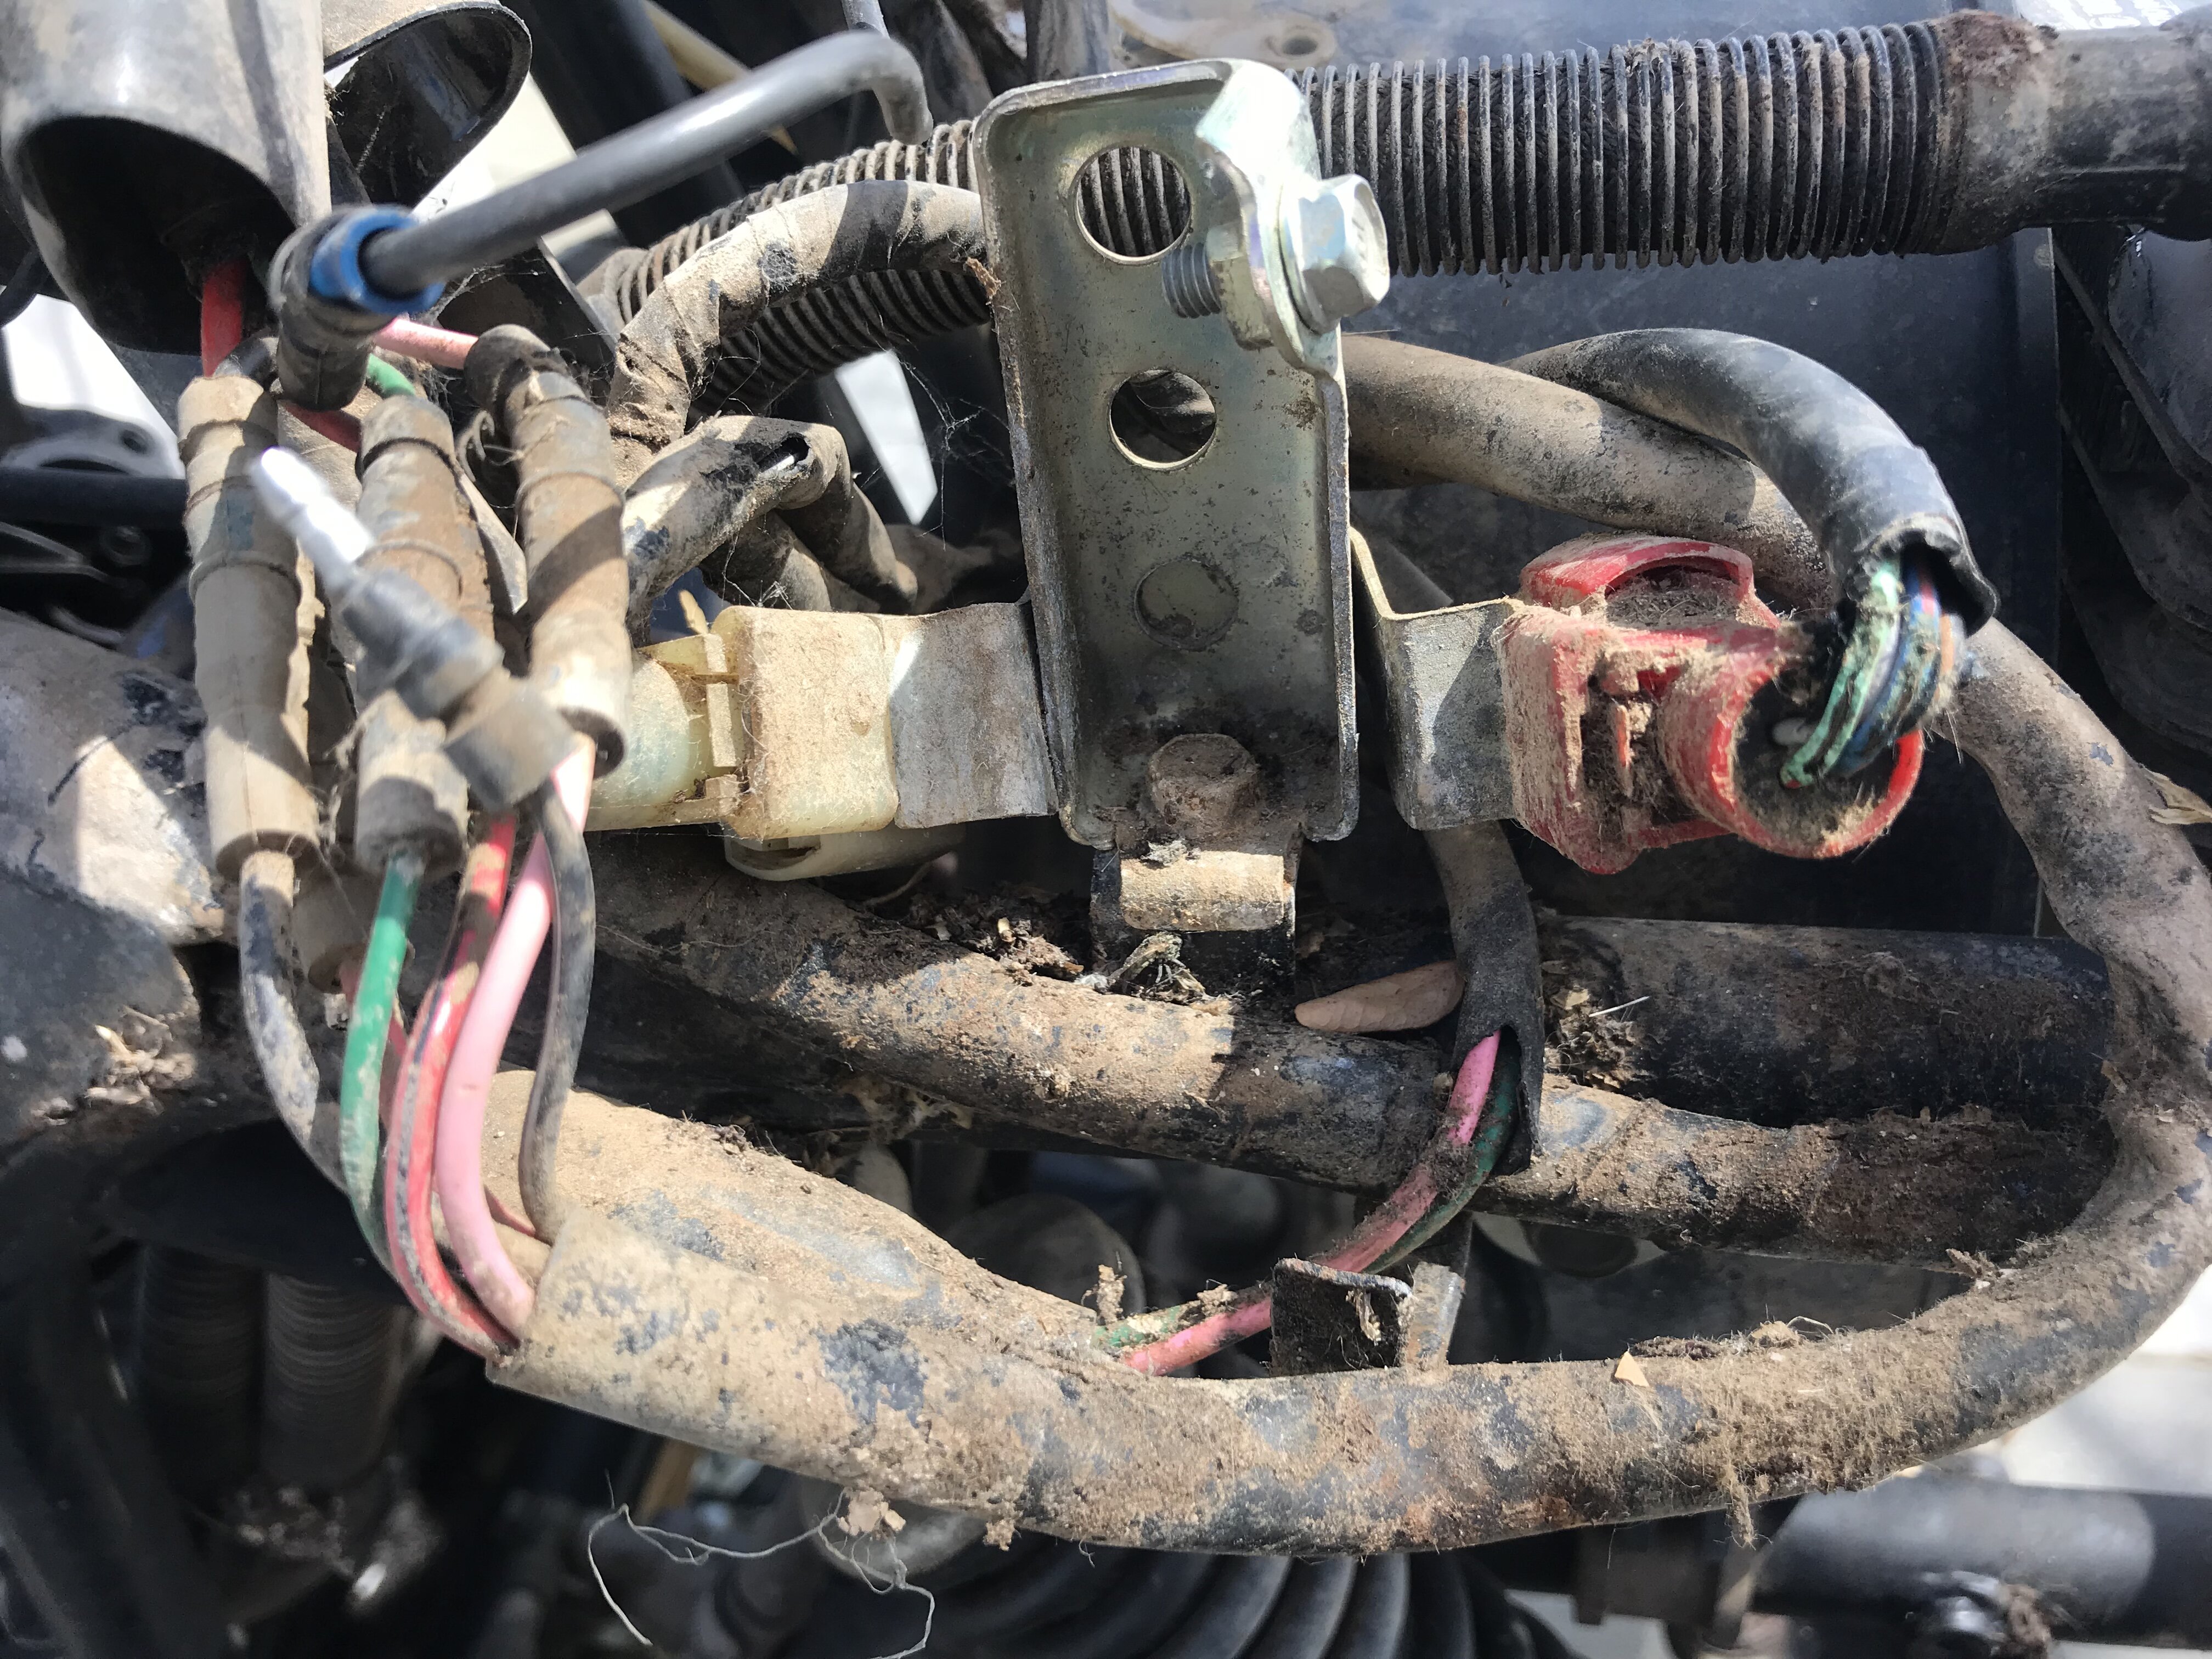
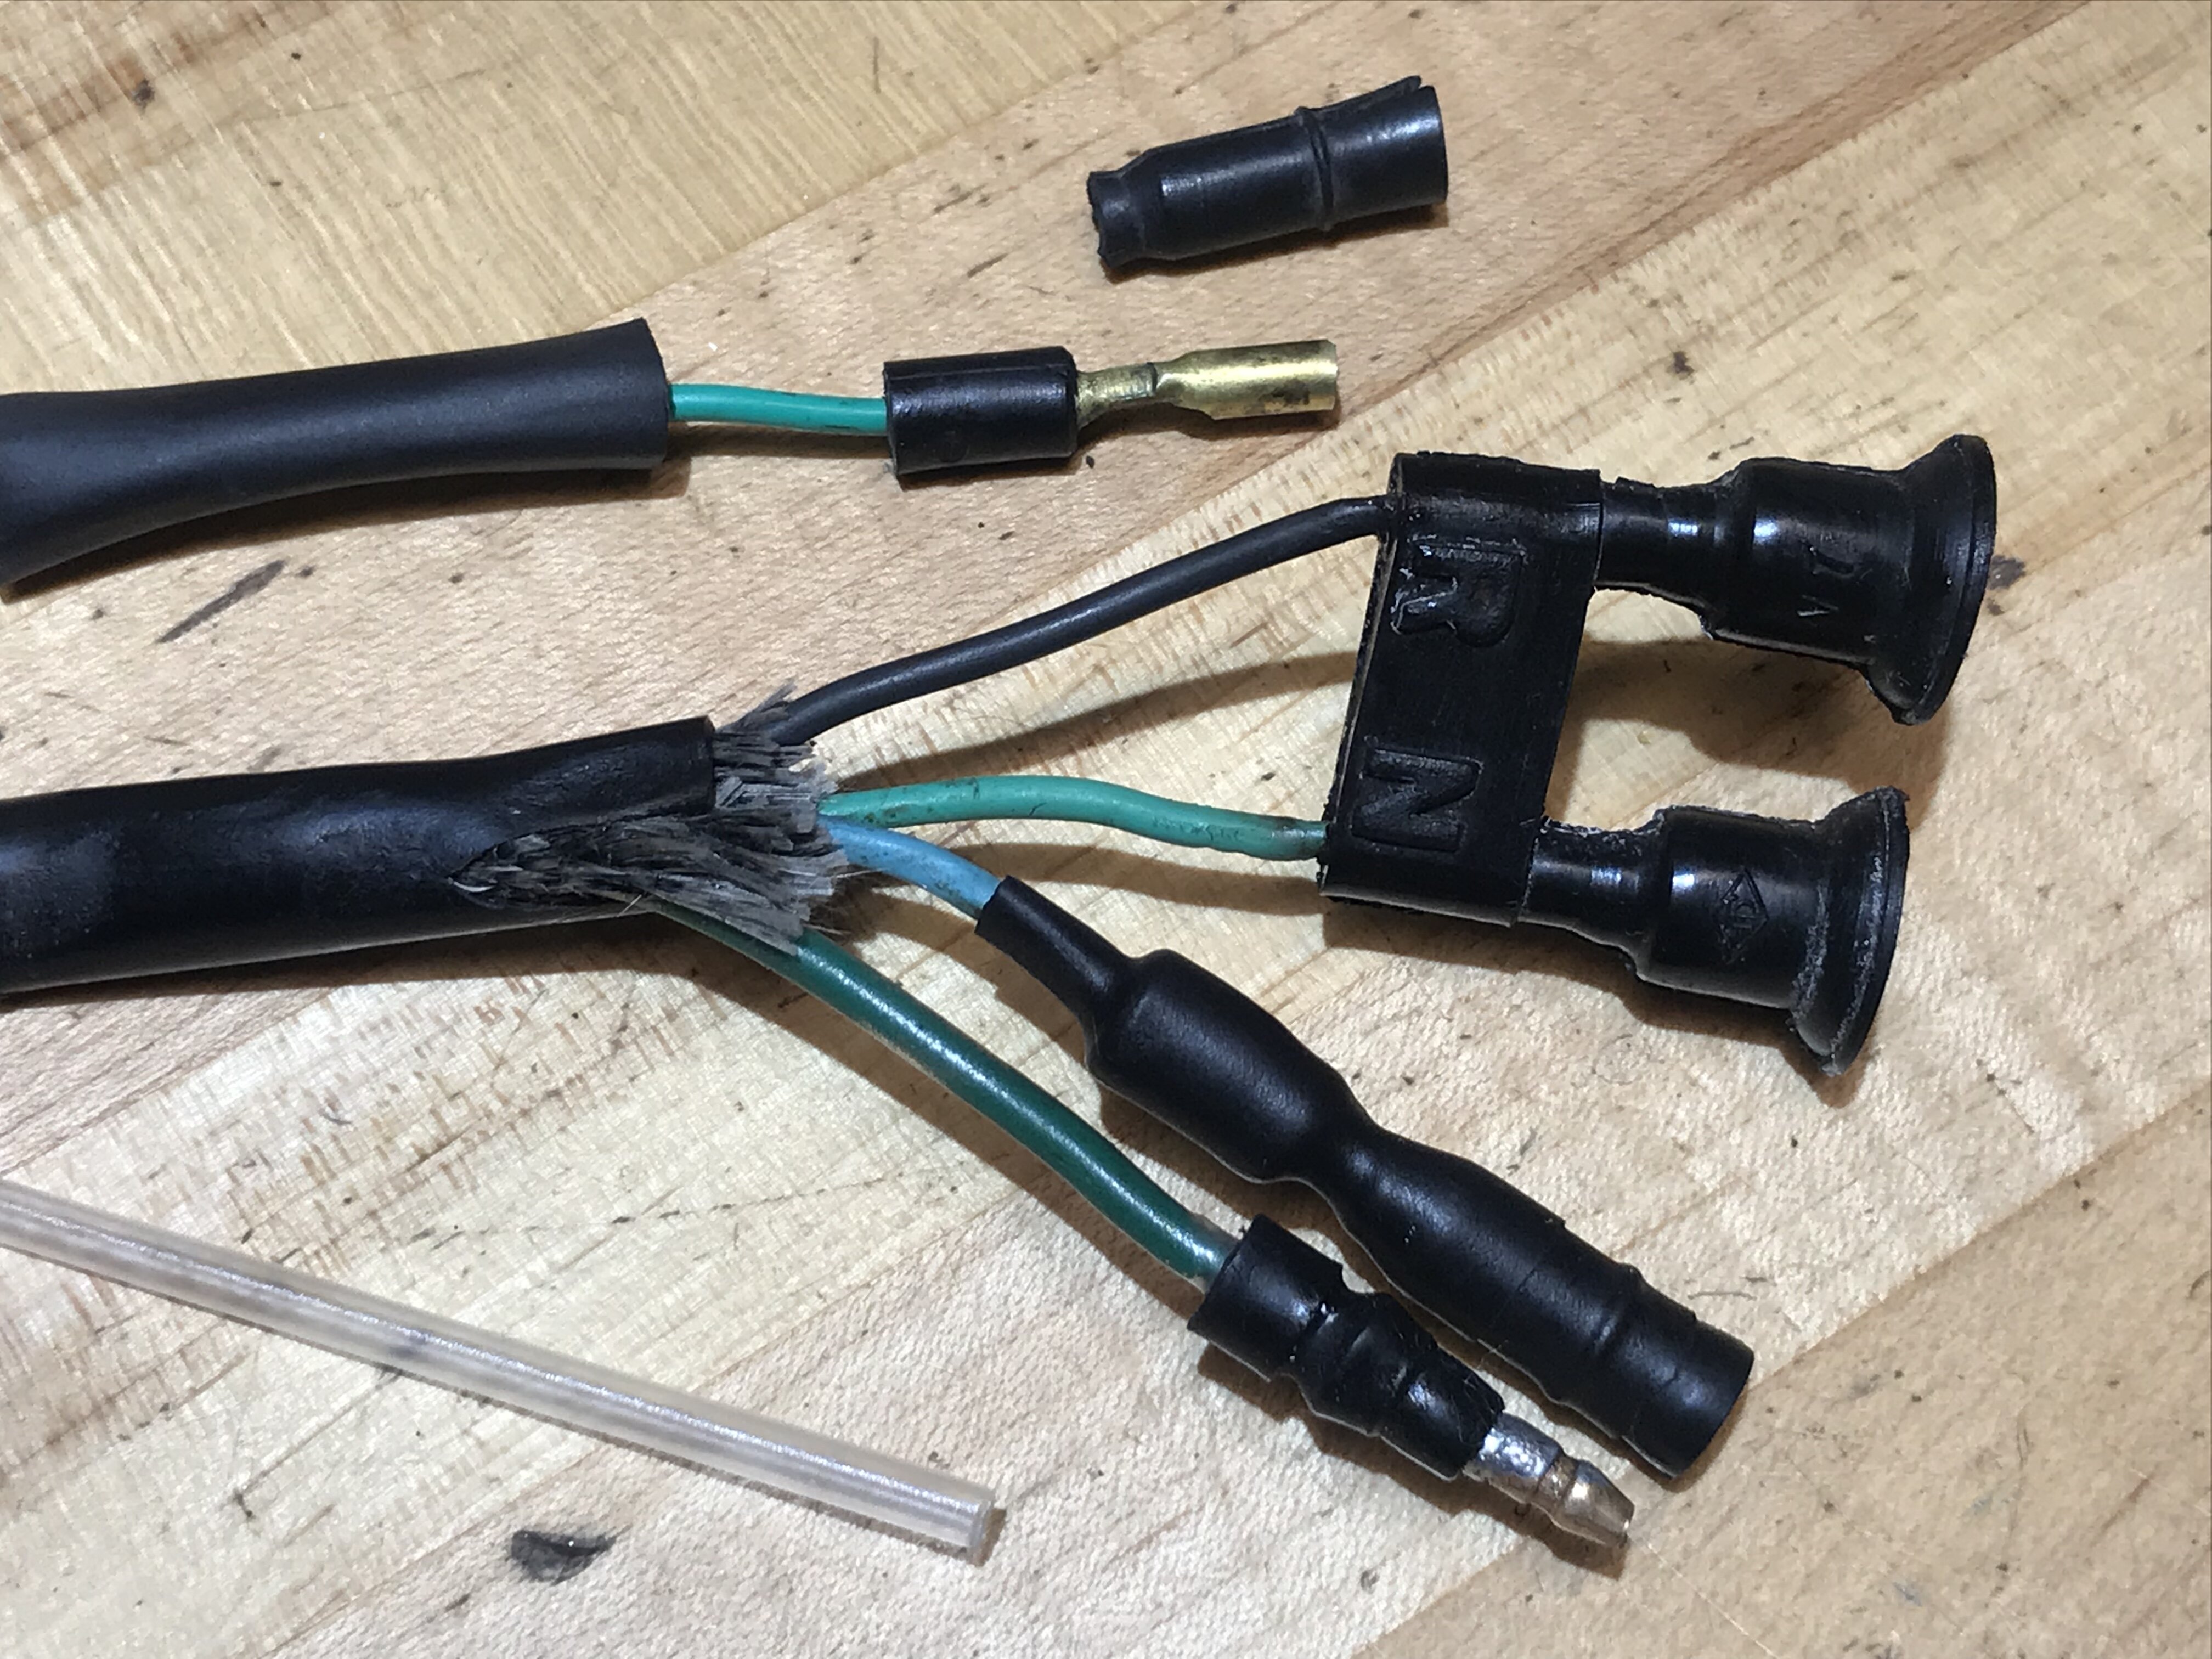
Here’s another I found while troubleshooting my no spark problem. RUN switch on a D model has to have continuity from Bl/G to Bl/W which connects fuel cut and CDI

-
1
-
-
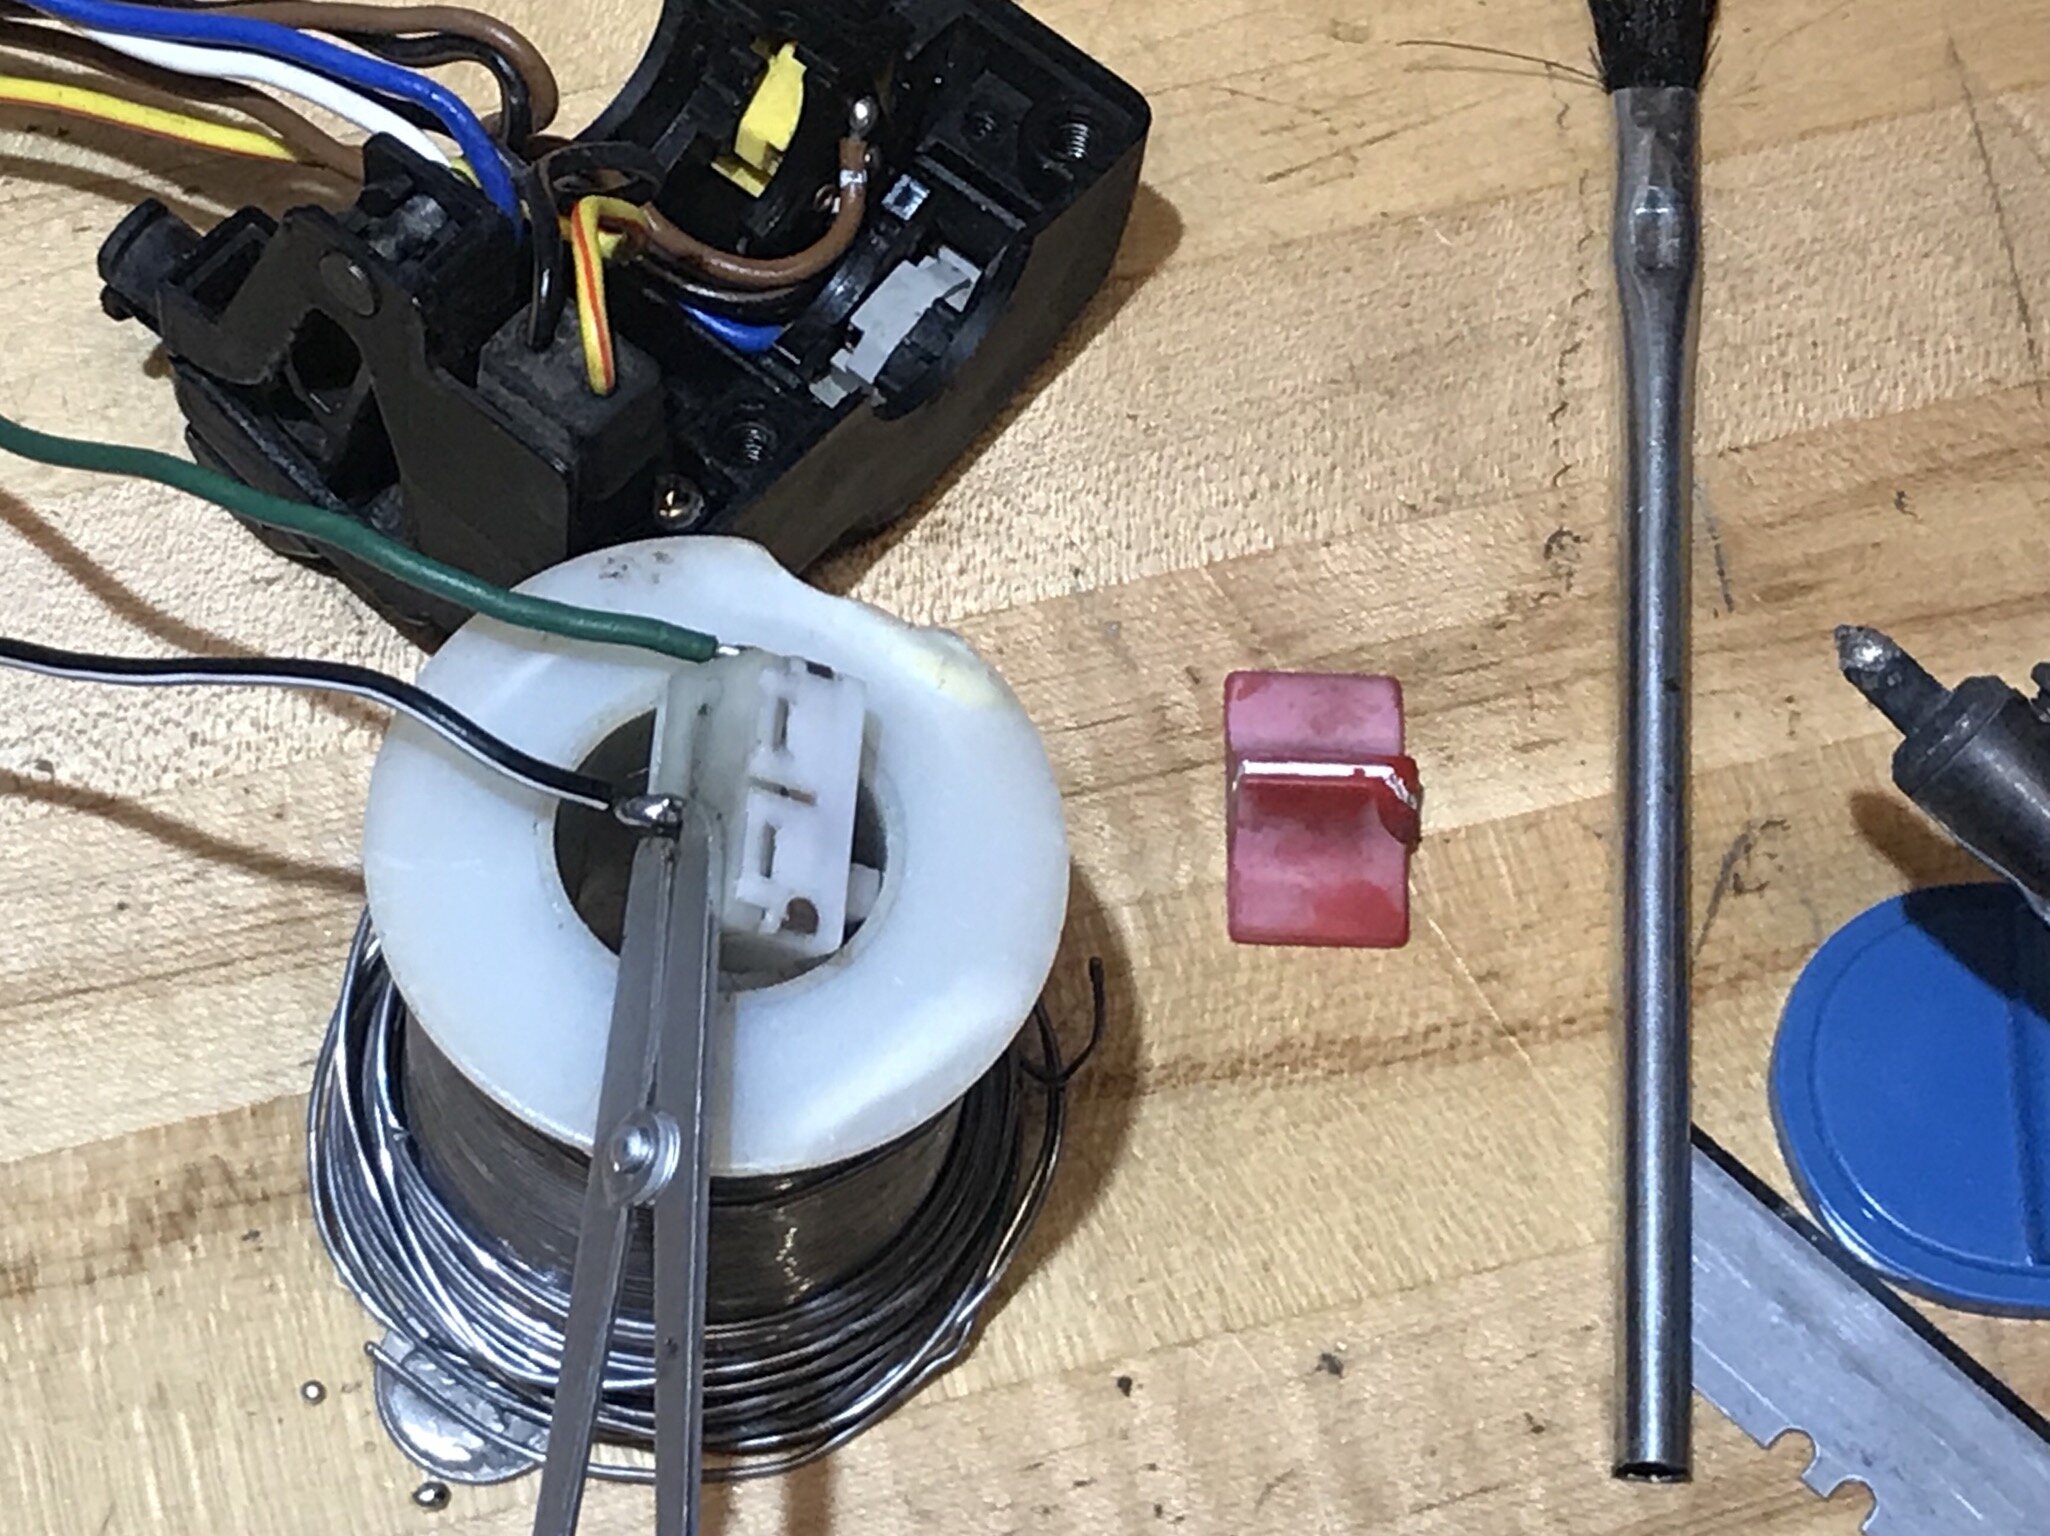
When i was troubleshooting no spark on my ‘86, I found electrical problems.
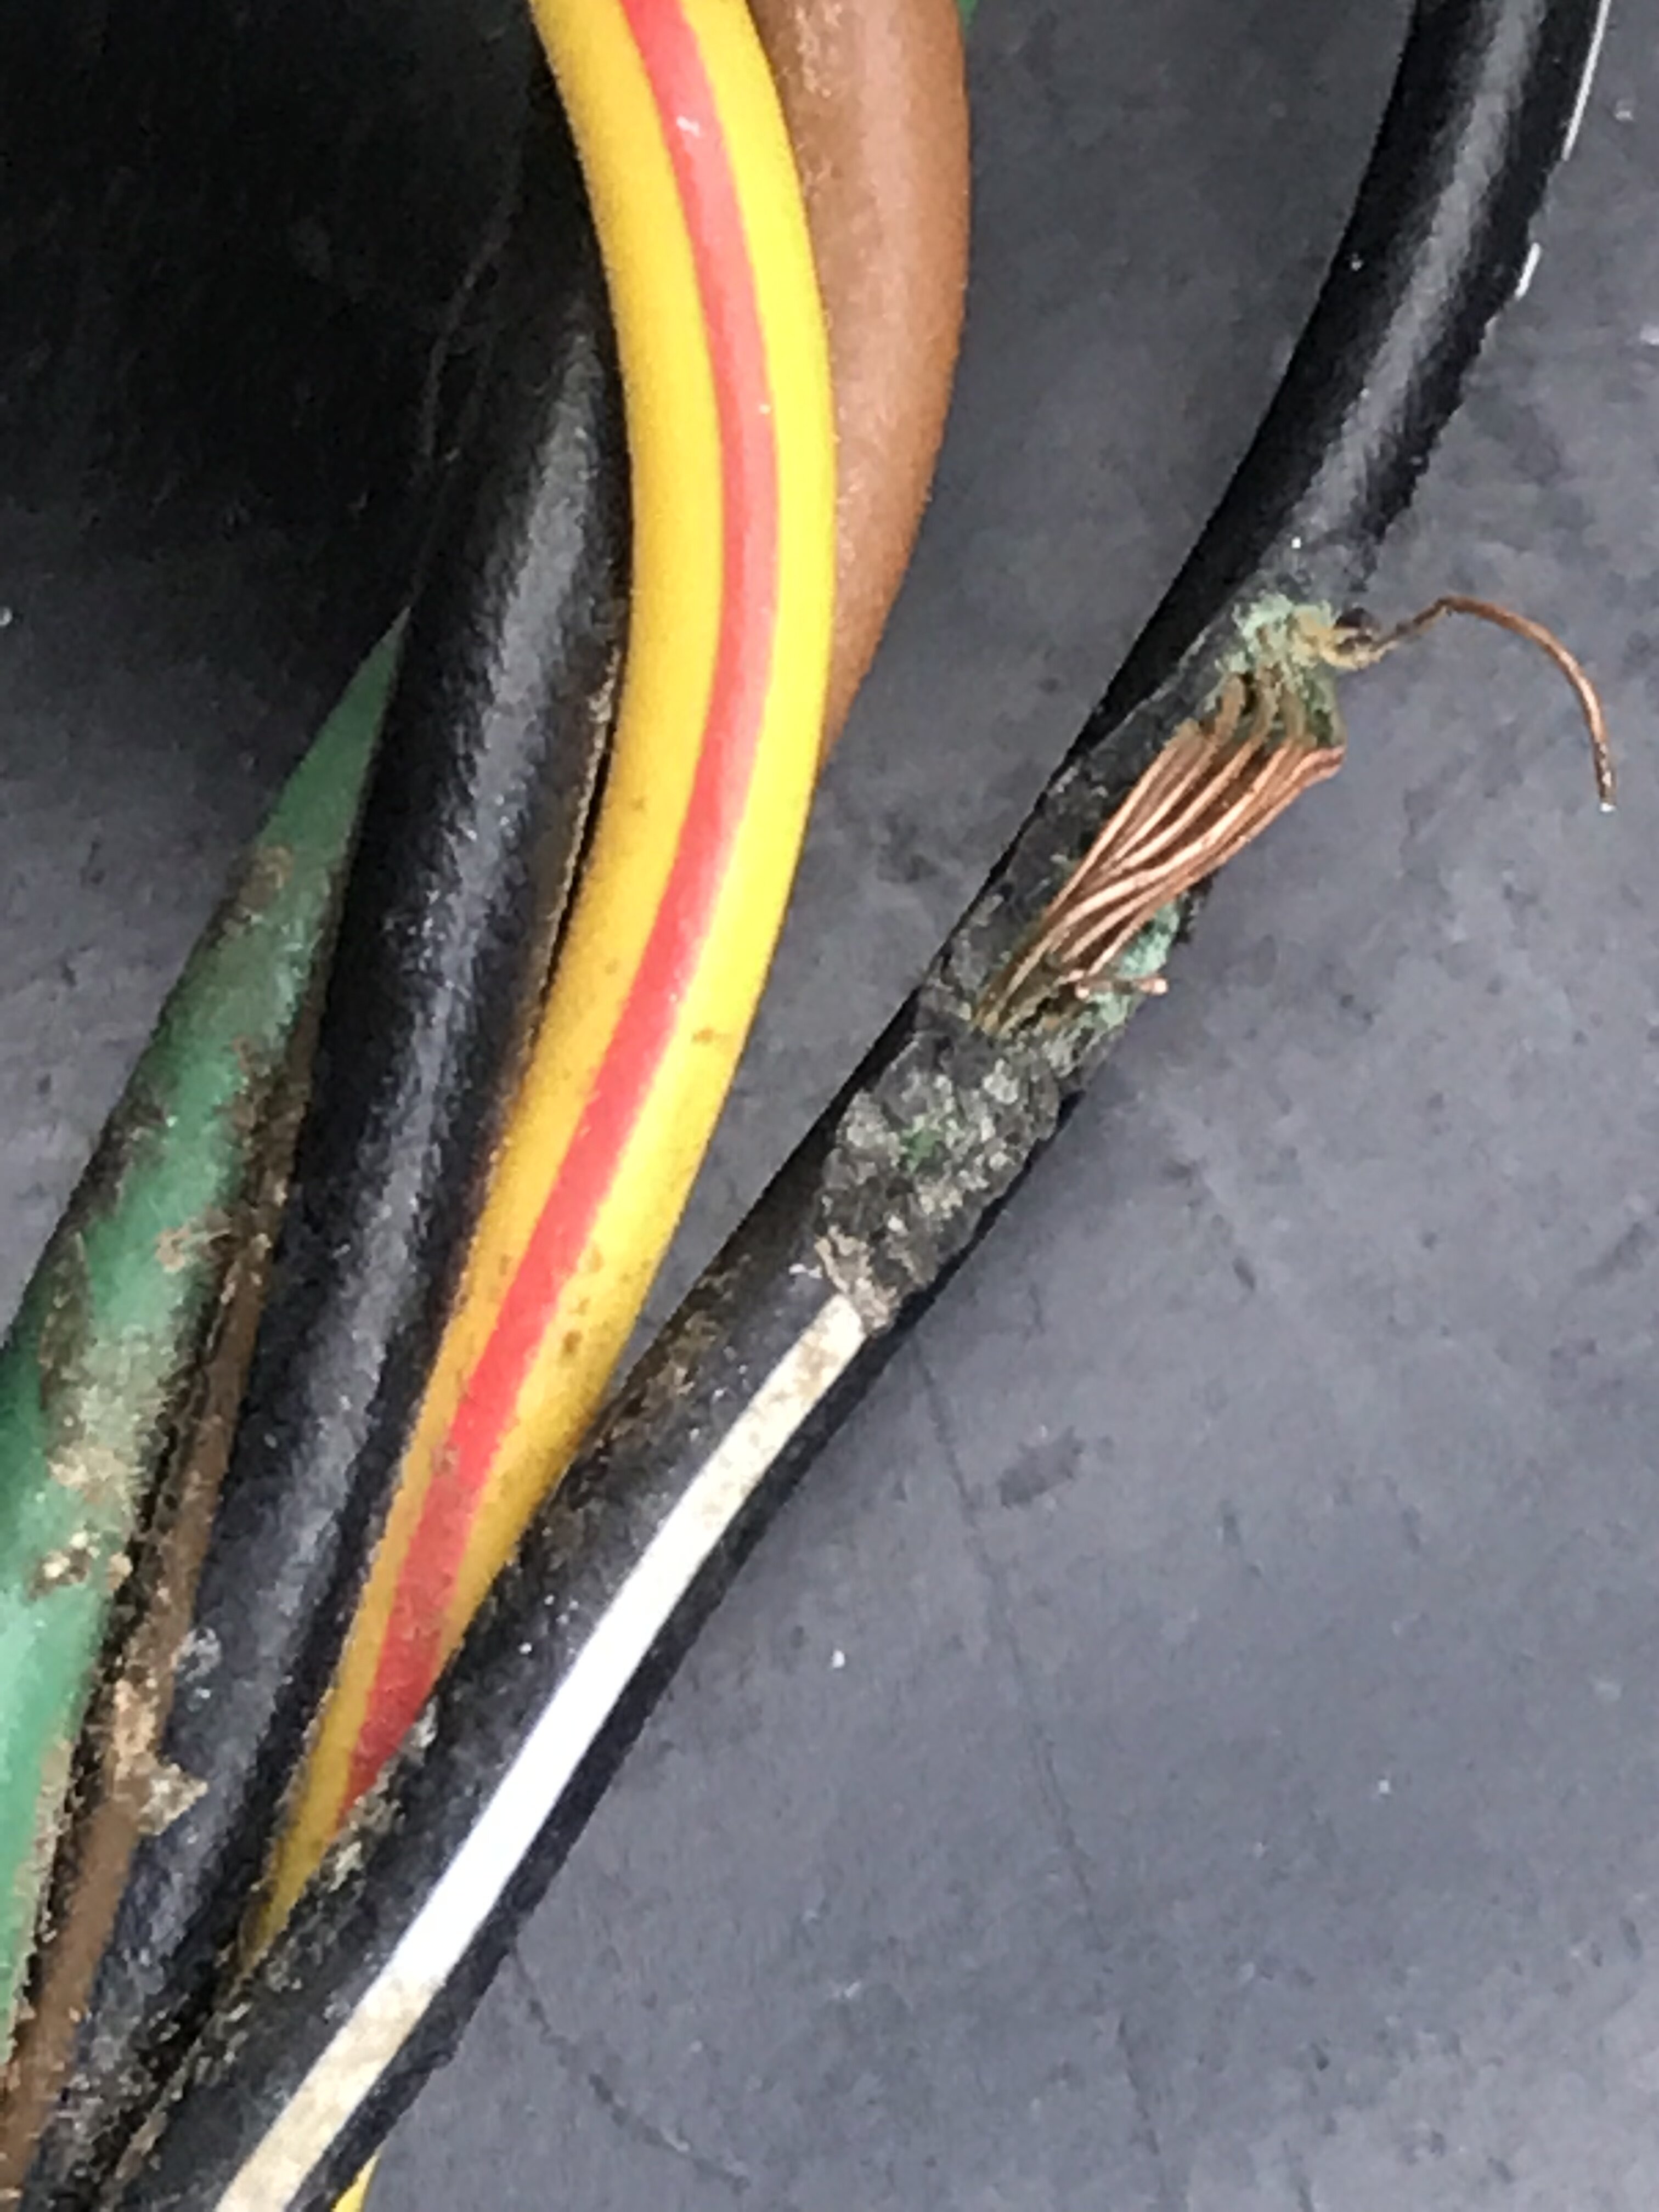
first my coil wire where it get spiked by the spark plug cap was very corroded. I cut off a half inch—til i got to uncorroded wire. And cleaned the spike with a .22 bore brush.
most importantly i found the wire connecting to the neutral switch to be intermittent. See right next to the N R harness support? That N wire insulation was a bit disfigured—the wire was hanging on by a thread. I rebuilt the harness connectors and solved my problem.
-
1
-
-
I heard them called Float towers. Can probably find another carb and keep broken one for parts.
-
2
-
-
-
check fuel filter is not clogged
check petcock is not clogged
There are two suction lines in the fuel tank and they may also have strainer baskets on the ends. This keeps the pump from sucking up coarse solids. However small particles like rust can build up in the lines. If you remove the petcock, you can use a 16 inch piece of weedwacker line to ensure the lines are clear.
in the past I’ve used a piece of throttle cable to drill thru obstructions in the suction line. Bee careful! Don’t poke too hard or you could pierce the strainer basket or get the cable ends stuck in the basket -
I would try putting my old CDI in to see if that restores fuel pump function but seeing as you got it to work:
when the fuel pump goes bad it can buzz like crazy or not at all.
-
Yeah couple of the members here can describe how to do cam chains real easy.
you can check cam chain slack by measuring how far in you can push in the cam chain tensioner once you pull it out and extend it. Then retract it and reinstall it.
-
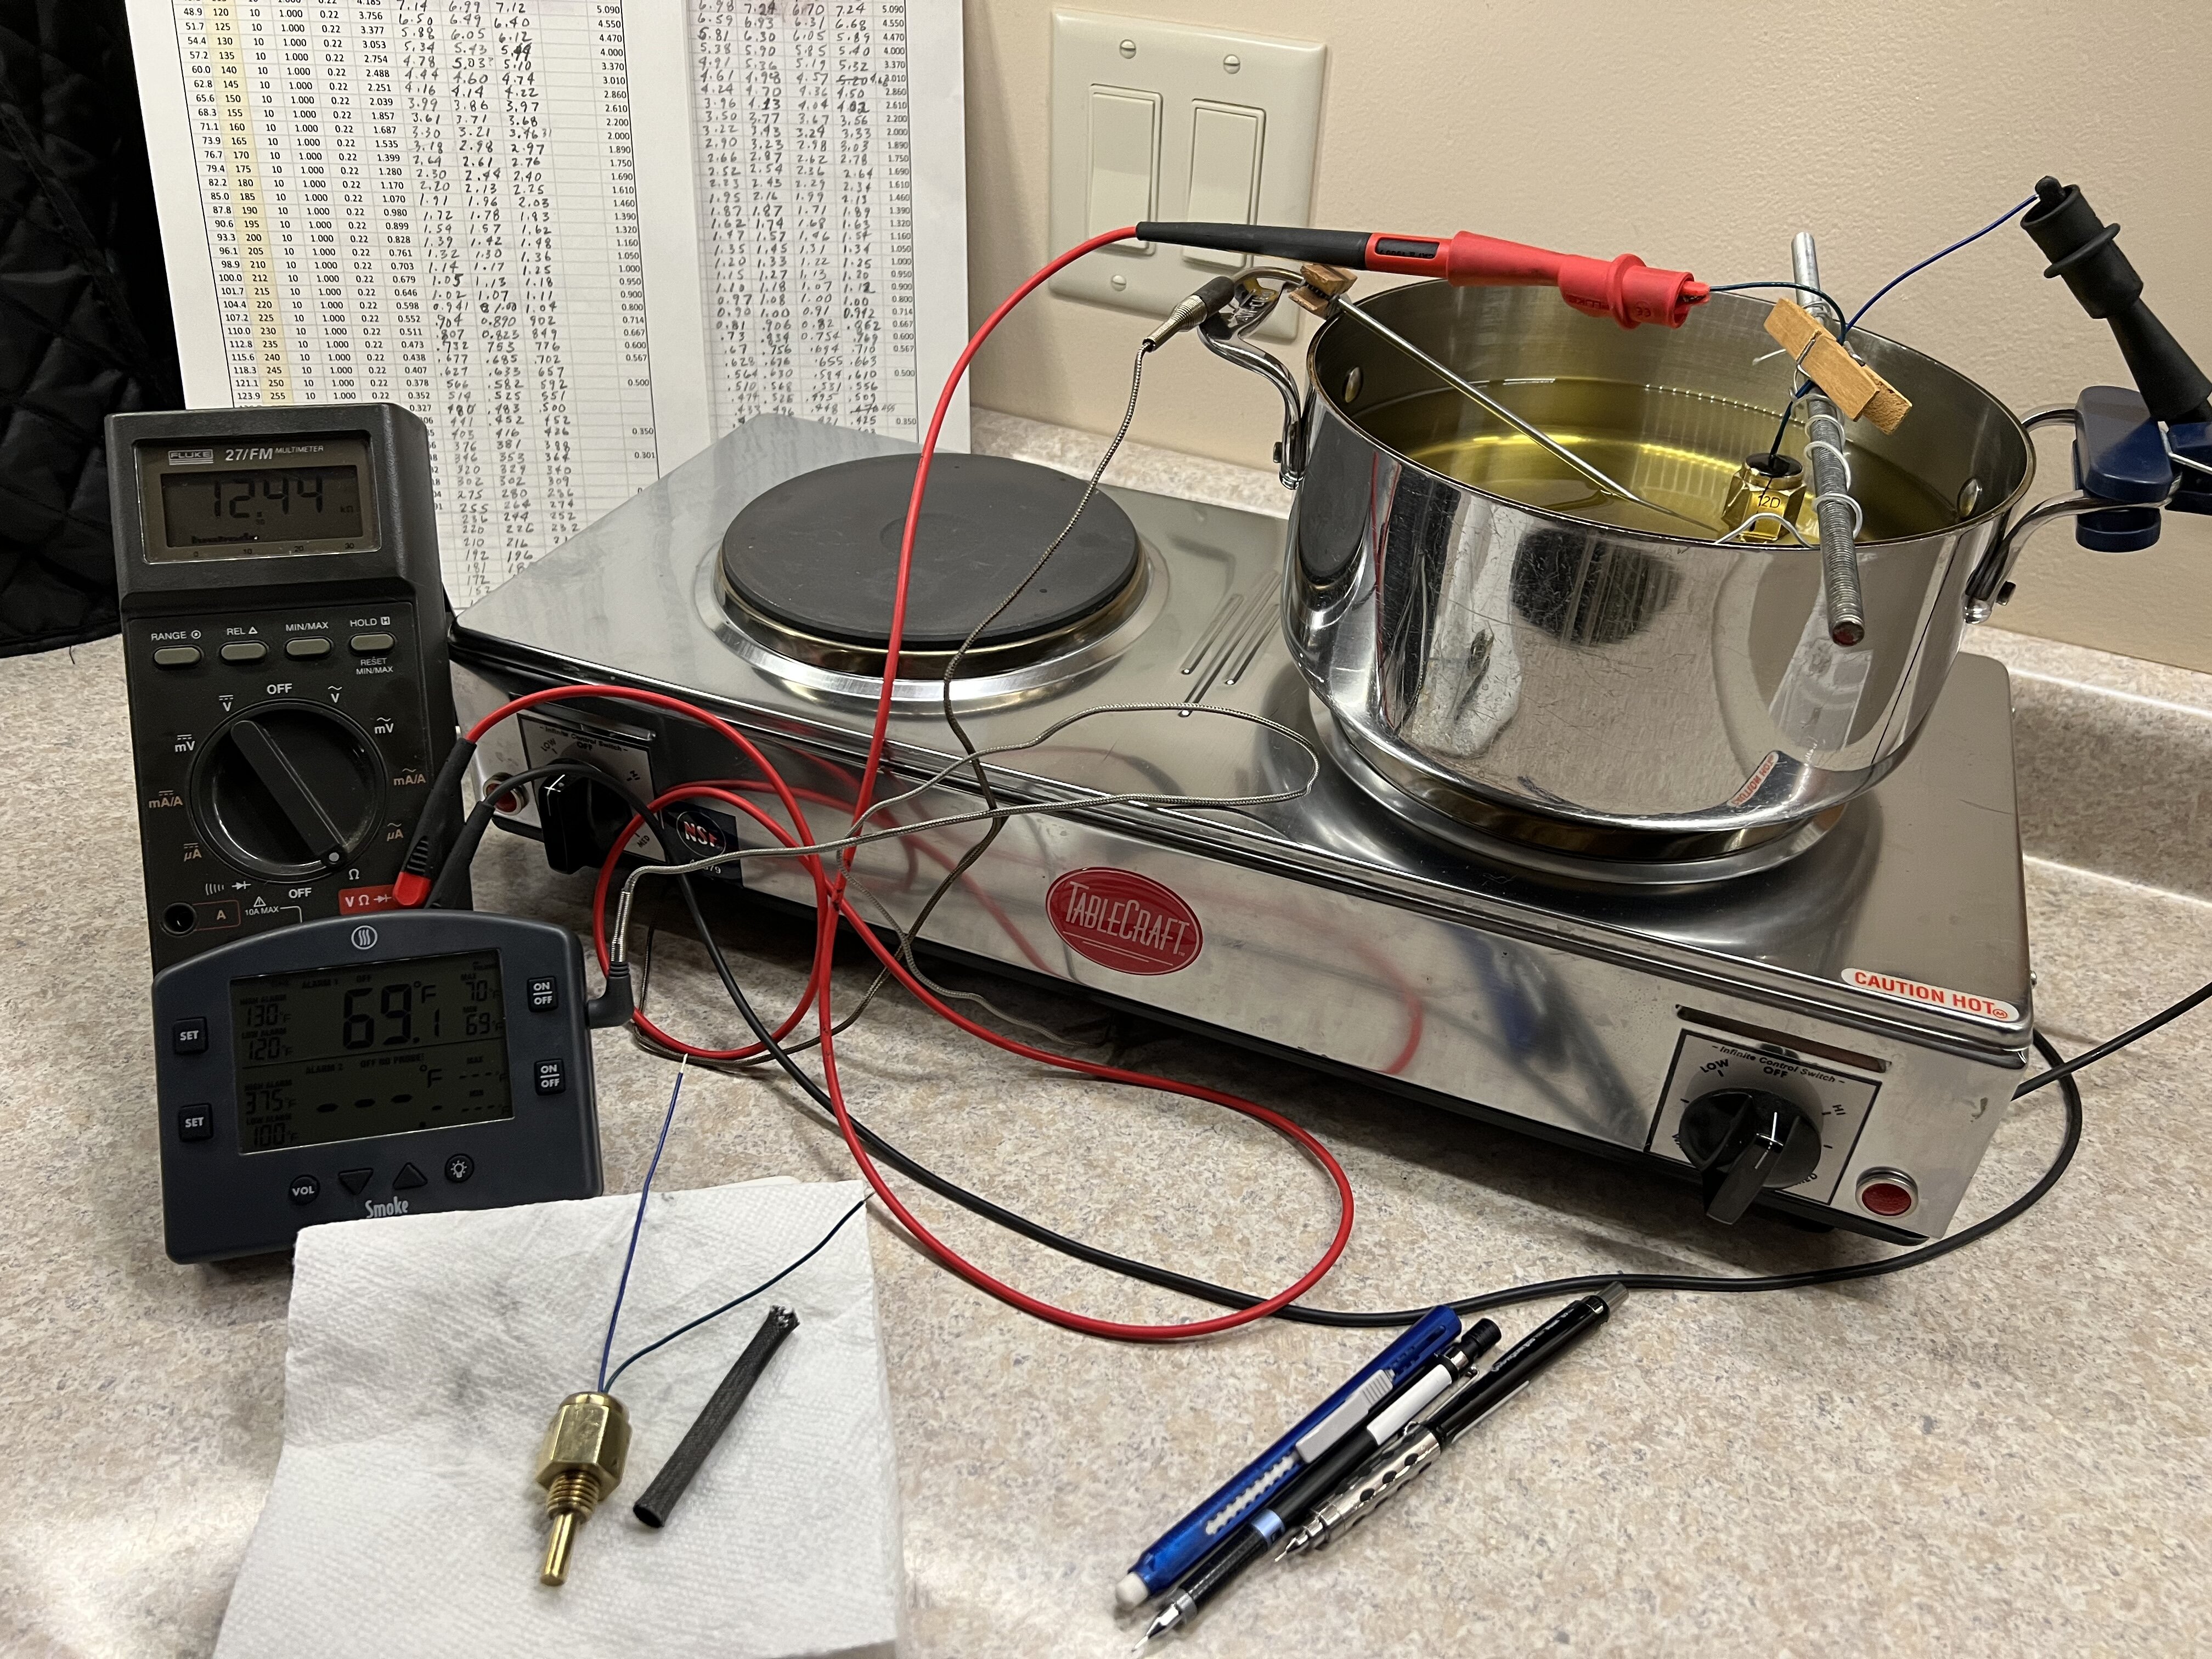
I learned from @retro how to rebuild these oil temp sensors. I was planning on building some of his homebuilt fan controllers but got sidetracked. I met a couple of TRX350 owners who needed a sensor so i traded and sold them. Even a used sensor these days is going for $80 to $100 and I don’t understand why!! Most used sensors the R value is too high for kicking on the fan at 212-220F—instead you find them coming on at 245F! That’s pretty hot.
-
I think that’s good rather have it low than high. The colder it gets the higher R value. It’s possible that it goes to zero too quickly but you won’t be able to measure unless you run it til it gets hot and then measure both.
-
There is a pin removal tool, but so many types I’m not sure which to recommend.
each pin has a barb—it locks against the plastic—the tool is used to slide between the barb and the plastic, unlocking the barb so you can slide the pin out by slightly tugging on the wire.
-
AKATV I know you found that 450F can result in a good fix; I’m sure you know more about these circuits and I appreciate you for it. We’re not going to bang heads because i think you’ll agree that high heat method fits into a diagnostic chain if you will.
i like to start out by recommending a contact cleaning, pin inspection and lube before trying anything else.
then I bake the modules at the lower temperature as a diagnostic tool. Before you mentioned it i had only ever heard about Shadetree heating these modules with a hair dryer. I didn’t know why it worked but i thot maybe moisture or mold or sealant warping. I had never heard of anyone heating them in an oven at any temperature; so I tried it on a TRX300 FCU which is BTW hard to find, and it worked. For about six months.
After hearing how you do it I’m now willing to try that high heat method on my FCU. But only because I’ve tried those first two steps.
-
5.8
23 minutes ago, Jared k said:So my oil is at almost exactly 100degrees and it reads5.49 olms I’ll wait until it cools to 77 and try again
that sounds pretty good to me sofar.
-
Yours uses the 37750-VM5-305?
-
Test the oil sensor with ohmmeter —at 77F you should get between 9.5-10.5 KOhm
you can also poke an instant read thermometer into your dipstick hole to read oil temp. Not when running!
you fan should come on at 0.95 to 1.05 KOhm
-
I would try baking one of the FCU in an oven to see if you can revive it.
i would try 200F for at least 3 hours. Let cool completely before you reinstall. See if that improves.as last resort, bake in 450F oven for 5 minutes. This may cause smoking or burning electrical smell
-
Good job. How does your oil temp sensor check out?
it sounds like a bad fan control unit except —your other does the same thing, right? Can you tap on it and get the same response?
-
There are a few other things you can check, like the fuel relay. pulse generator. These are both lectronic modules
How’s your fuel pump sound?
-
2
-
-
You replaced the FCU, CDI too? Where did you get these components? Are the OEM used or new?
-
Welcome. What specific model? TRX300A (2WD) or TRX300FW?
-
best thing to do is check the resistance on your oil temp sensor and buy a new OEM sensor.
The service manual has some information on the Oil Cooling System. You ought the run through the diagnostics so you understand a bit on it—I’m not familiar with the systems on the model.typically there’s a fan control unit working with an oil temp sensor. First step in diagnostics: When you switch on, the neutral light comes on steady and the oil light comes on momentarily and then goes out.
The oil temp sensor uses a thermistor designed to reduce FCU circuit resistance as the oil gets hotter. At 77F (ambient air temp) Starts out about 10.5KOhms; then about 100C/212F it should be down to 1KOhm—fan comes on but oil (overheat) light stays off. At about 345F the sensor resistance should be less than 300 Ohm. That’s down 97% from the starting point! oil is hot enough to fry chicken. Fan should already be running but the warning light comes on.
As it ages, the oil temp sensor degrades and the resistance is slow to degrade. So you might be running at engine temp of 245F, your engine could be running hot, but your fan’s not kicking in. you can try testing temp sensor response by measuring resistance in hot oil at 100C. Have to take it out to do that. So that’s why I suggest buying a new sensor—don’t throw away the old one
Or, you’re also light on the throttle, good fuel/air mix, machine in good shape and just not getting as hot as your friend’s quad.
-
Here’s a Shindy kit. When you rebuild the carb, inspect the passage plug. If it still sticks good in the passage maybe it’s ok

1987 Honda 350d spark-no spark
in Electronics
Posted
Yes that’s the fuel meter