Turbo Twister
-
Content Count
340 -
Joined
-
Last visited
-
Days Won
1
Everything posted by Turbo Twister
-
Unfortunately it never stays perfect for long when you start putting items on a finished surface! You could wax and polish it, lately I've seen a lot of people using Odies Oil over there, mainly on natural timber to pull out the grain texture, but I don't see why you couldn't use it there too?
-
Well I redid the coat on that table and came out with a similar result! Fortunately my friend who is receiving it actually likes the effect so I guess it'll stay as is! I have started my next project which will be a beer bottle cap table top, for this I had to make a steam box to steam bend some beech wood. It's made from Laminated red deal pine, with a hinged lid at the upper end, 3 holes at the lower end on the bottom side to allow water out, a hole in the side to allow excess steam out and a hole on top to put the hose from the wall paper steamer in. Excuse the wonky dowels in the steam box, it's deliberate, to allow moisture run off the sides of the items to be bent). I got 2 bends done yesterday and the first one glued, clamped and pinned into place today. (Things are a bit boring this week as the Covid 19 is putting a downer on a lot of things here). I also started to paint the trailer sides with some black oxide paint but was unable to photograph them as I had gloves on, I'll get some snaps next time I'm out there. I had intended to paint it red to match the quad but we have some black paint leftover from another project so I will save a few bob there.. I could be told I've no work after tomorrow if the virus gets any worse so I can I suppose complete the trailer and quad items that need addressing. Stay safe all!
-
After some thorough inspection of the rubber blocks, and a physical test of the suspension movement by dad, we have agreed that the old rubber suspension units are seized, perished and therefore rendered useless. The hub that I did remove, the seal at the back of it was worn and there was grease everywhere! I use a spray called TJep and its brilliant for cleaning off grime or grease.. I use it to clean my 2 Paslode gas nail guns aswell. So I will have to buy new rubber suspension units and redo the mounting plates on the trailer to suit them.
-
Which slot are you referring to Fish? (Pic 1) The reason I went for a new hitch is the one I put on the drawbar is actually very stiff and i find it difficult to unhitch when on the quad. I needed something easier to manage (and for dad too) so I just bought a brand new one. I've never seen the likes of it either, the front black bits are made of strong rubber. Dad picked up new bearings and hubs for the rubber suspension mounts a few months ago so I plan to tear them down soon, repaint the rubber suspension housings and then put it all back together.
-
Some goodies arrived in the post today for the trailer!
-
For the herringbone style effect, I used spalted beech. I scraped off the rotten bits and filled the voids with coloured epoxy. The edge strip is white ash. The legs are from another table I bought last year, beech with cats paw type legs. I removed the top as I disliked it so I'm in the middle of painting it gloss white before screw the above top to it. Unfortunately it looks like the top coat didn't set good last night so I'll have to recoat it😓
-
After finishing off that epoxy table I showed you guys a few weeks back, I gave it to a couple, really good friends of mine. They loved it! And their 4 kids were amazed when they realised it glows in the dark! The attached photos are of another table I started a while back but got held up finishing due to the cold weather. I painted the legs with undercoat earlier and gave the top a good sanding for a final flood coat of epoxy, which is also done. Hope to assemble it all and give it to my newly wed friends. Then I have a final table to do, a beer bottle cap table top with epoxy resin.
-
The chute is a success! No issues as of yet, we chipped for about an hour with no problems at all. It actually appeared to work as a better vacuum than the old chute. Will attempt a video post soon, need to upload it to youtube I assume?
-
Due to GDPR here in Europe, that kind of stuff is not allowed (although I'm sure it does happen). But it's a pain when it does happen! Here's a few snaps of the chute top painted, I'll try get a video of it running later.
-
Approximately $27200 Fish! It was called the "secret sound", they played a sound on the radio and you had to guess what it was. The answer was, taking a screwdriver bit out of a hand ratchet screwdriver and putting it back in again!😂😂 my ex girlfriend's mother had the answer but because they rang me back, I got the money split 3 ways! So we ended up with €7800 ($8840) each!
-
Correct, a drum about 6 inches diameter with opposite blades that are reversible for quick blade change. I also got a spare set with them untouched so far. I get about 10 hours chipping per sharpen, which in my book is good cus I won't chip unless I have a stock pile of branches. I think the drum rotates at about 15000rpm but I could be wrong, it sucks in small stuff in a shot so I wouldn't like to have a finger or hand go in! The belt is brilliant, if something gets stuck or jams it won't burn the clutch, the belt slips and I knock off the engine straight away. Its funny, most of the time it's a tiny piece of wood chip that stops the drum dead! The guy that sold it to me said it can take 4inch branches and I laughed at him, it will, at a rate of about an inch a minute. There are bigger machines for bigger timber! I got this one as it not only fits in the van, but I can bring it through someone's house if they have no side access to their back garden. Saves dragging loads of branches through the house..
-
This chipper is a little animal! I bought it when I was out with a back injury for nearly 6 months about 2.5 years ago. I won some money on a radio station (24k euro approximately) and treated myself to a little investment! It was around €1500 new. This one has a 5.5hp 200cc Loncin engine, belt driven with 2x reversible blades that mash up anything to about 1.75 inch diameter (45mm). I only have about 46 hours on the clock since I got it but it has chipped some amount of stuff for me. I have had to weld the bottom end of both chutes as they have both cracked with the thin crappy steel they're made of. It also had a terrible kill switch bar, anytime you leaned towards the infeed chute your leg would kill the power. So I removed the bar and fit an emergency stop button instead! Much better and still safe to use, it's also easier to access than the on/off switch. The only big downside is the weight of it, about 86 kg total. I made a front swivel axle for it with the help of a welder friend, so when I push it, it's on 4 wheels and easier to move around, when it's chipping it sits on 2 wheels so as not to vibrate away!
-
Slightly off topic but this may be of interest to some of you. I Have a small petrol wood chipper and have never liked the out feed chute on it. The original ond was round and curved but the top of the cute was narrower than the bottom of it, so I finally got around to cutting off the round top and made a whole new square shaped one, hopefully this one won't block up as often or at all!
-
I've been busy at work these days, not getting much of a chance to finish my trailer (weather still a bit too cold to paint the frame). I ordered 2 new rims with tyres for the trailer, it was cheaper than just getting new tyres for the old rims! I also bought a new hitch as the one off the old trailer is extremely stiff and hard to open when on the tow ball. Spent the evening ply lining the back of a friends new van, with a small shelf for hand tools, what a pain in the !!!
-
Shade, what's the box on the far right of your workbench? Is it a sand blasting box? Nice shed btw!
-
I am aware both wheels spin together always. I think the issue is a bent mud flap on the right side allowing more muck to fly! I may give the bike a wash soon, it's manky😜
-
Here's how my day out went. We borrowed a friends trailer to bring the chainsaw gear to the trees we had to chop up, just about 500m from the van to the tree. The route consists of gravel road for maybe 100m, then a muddy stony lane down into a valley, followed by a grassy lane way up the other side of the valley to the tree on the side of the hill. The trip down was fine. We both cut for about 3 hours and were running low on fuel so I filled up the trailer with wood, almost to the top and proceeded to drive back to the van to get more fuel. First problem, nowhere near enough weight on the front of the bike. As I climbed back up the stoney road, all wheels spun but the bike was like a sitting duck, the front was starting to lift so I threw off about 20 rings to reduce trailer weight and eventually got up to the van. Lesson learnt! Only half fill the trailer! On the way back down, I put 4 of the rings I threw off into my new wooden box to act as weights. I only half filled the next few loads but managed to sail up the stoney road with no issues..16 return trips and 3 hours later my own trailer was full with wood! Overall the bike ran well, with the fan coming on the odd time, although I suspect it came on more often due to the tiny oil leak burning off the exhaust manifold. The Daxara trailer is a bit heavy for my bike, when I get my own trailer finished it will be about 40-50kg lighter, 2 ft shorter overall and a bit narrower, but it will also be lower to the ground. On a side note, does anyone else notice that the rear right tyre throws up more muck than any other wheel on the bike? This side always seems to get dirty quicker! I need to get longer mudflaps to stop destroying anything in the trailer behind with mud! Bonus** The photo of the strap and wedge is a trick I learnt years ago, how to turn a log over with basic tools and something with a bit of leverage behind it, in this case the quad!
-
When carpentry clashes with mechanics!
-
I finished the front box and bolted it securely to the front rack (with a folded rubber mat in between to reduce scratching). It got a coat of varnish to throw any rain drops off, I'll give it a second coat next week as I need the bike to haul firewood this weekend (yippee!!) The steel Jerry can fits perfectly and tightly into the box, aswell as my combi can for the chainsaws. I'll mess around with the few other bits to see how best to secure them in the box but I'm a happy bunny to finally have a box that suits my needs and sits within the width of the bike ( I made the box a specific height due to the shelf in my van).
-
Wilson, Dad sourced a new digital hour meter that he just installed yesterday. There was just over 3280 hours on the old clock, this one starts from 0.1 hours. The old hour clock never worked when I got the bike so its reassuring to know I can keep an eye on the hours for service intervals now. The speedo works fine. I took off the rear left wheel last night as I felt the hub has a bit too loose for my likening. Upon inspection, I noticed the 4x threaded studs had loosened, which bolts the rear final drive to the driveshaft!😵 bit of an "oh ! moment when I saw it! We never put thread lock on the driveshaft side of the threaded studs, probably assuming they were already done. I took them out one by one and put plenty of thread lock on each.. wouldn't be nice to loose the rear axle someday in the middle of the woods!
-
I sparked an idea a few weeks ago to make up timber boxes that suit the quad racks, rather than trying to make do with plastic boxes that don't fit great. I have a few offcuts of laminated board red deal and birch plywood so I started ripping down the material last night. It will be directly bolted to the racks through the plywood. They're being custom made to fit my chainsaw gear, maintenance gear and fuel for the bike and saws. Should have the front one finished this evening. If you can't find it, make it!
-
It has been very cold the past few days so the bike has relatively been untouched and covered in power tools! Dad is staying inside, away from the cold as he doesn't want to get the flu (Corona virus is currently sweeping through Europe) so that's understandable. I took off the fuel tank yesterday to replace 3 rubbers that keep it in place, the front two rubbers are round and stop upward movement I would assume, these were loose and kept falling off anytime I removed the tank for maintenance. I also replaced the big rubber that the bolt under the seat fixes to the frame. The final job for the night was replacing the gasket on the starter motor side cover, the old one was cracked in 2 spots so no harm to change this. The front inner fenders were not refixed in place after the rebuild in the workshop last week so I will have to rebolt all these. The mechanic highly recommended changing out any gutter bolts for standard 6 sided bolt heads and he says gutter bolts are a nightmare to loosen when they are old (and he is right!). I will have to set the front tracking when the weather picks up as the bike was very inclined to pull to the right last Sunday. How does everyone track their wheels? I was shown 3 ways to do it, just want to know if there's other ways..
-
I agree, I hate leaving jobs to other people when I can fix them myself but unfortunately in this case, we didn't have the know how. Now that I have the bike back, it's not going go another dealer unless urgently needed! Glad you enjoyed our rebuild, (half of which is on the old website). It was an interesting project but more importantly one I can use in my work line aswell.
-
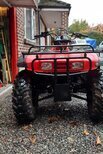
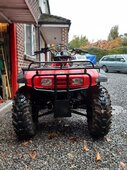
The bike is finally back in my hands! The fan is working fine, coming on quite a bit yesterday but I had 2 passengers and we were in 1st gear most of the time so that's understandable.. it does its job at least! I brought two friends up through another friends forest to show them the nice view at the top but unfortunately the clouds came over and it started raining. We had great fun coming back down again, but the added passenger weight gave great traction. A few snaps from our trip..
-
So, I finally got an update on my bike 6 weeks after I left it in.. Ed sourced a new loom and fit it in place, yet the fan still wouldn't work. So then an electrically minded friend of his gave him 2 ultimatums to fix the issue (I wasn't told in detail about either), but the solution seems to be that a relay has been added to the new loom specifically for the fan, so when the thermostat gets to a certain temperature, the fan will automatically kick in. It was no harm to replace the loom as some of the connectors were damaged and there were odd ends from someone messing with it in the past. So, I'm aiming to collect the bike saturday coming, although I'll probably have to refit the front end plastics and bumper myself as they don't seem to have time to do it themselves🤔 I thought that a bike shop would treat all customers fairly but it seems that my old Betsy was shoved in a corner while the newer bikes got all the attention. In this case, I would give a 3 star rating, losing 1 for this. They have also said they don't have time to rip the head off the engine to fix my oil leak, so they lose a star for that too! Pic of how it was yesterday.. I cant wait to get it back, so many jobs to do with it.