
Orvis25
-
Content Count
133 -
Joined
-
Last visited
-
Days Won
1
Posts posted by Orvis25
-
-
4 hours ago, JR_TRX said:Me again… so I got everything back together after installing the new timing chain. The Kickstarter never came out and it stayed in place(wound up), lined up shifter on the secondary clutch(dot, arrow, the triangle bearing piece) put the reverse lever back on to what I though was correct.
The Bike won’t go into any gear and the Kickstarter doesnt have the resistance it did and won’t start the bike. She starts and purrs great just won’t move. Feel like I’m gonna have to go back in the crankcase.
Pretty sure I did something incorrectly.
Anyone have experience with this?
Well the kick start no resistance sounds like the spring is not under tension. When you pull the crank case back off, put the peg back on the shaft and crank it and look if its under tension.
In terms of the shifting thing, I am going to defer to @shadetree. -
1 minute ago, DLBeltran74 said:Well, right now the engine is off the bike and just sitting covered up. When I bought the quad, it didn’t have the top end on it. I just ordered the top end and I will be putting it on in the near future. So I just wanted to make sure any debris that might have gotten in there is flushed out the best I can before I start putting it back together. From just looking in it with the cylinder off, it looks great.
Ah my bad, I misunderstood. I thought you put the top end on, but it sounds like you got it in 2 pieces (top and bottom ends)
If so, ya "flushing" it with diesel could be feasible, but keep in mind it will in all likelihood also remove a lot of the oil residue in the bearings and stuff, so when its reassembled and filled, there will be a small amount of time that virtually everything will be "un lubricated" per say.
I would say, if your really want to "flush it" (the crank case) for any larger debris hanging at the bottom, go with vegetable oil, since at least it will protect the parts and not leave them stripped of oils.
Most likely cheaper too, diesel in my area is like $4.40+ a gal.
Just buy a few gallons, poor it in (maybe shake her up if you really want to I guess), and let her drain out the bolt hole like a regular change.
Nice thing about vegetable oil is its bio degradable, so even if you use 10 gallons to flush it, you don't "need" to recycle it like motor oil or used diesel (non-bio degradable).
Poor it (the vegetable oil) over some weeks, poor some salt on the now sticky leaves, and boom, discount weed killer while your at is >.<
If you don't see any big stuff, just pop the top end stuff on, fill her up with your oil, and run it. Just make sure to tune/align stuff first.
Best of luck man.-
 1
1
-
-
3 minutes ago, JRB said:Thanks Orvis, Yes crankcase to cylinder. T
he manual for dummies said to. reason i ask is because on disassembly, it looks like some kind of sealant around the stud bolts?
I have never read a repair manual for a 450, but I know that under normal circumstances, Hondabond+gasket is not recommended since you don't want it seeping into your cylinder where the piston rides.
The flat gasket should be all that is needed to seal it.
Maybe the PO put it on if/when they worked on it, but on my 300, there is no liquid gasket material that assists with sealing the cylinder head/base, or my crank cases, other than the OEM flat gasket.
Maybe let someone who broke down a 450 before give you some more clarification ( @bcsman ), but I would advise most likely not. -
On 8/27/2021 at 4:27 PM, DLBeltran74 said:Ok, question. I have a 2003 Honda Foreman TRX 450 FM. I currently have the engine out of the bike and the top end off. Everything looks good but I was wondering what can I use to flush it out before I put the new top end on and put it back on the bike. I want to do it now but don’t know what to use. I was told that I could use diesel but I have my doubts. Does anyone else have any good suggestions?
Honestly, if its running find, i would not "flush" the crank case.
I have seen people swear by diesel and a bunch of other stuff, but Project Farms (YT) tested a few, and every one led to cylinder wall/piston damage due to lack of lubrication when running the engine.
The only on I have heard that can be done with no/minimal damage to your engine is vegetable oil flushing since it performs pretty similarly to 10w-30 for a while, and is super cheap and bio-degradable.
Honestly. Unless it was sunk, I would just replace the filter, and treat it as normal.Maybe even ! a magnetic drain plug.
-
5 hours ago, JRB said:Hay All, hondabond on cylinder base gasket ? yes or no.
No, Hondabond was not made for that type of environment/purpose.
Go with a raw (un-honda bonded) OEM or aftermarket gasket.
Only use hondabond to replace places that where priorly Honda-bonded by the factory (like the rocker boxes) or when clamping differential shells. -
https://4stroke.wixsite.com/mysite/3-honda
This guy also makes them. He also does BBK for the 300.
Never bought from him, but I considered it when i was going to do the mod and possible top end rebuild. -
good luck on the 400 btw!
-
49 minutes ago, jeepwm69 said:Great write up Orvis. Thanks for putting that here!
Glad to help where I can.
-
 1
1
-
-
Welcome!
-
Welcome!
-
Welcome!
-
Welcome!
-
-
@JR_TRX
You might find this helpful if you have not taken a trx300 right side crankcase apart before.
Wrote it up specifically to assist others for timing chain replacements 🙂
I had to do mine recently myself also, except mine was worn down to about only 3/16 of an inch of gap (SUPER WORN)
Hope it helps you with yours!
-
2
-
-
Howdy everyone,
Bringing you all another tutorial, this time on how to disassemble a 1994 Trx300fw right side crank case all the way down for a timing chain replacement.
Special thanks to @shadetree for guiding me though this process when I did mine, now I will be paying it forward in the form of a guide for all to use.Note: This guide is mainly for those who need to do a timing chain replacement, and need to take the right side crank case apart for that purpose. It can be used for general disassembly help, but keep that in mind as that is how I will be structuring the steps for disassembly.
Ok with that said, lets get started!
Note:
I do not remember everything exactly, so there may be some missing info in the explanations.
Take this guide as a addition/alternative to the manuals break down of disassembly in some ways. Some details like bolt sizes may be updated over time.If you find an error, please PM me and i will change it (do not clog up the thread with the corrections)
_____________________________________________
Tools:
metric wrenches and sockets (8, 10, 12 and 27mm)
Impact
Gasket scraper
Flathead screwdriver
Clutch puller_____________________________________________
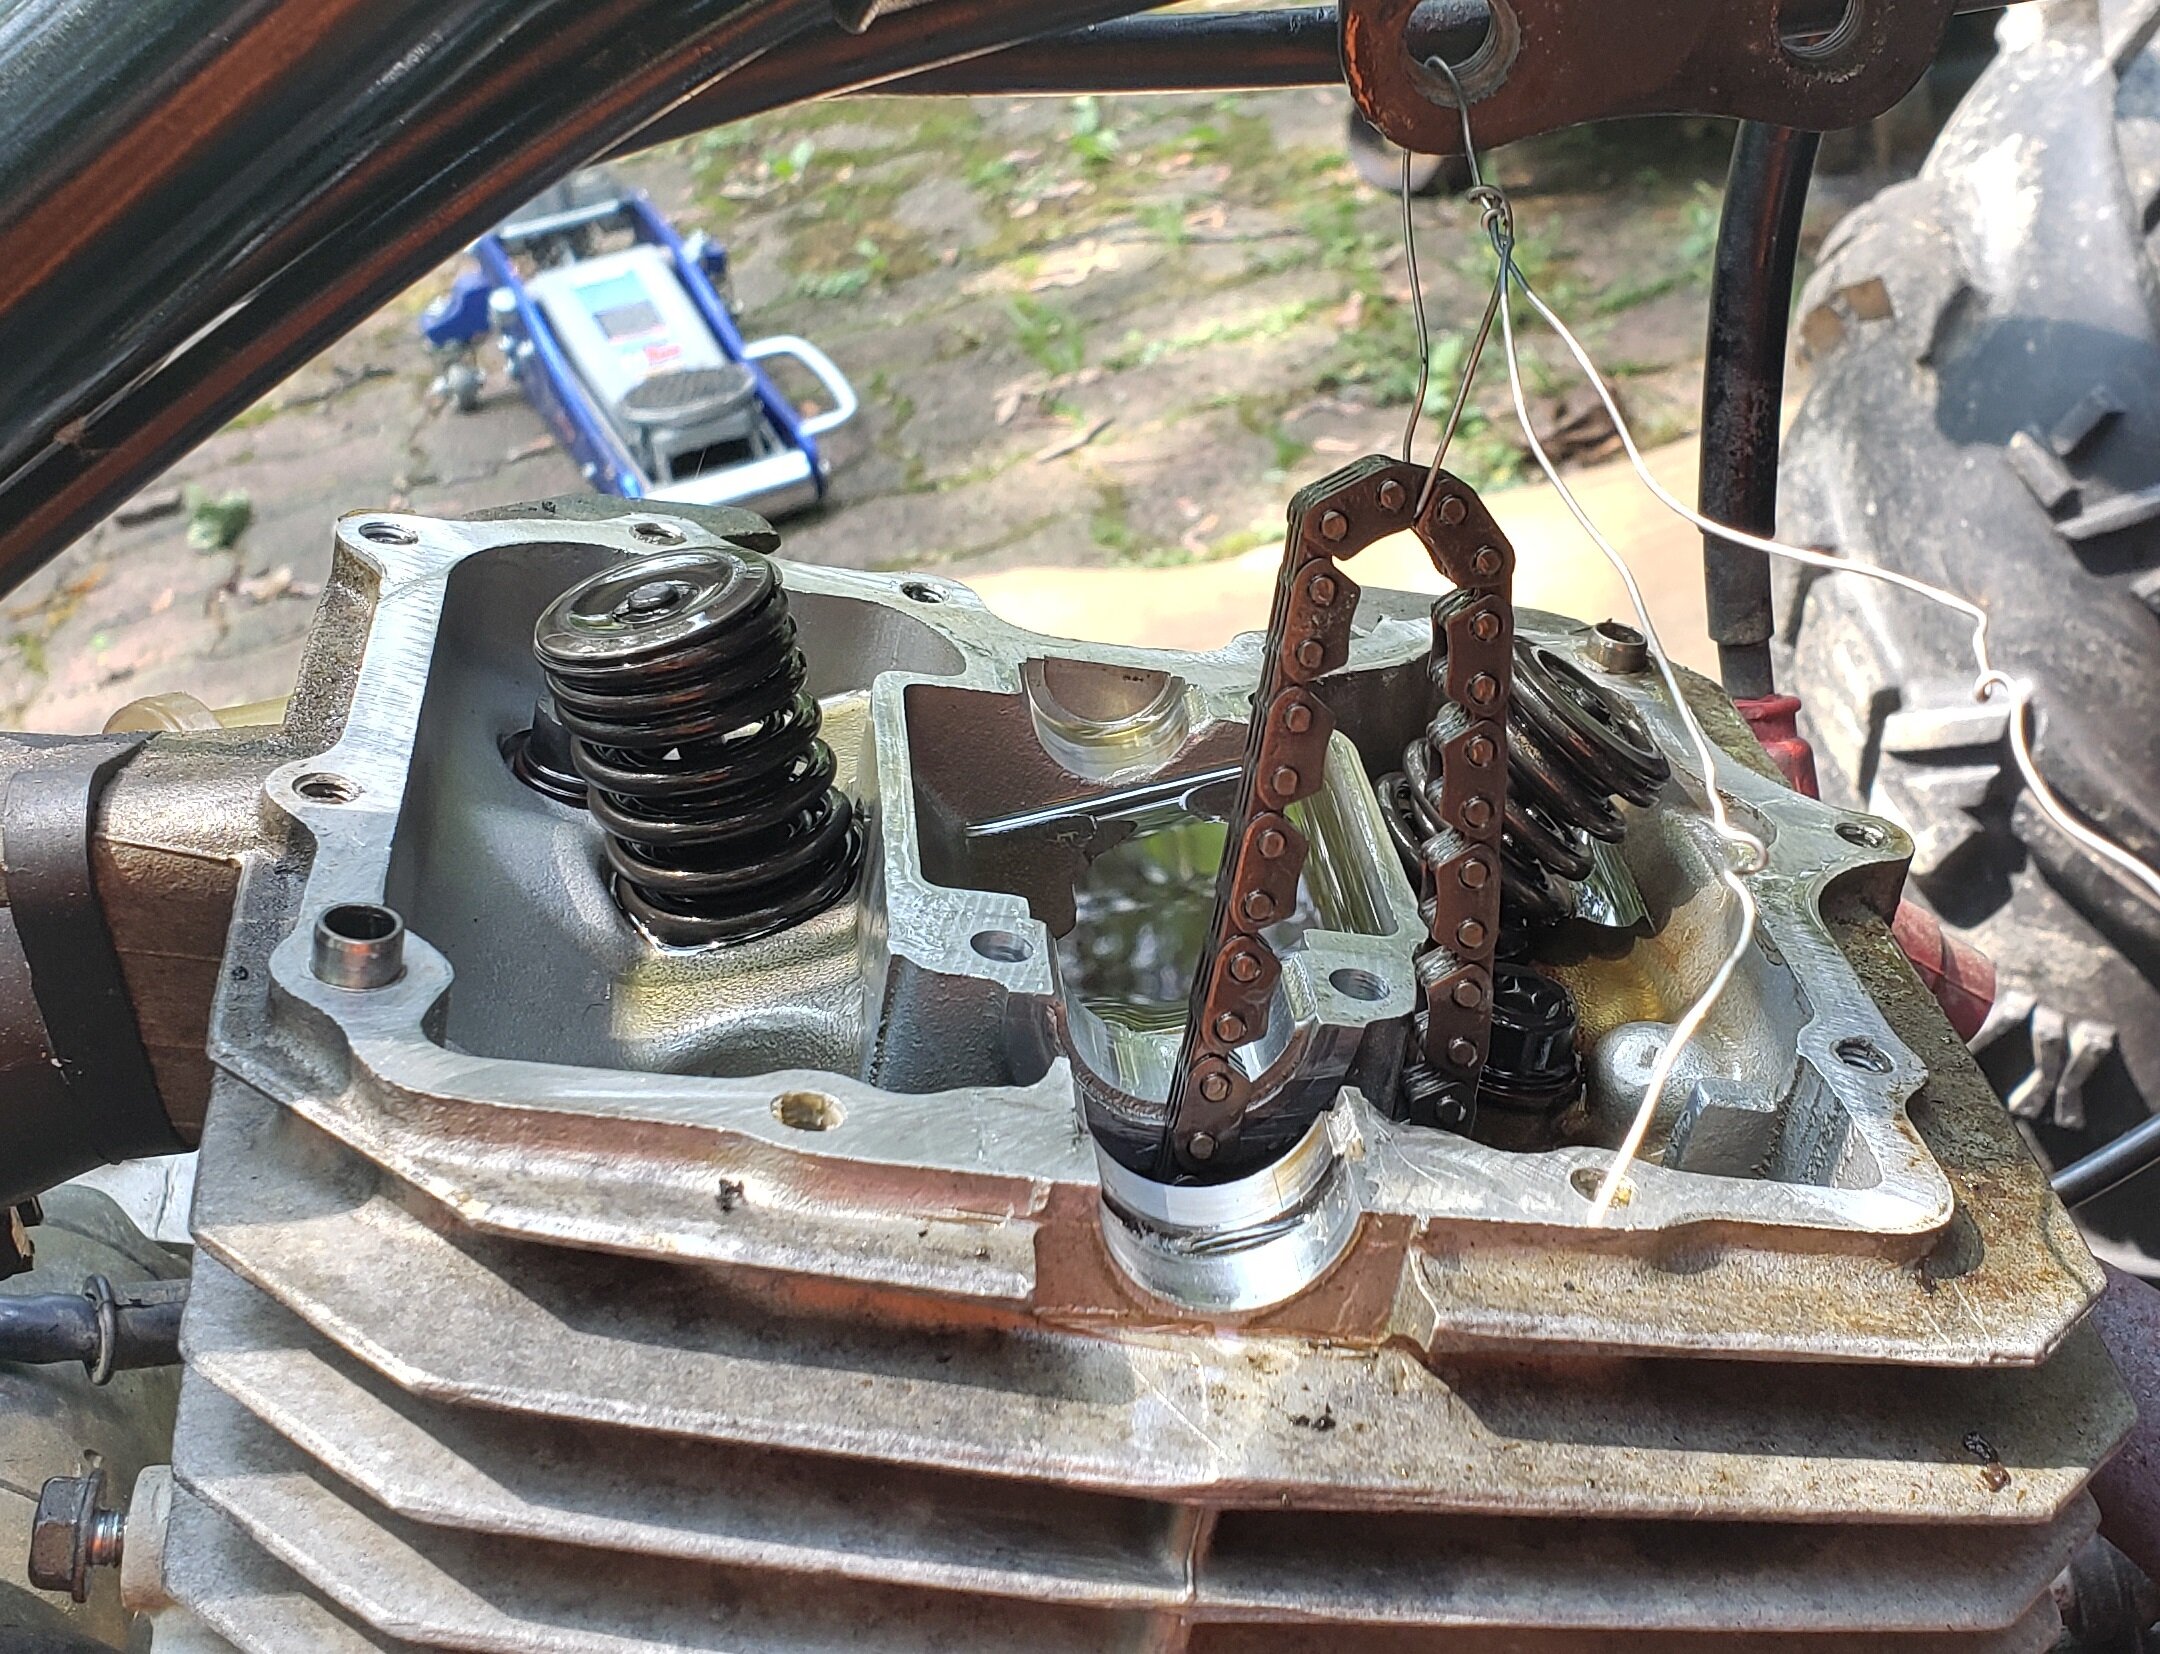
Step 1)
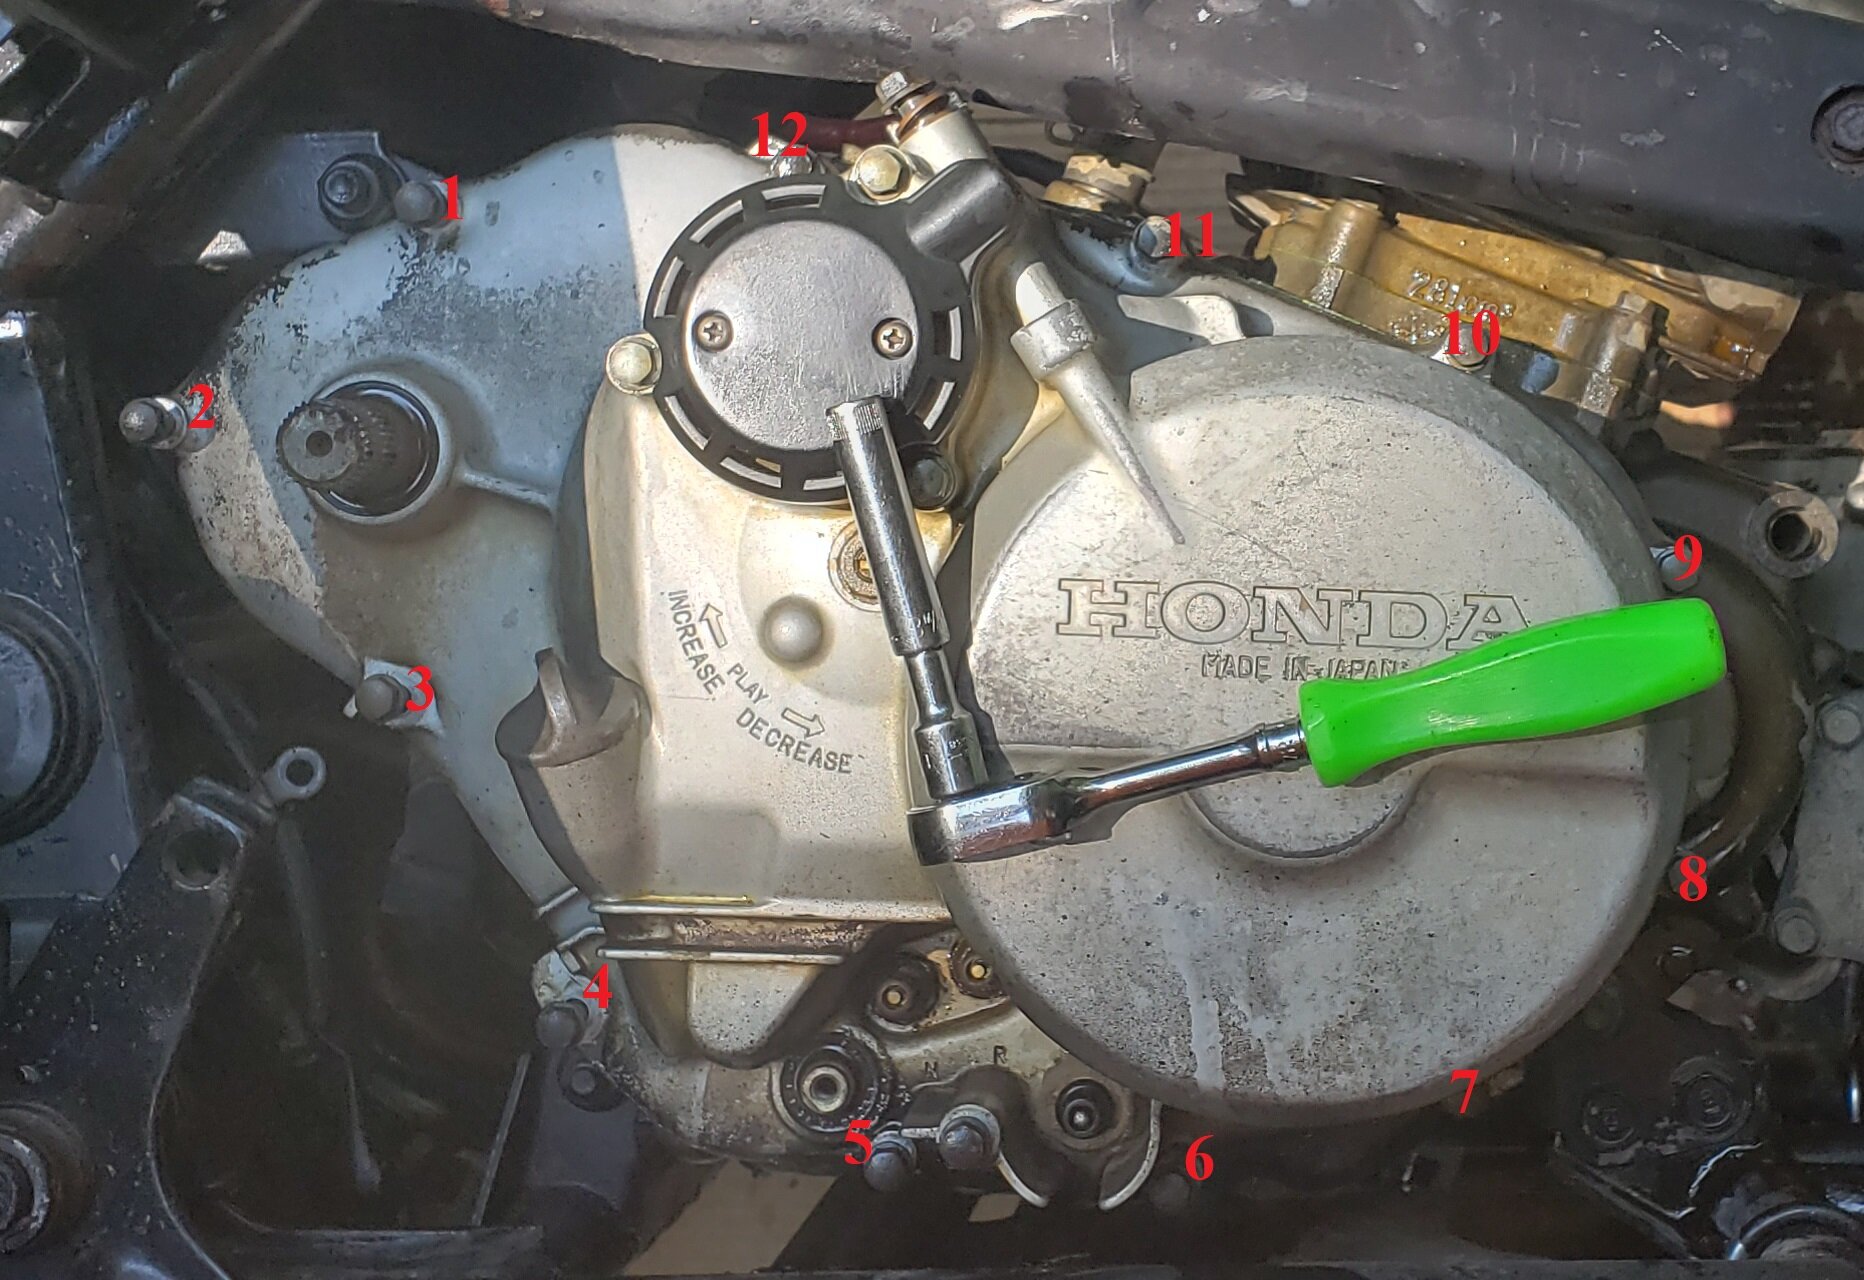
Unbolt and remove the timing chain automatic tensioner (located on front right side of the engine jug)- 2x 8mm bolts + 10mm head cover. insert flathead screwdriver and turn to the right to retract the tension rod.
Remove the front bumper, and plastics, and airbox plastic feed tube.

Step 2)
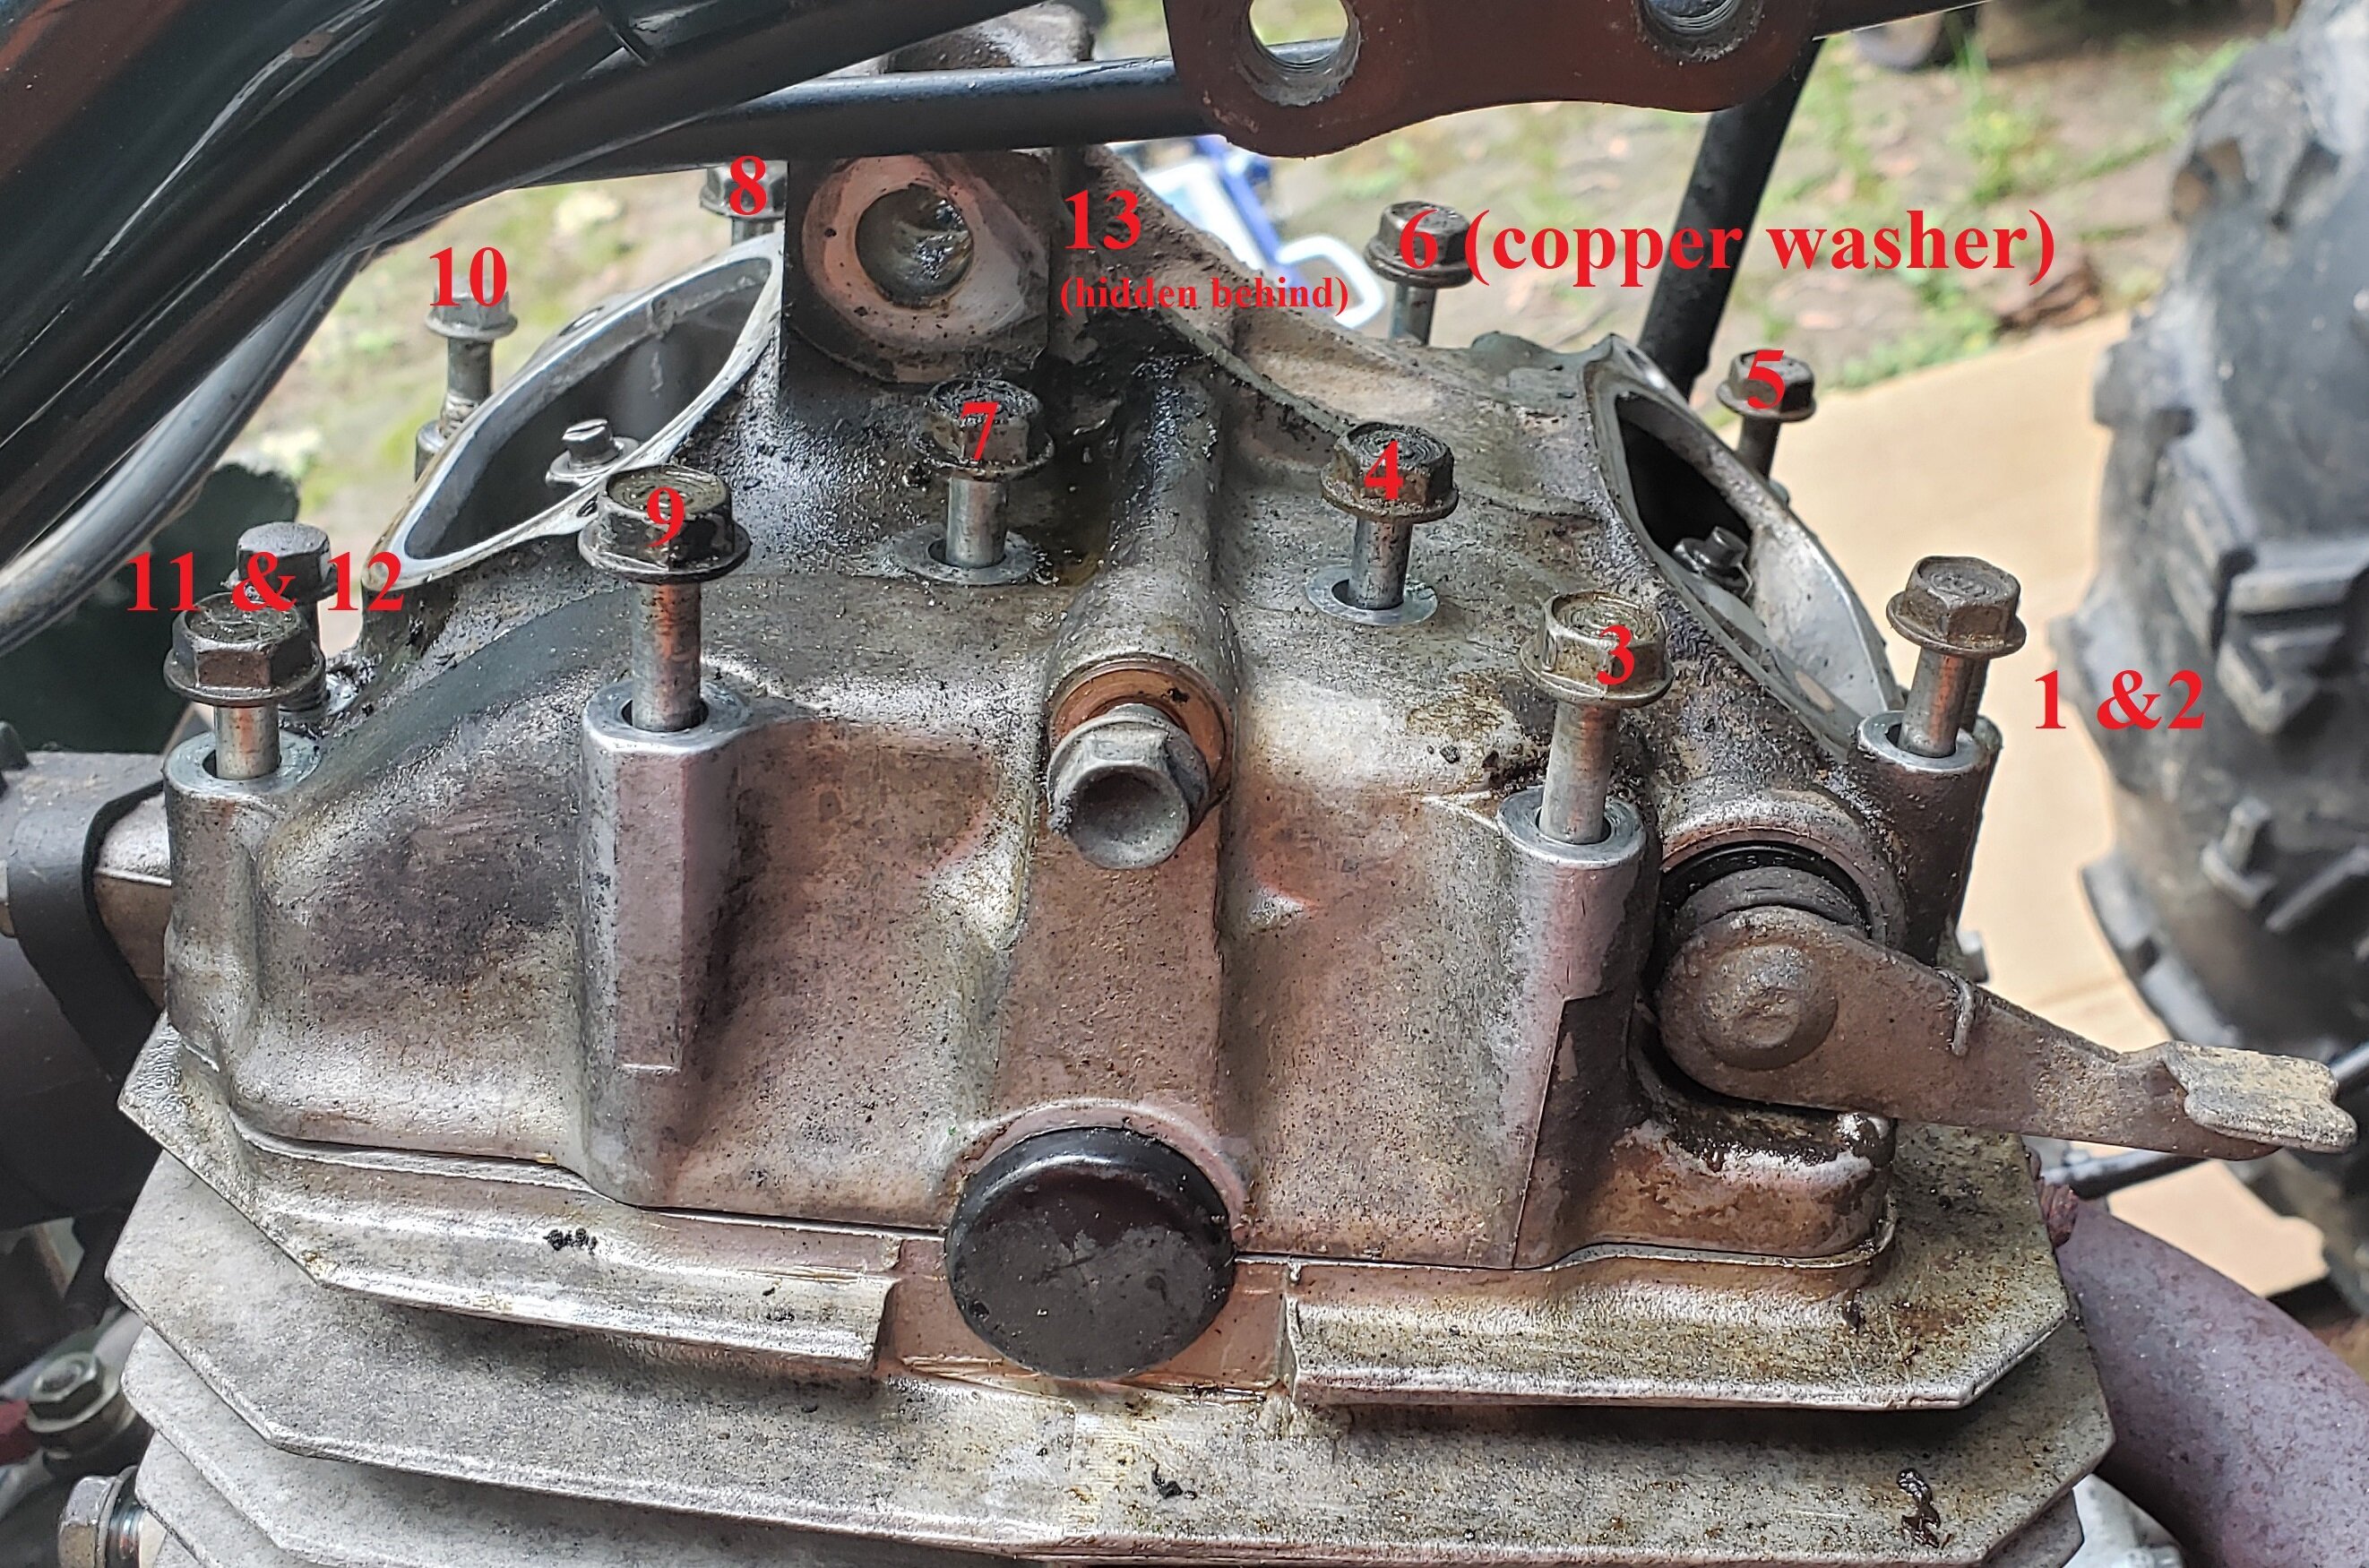
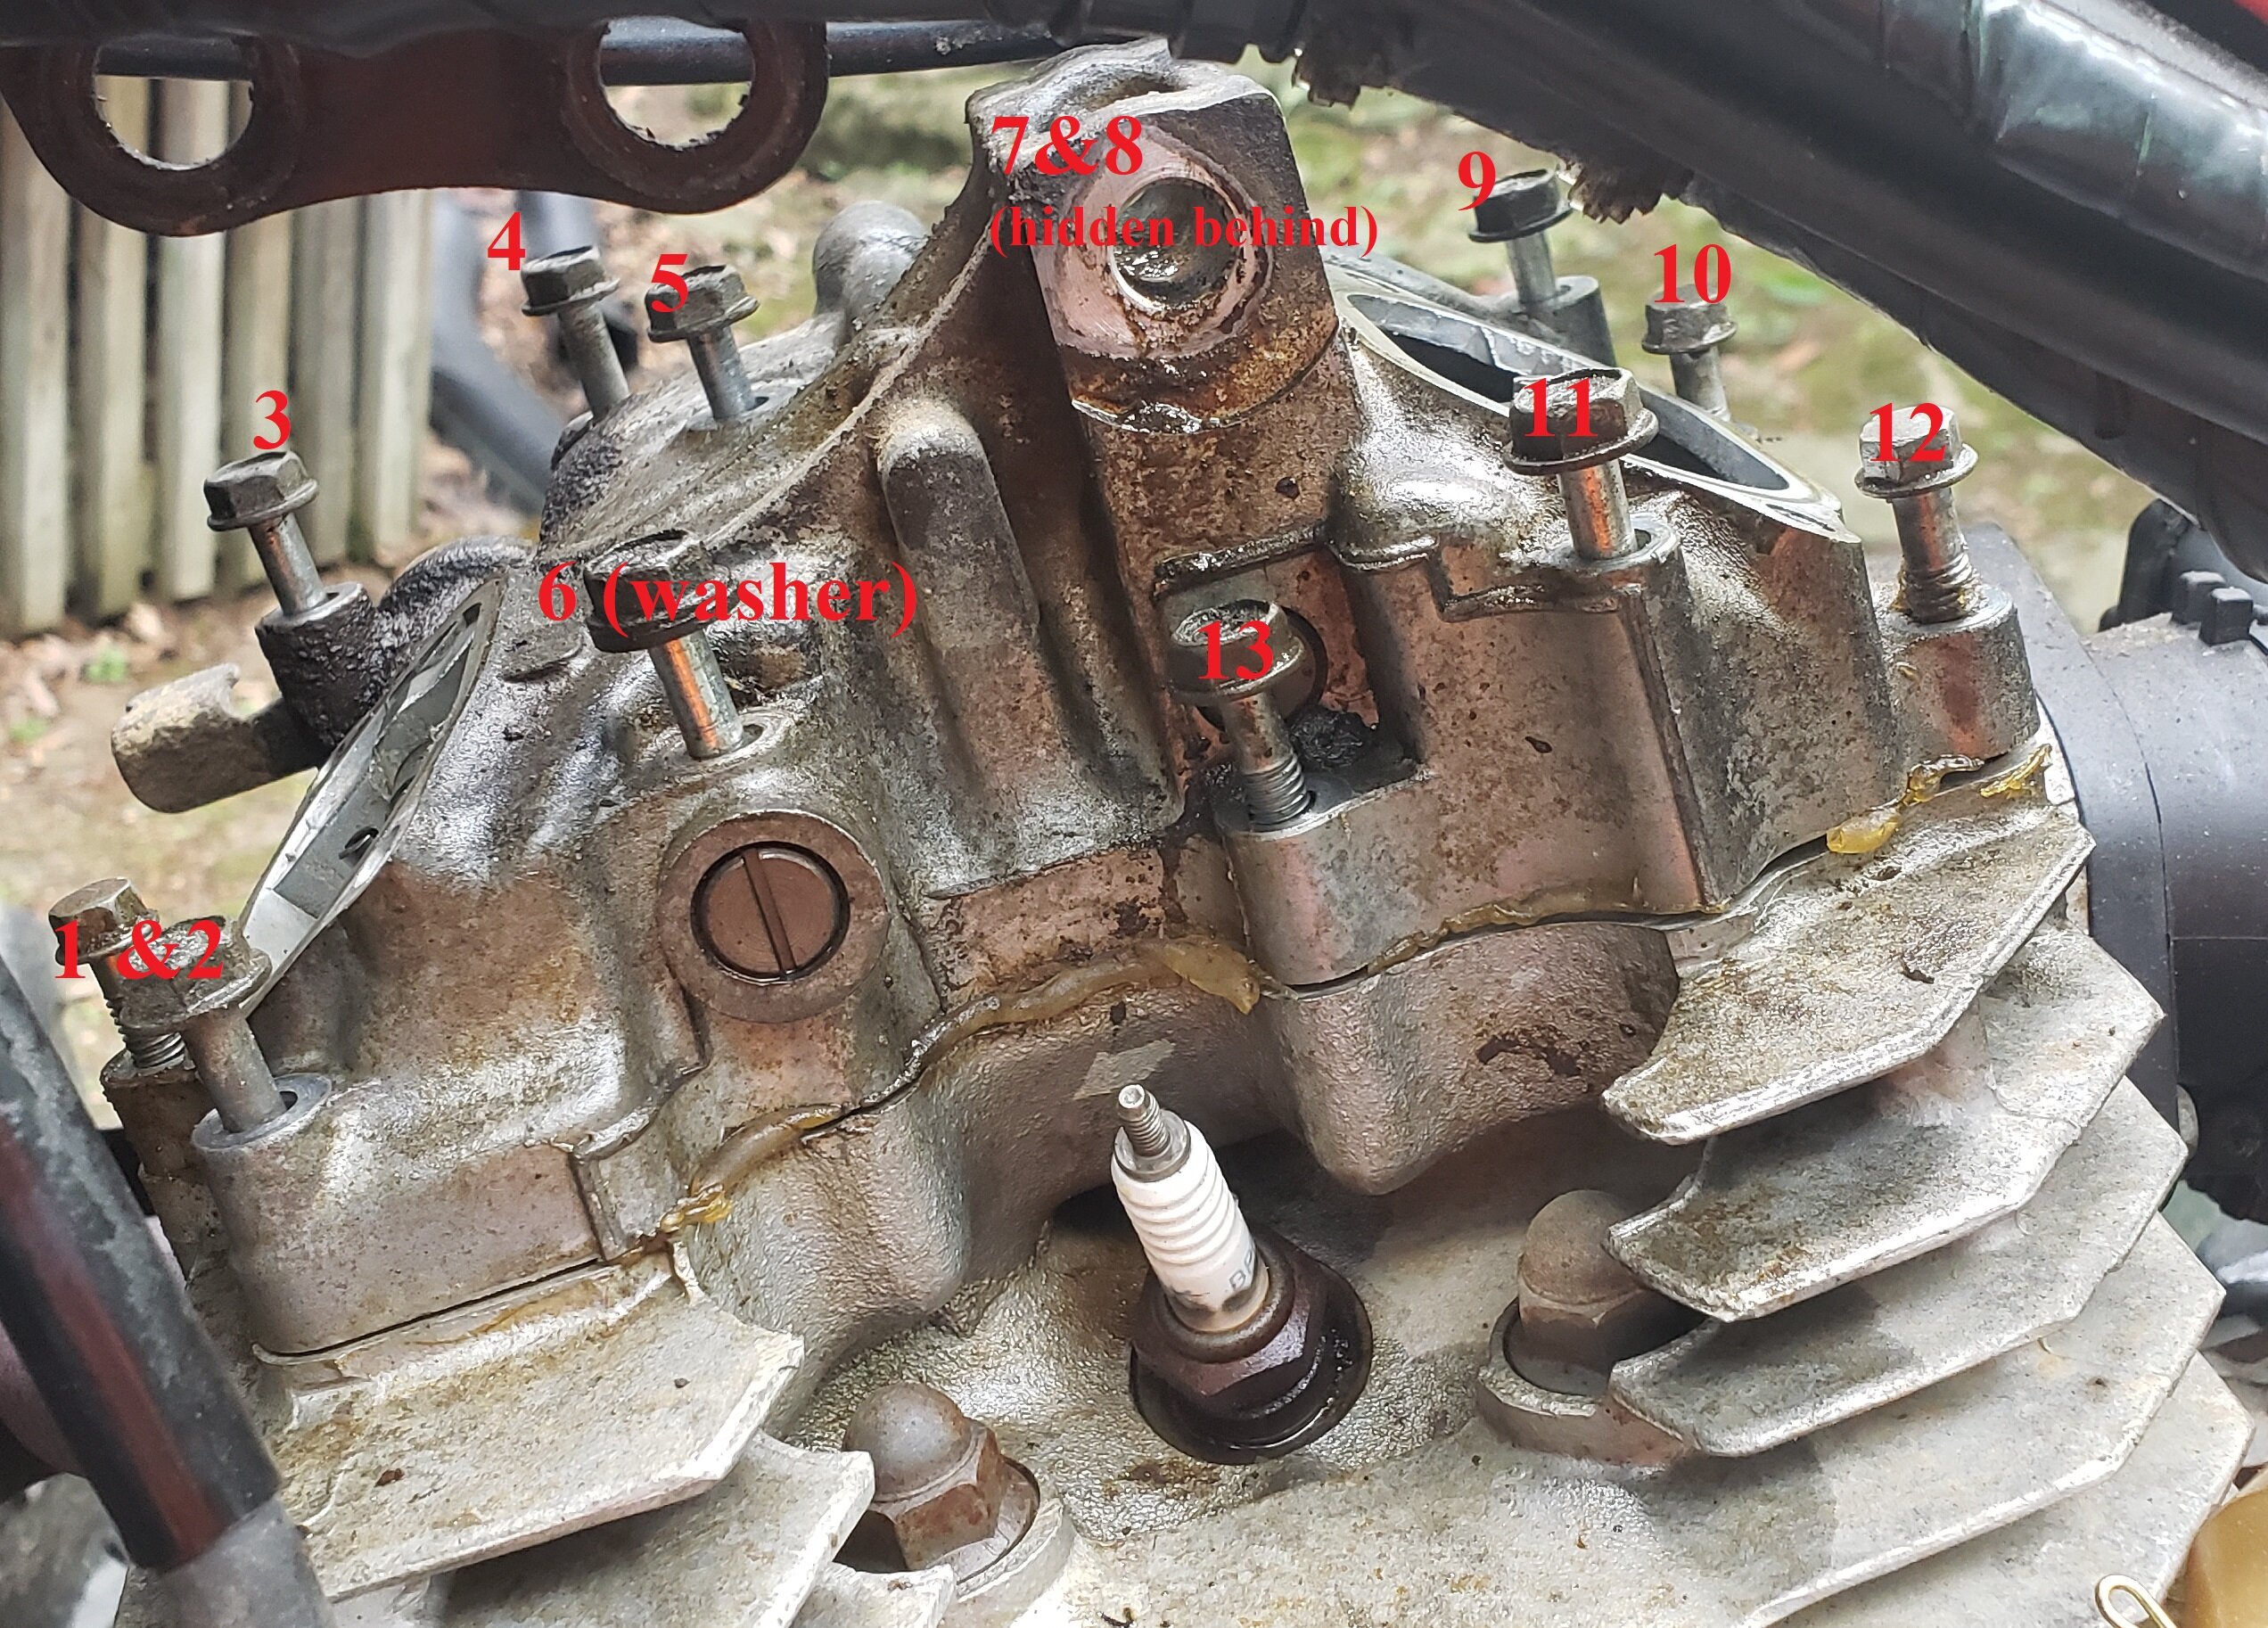
Unbolt the rocker box cover/head (13 bolts) and remove.
- mix of 8mm and 10mm bolts.Unbolt the oil line and remove (the black thing connecting the crank case to the head on right side)
Step 3)
Unbolt the 2 bolts on the cam sprocket (10mm) (you will need to turn the engine, to do this, use the 8mm allen wrench (or socket) on the inspection port for the electric starter and turn to the right)
- Do NOT drop the bolt in the engine. I recommend stuffing a rag in the gap just in case.Once unbolted, slide the sprocket forward, so the sprocket drips down onto the lower part of the cam shaft, which will allow the chain to be loose and come off the sprocket.
Take the chain, and using metal wire, string it tightly to the frame so it will not fall into the engine.
Then remove the cam and sprocket assembly.
Step 4)
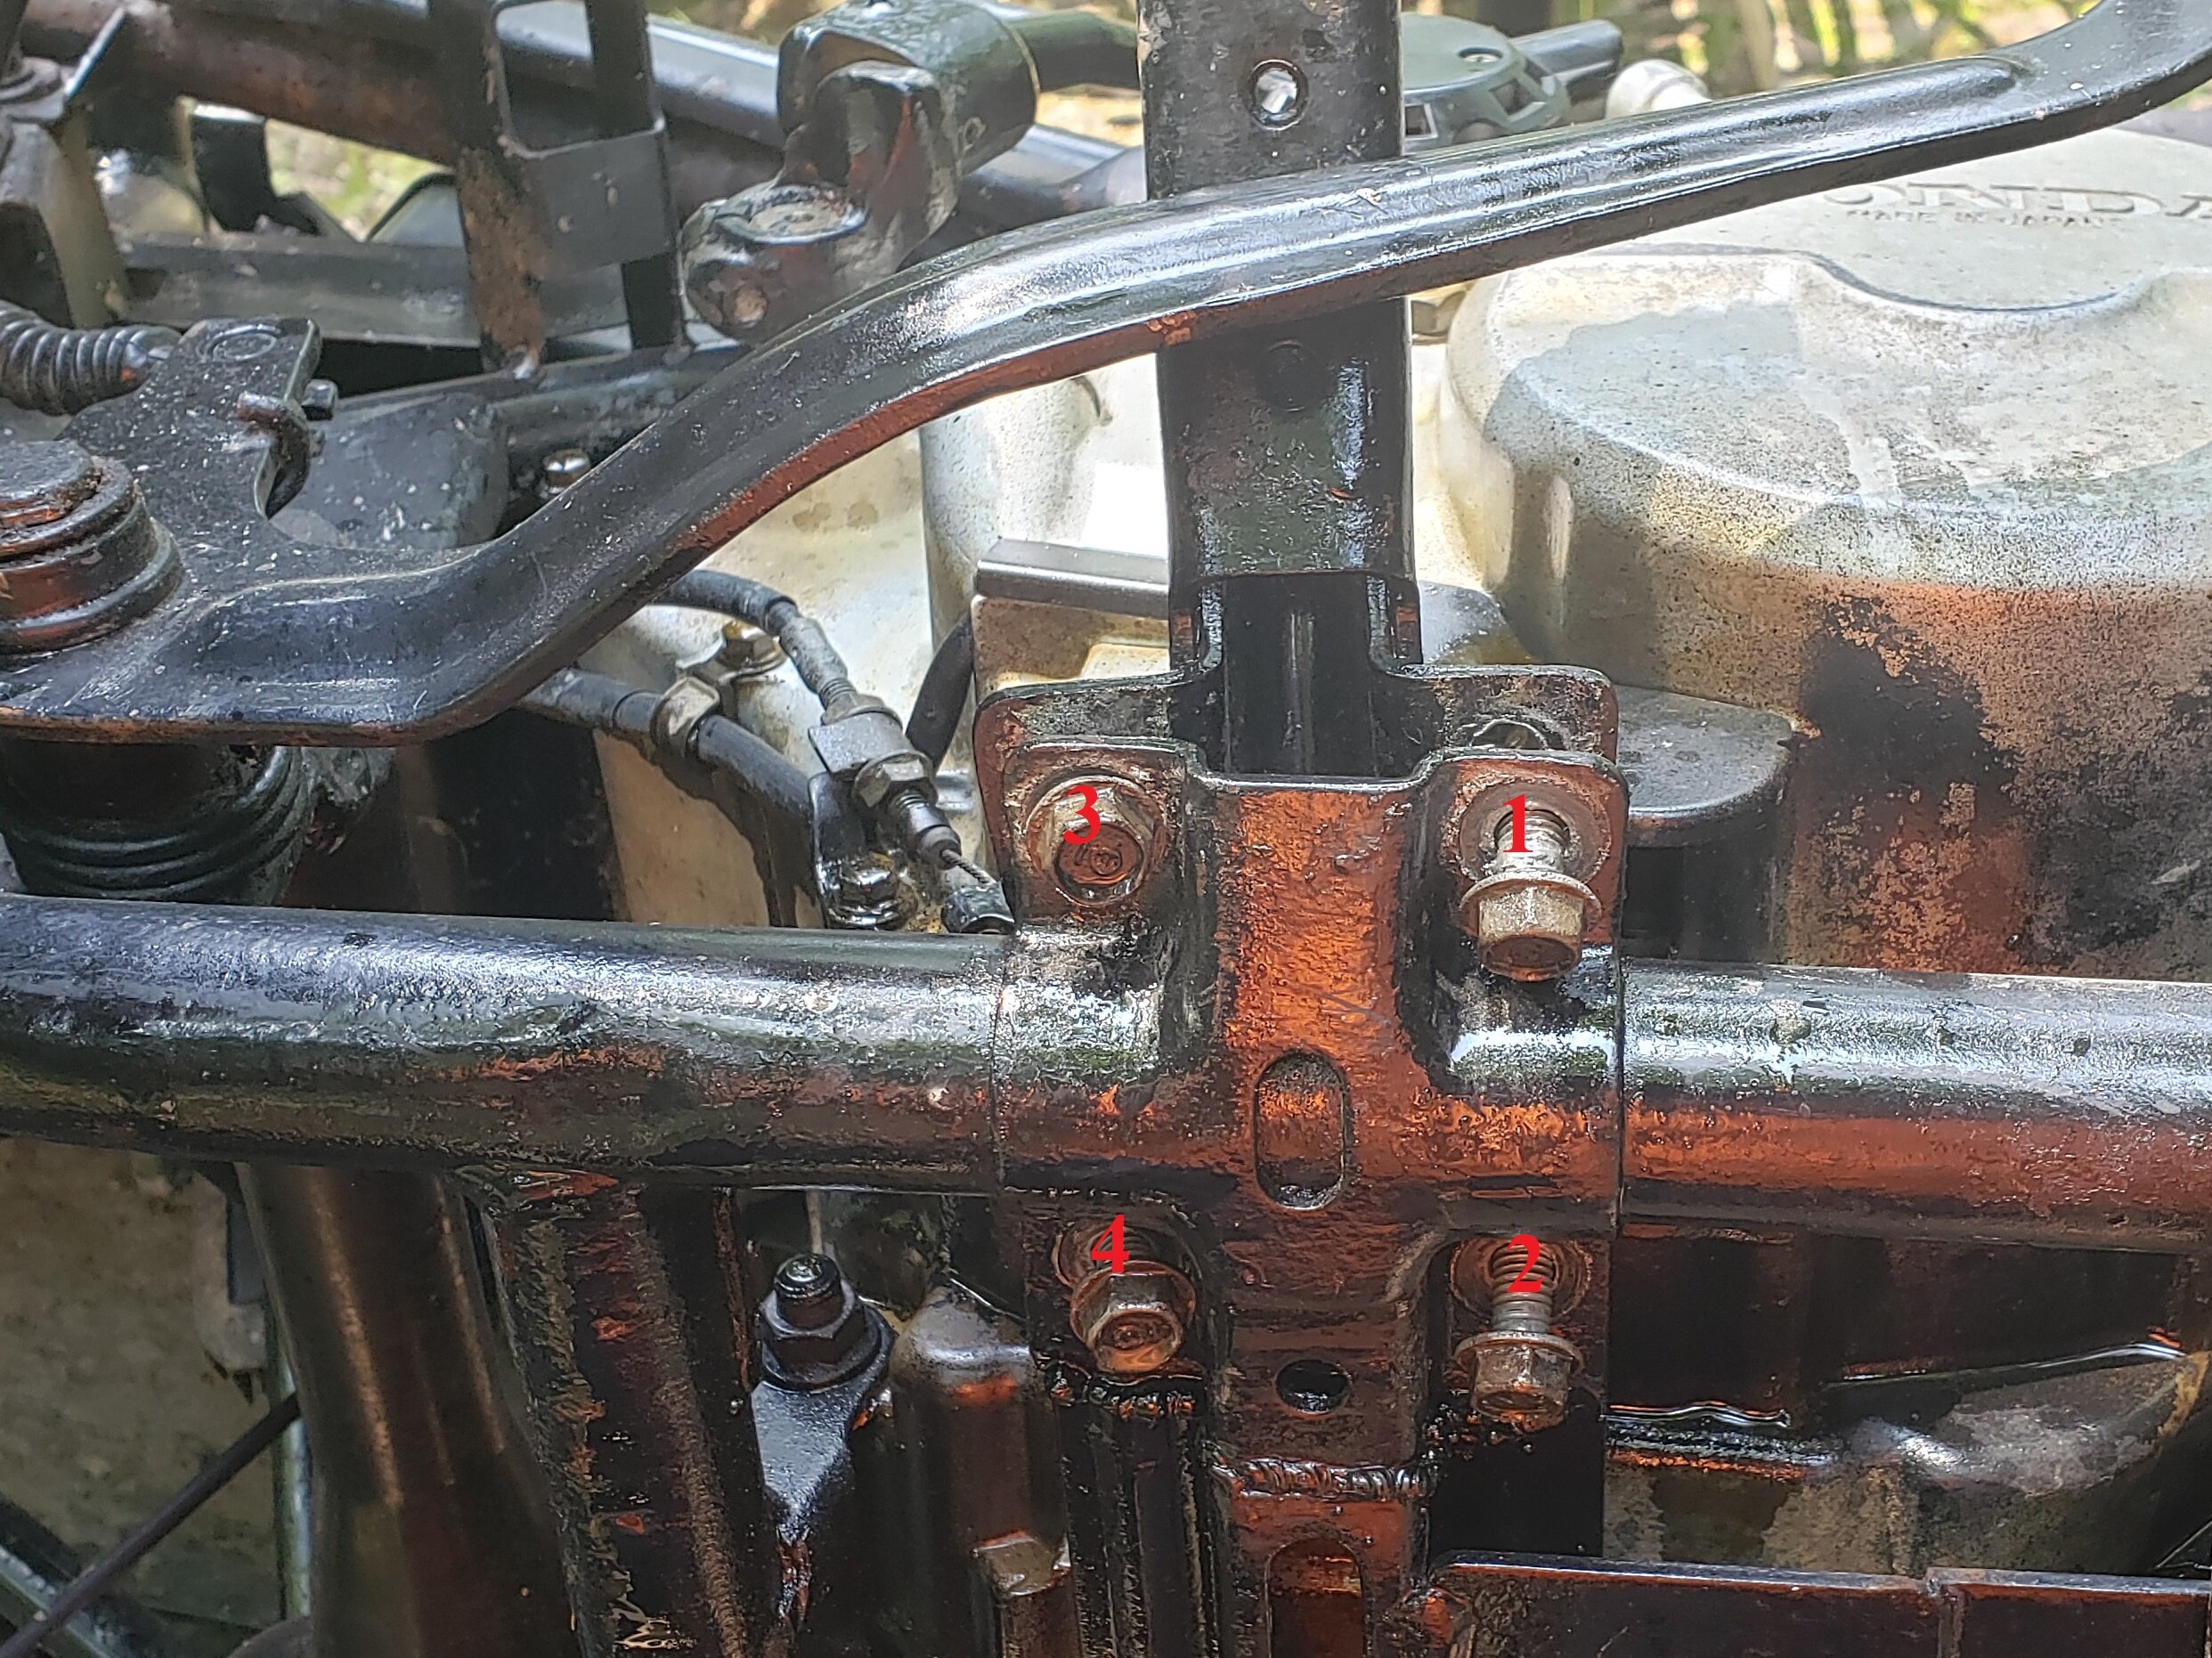
Flip ATV onto its left side, so the right crank case is up.Unbolt the right footpeg (12mm) and swing the foot break out of the way (I recommend unhooking the cable too)
Step 5)
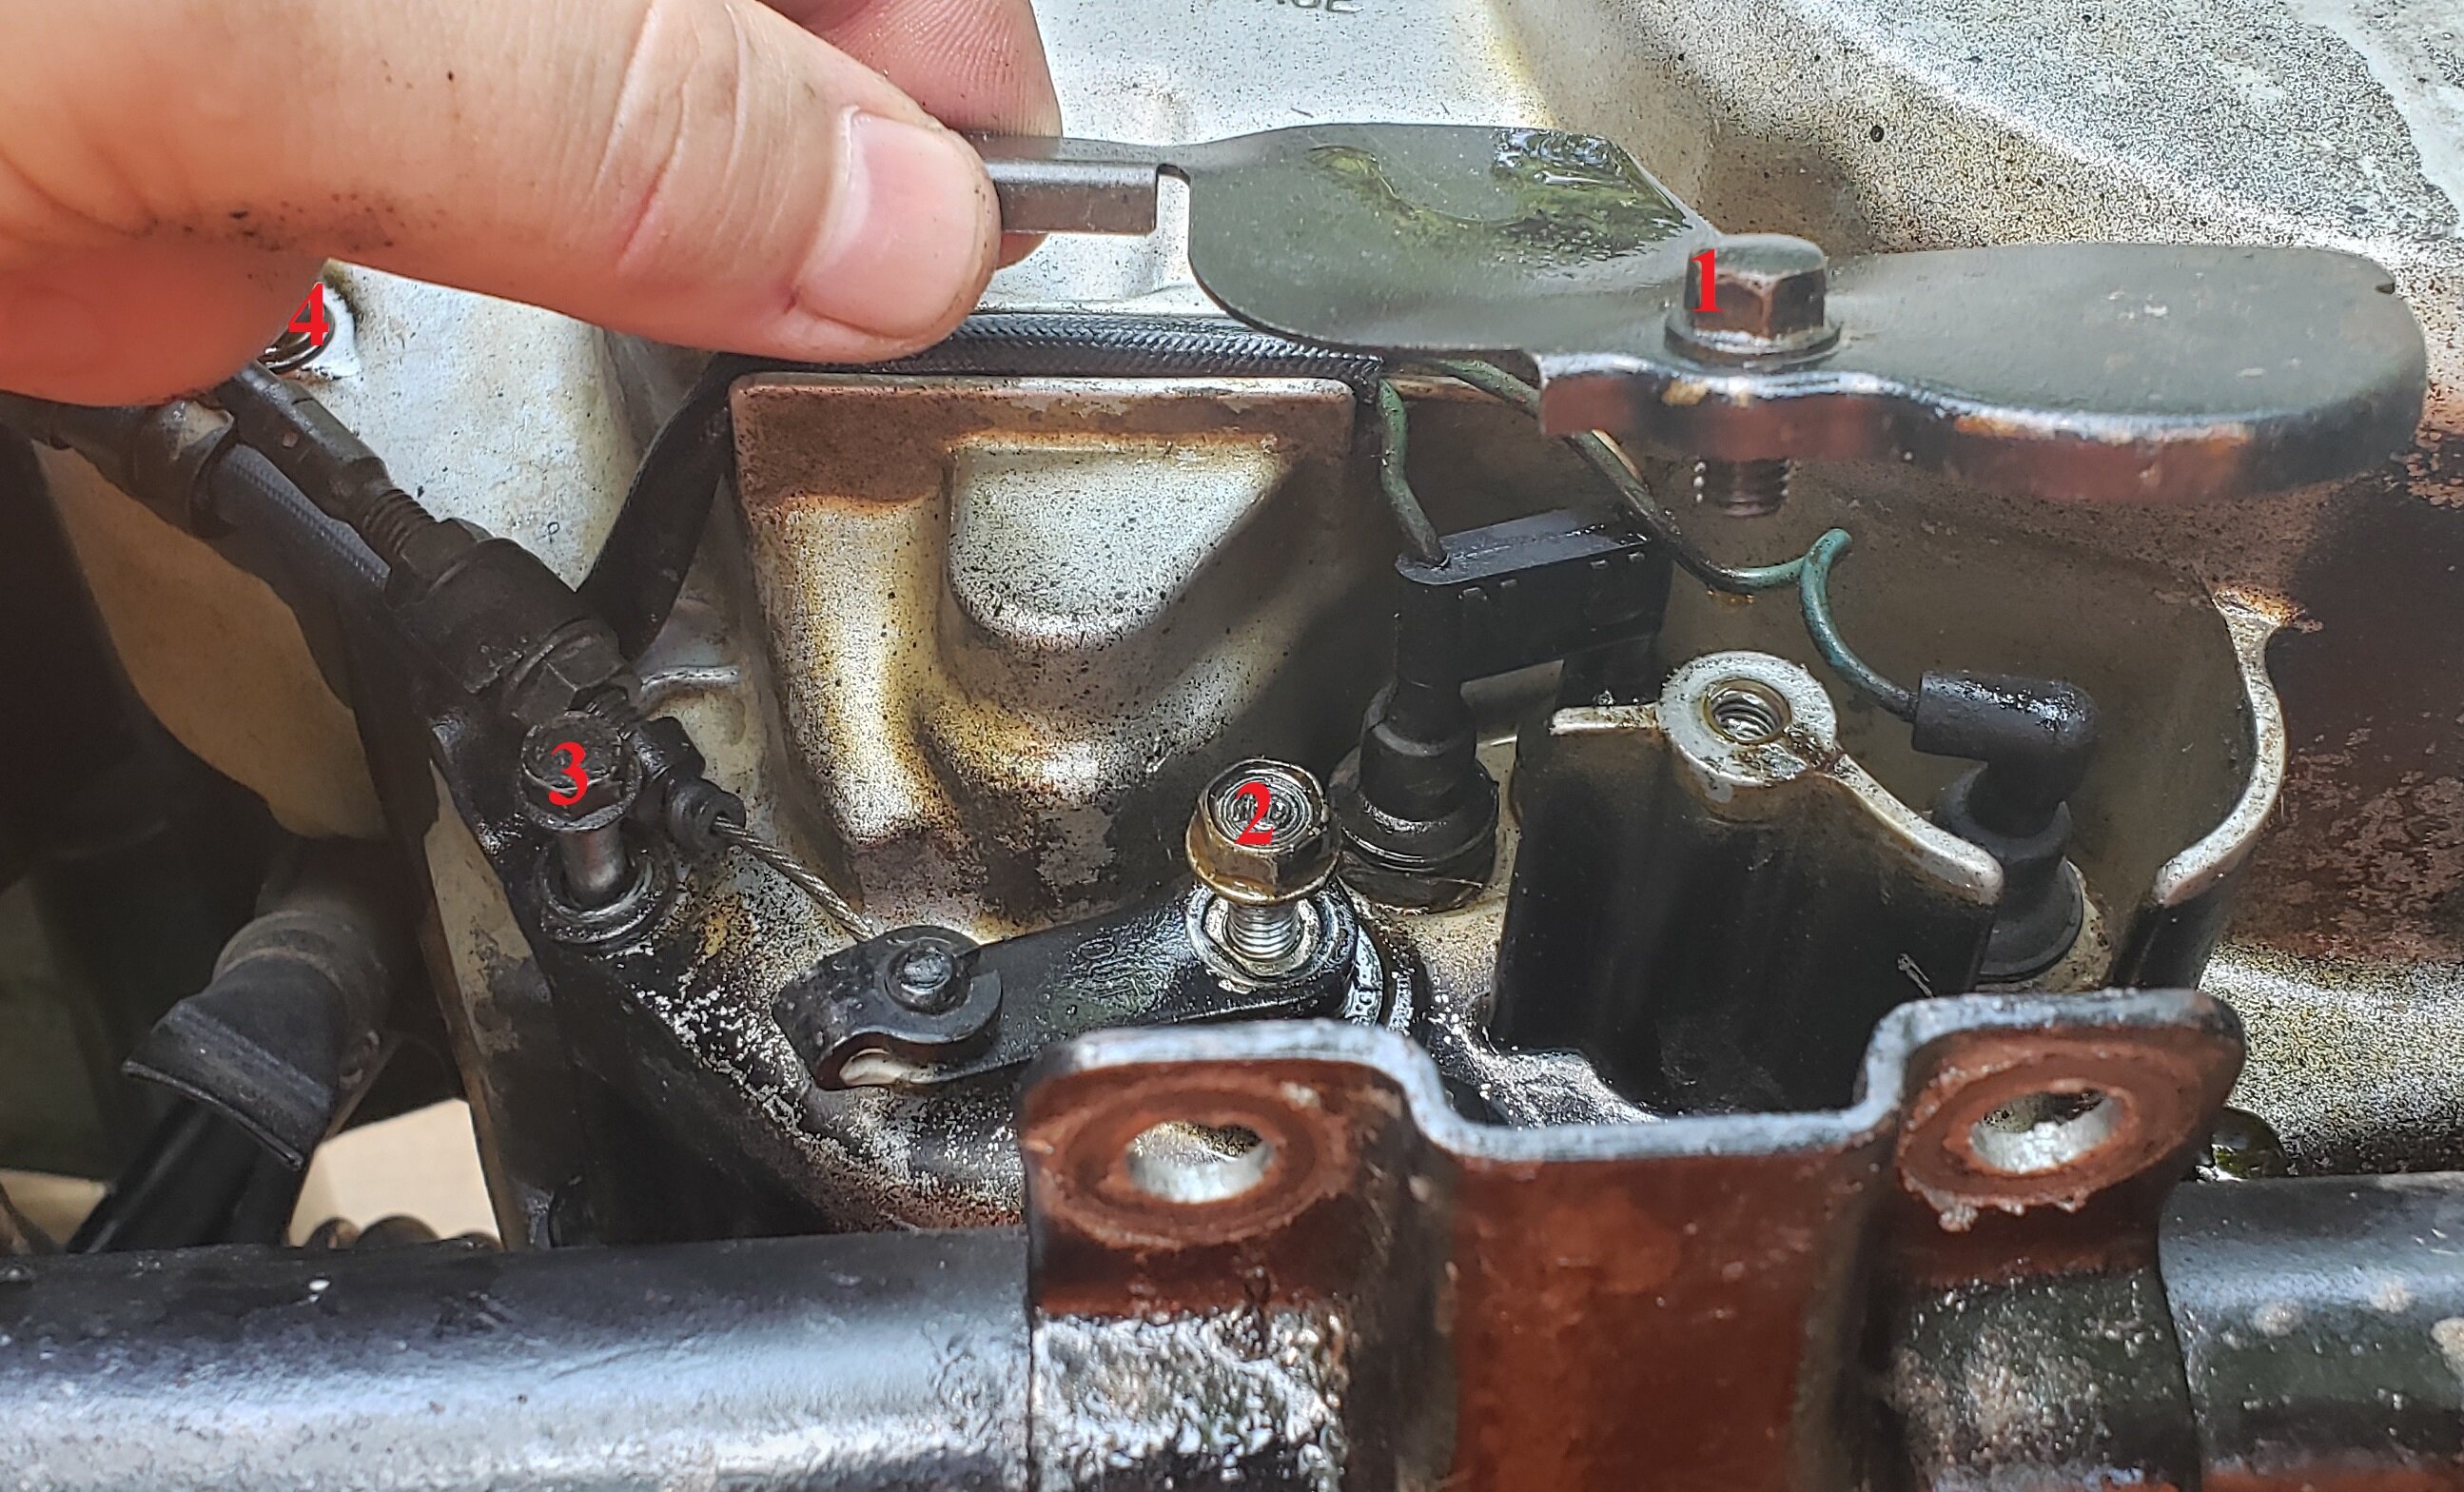
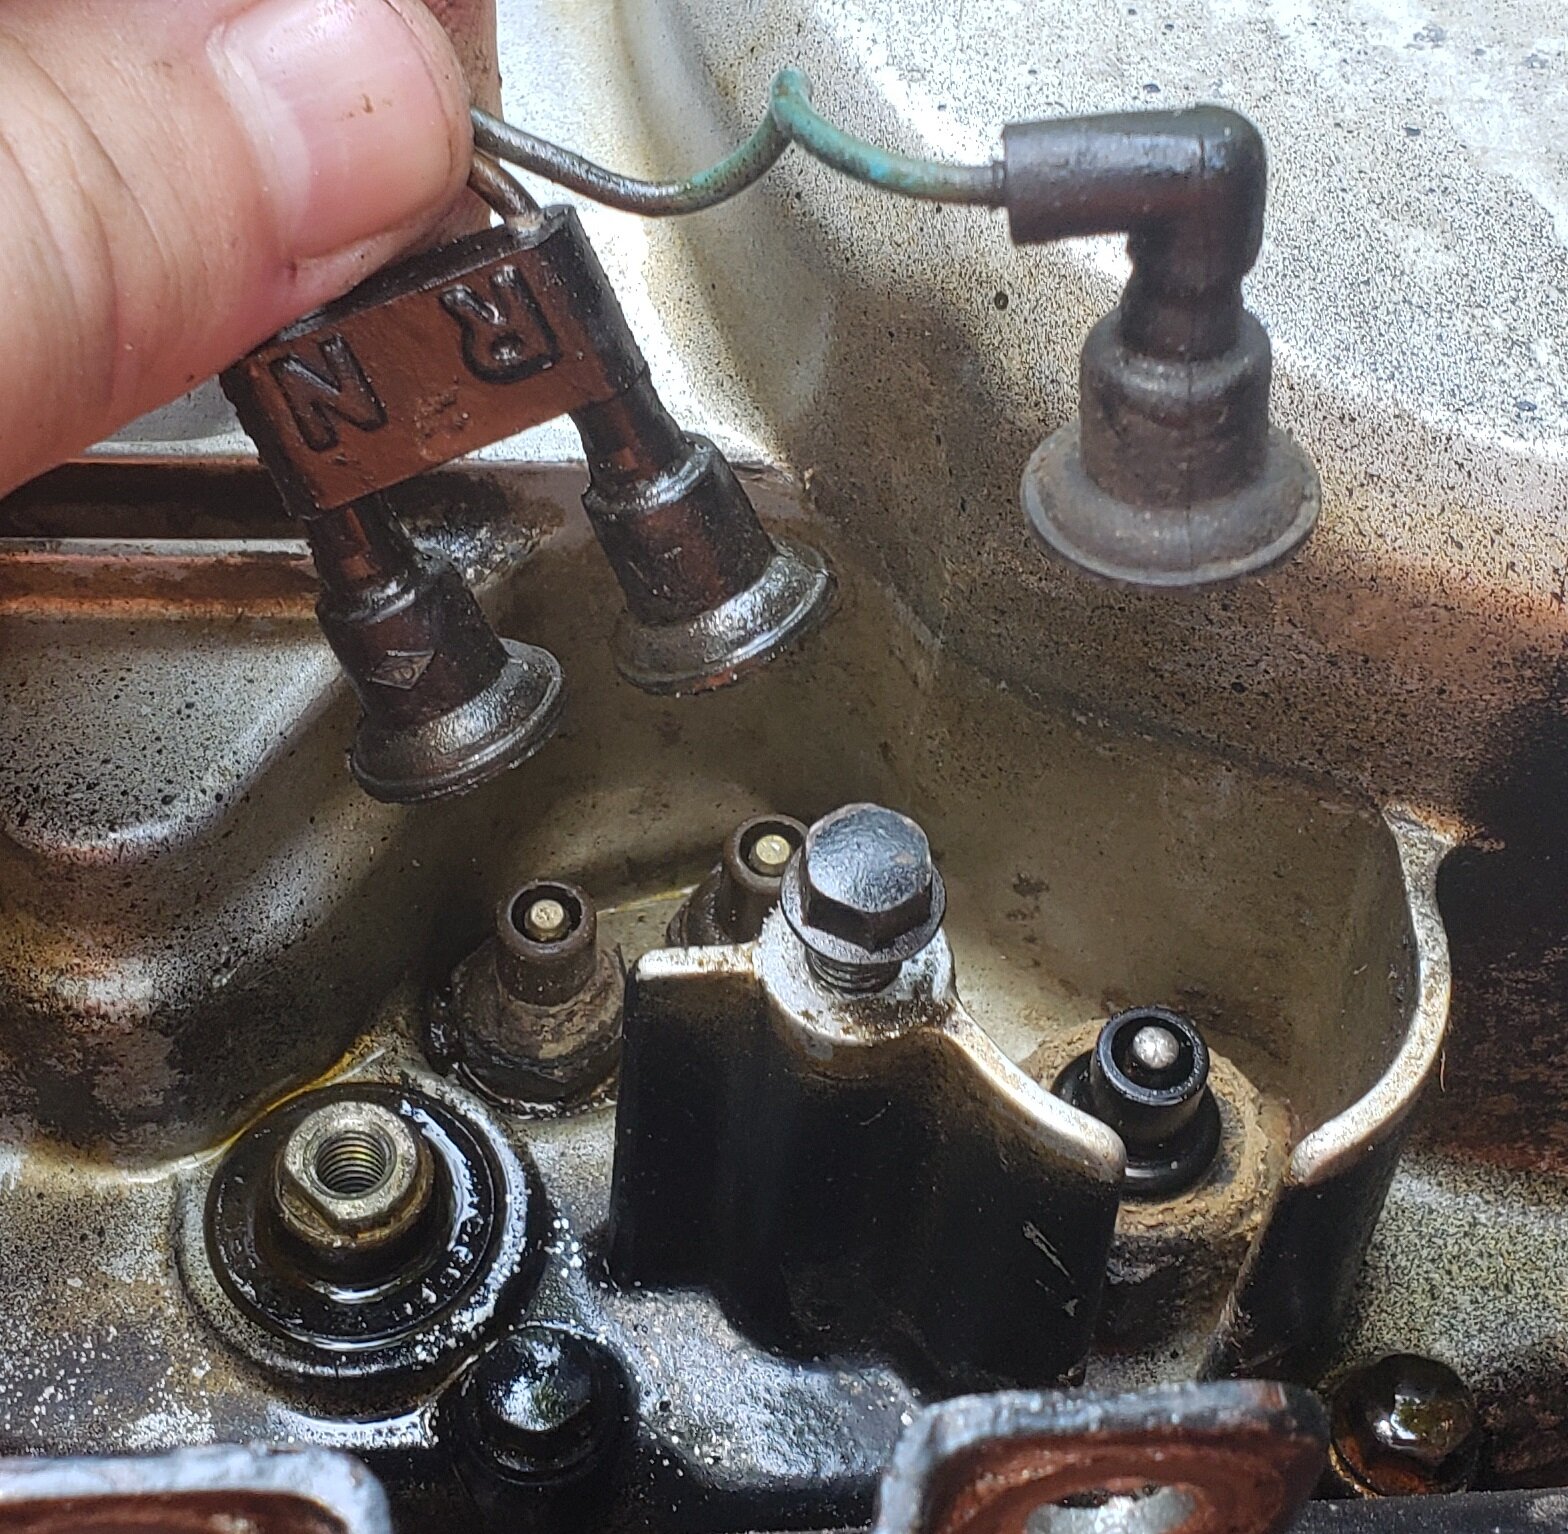
Unbolt the 4 bolts covering & holding the neutral, reverse and temperature sensors. (8 & 10mm mix)Once unbolted and loose, remove (unplug) the sensor connectors and tuck to the side.
Remove kick starter from its shaft (12mm)
Step 6)
Unbolt the right side crank case (all 8mm)
Remove right crank case cover
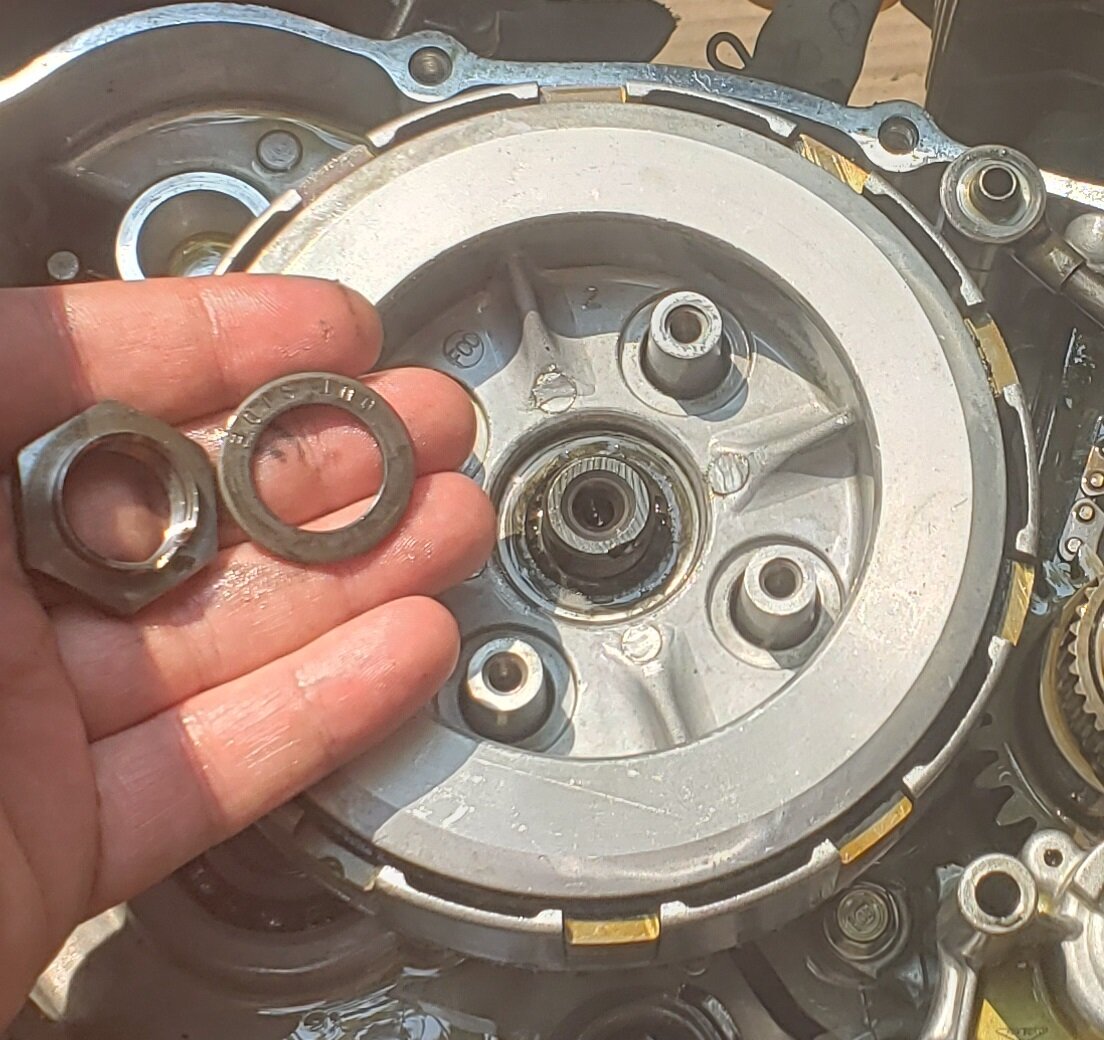
- Important! Keep pressure on the kick starter shaft as you pull the case off. DO NOT LET IT MOVE AT ALL.If it slips outward (with he case as you pull it off), there is a very high chance the washer on the back side will fall off the shaft and into the center part of your crank case.
See This thread I made on how to recover the washer without pulling the engine if you do mess up.
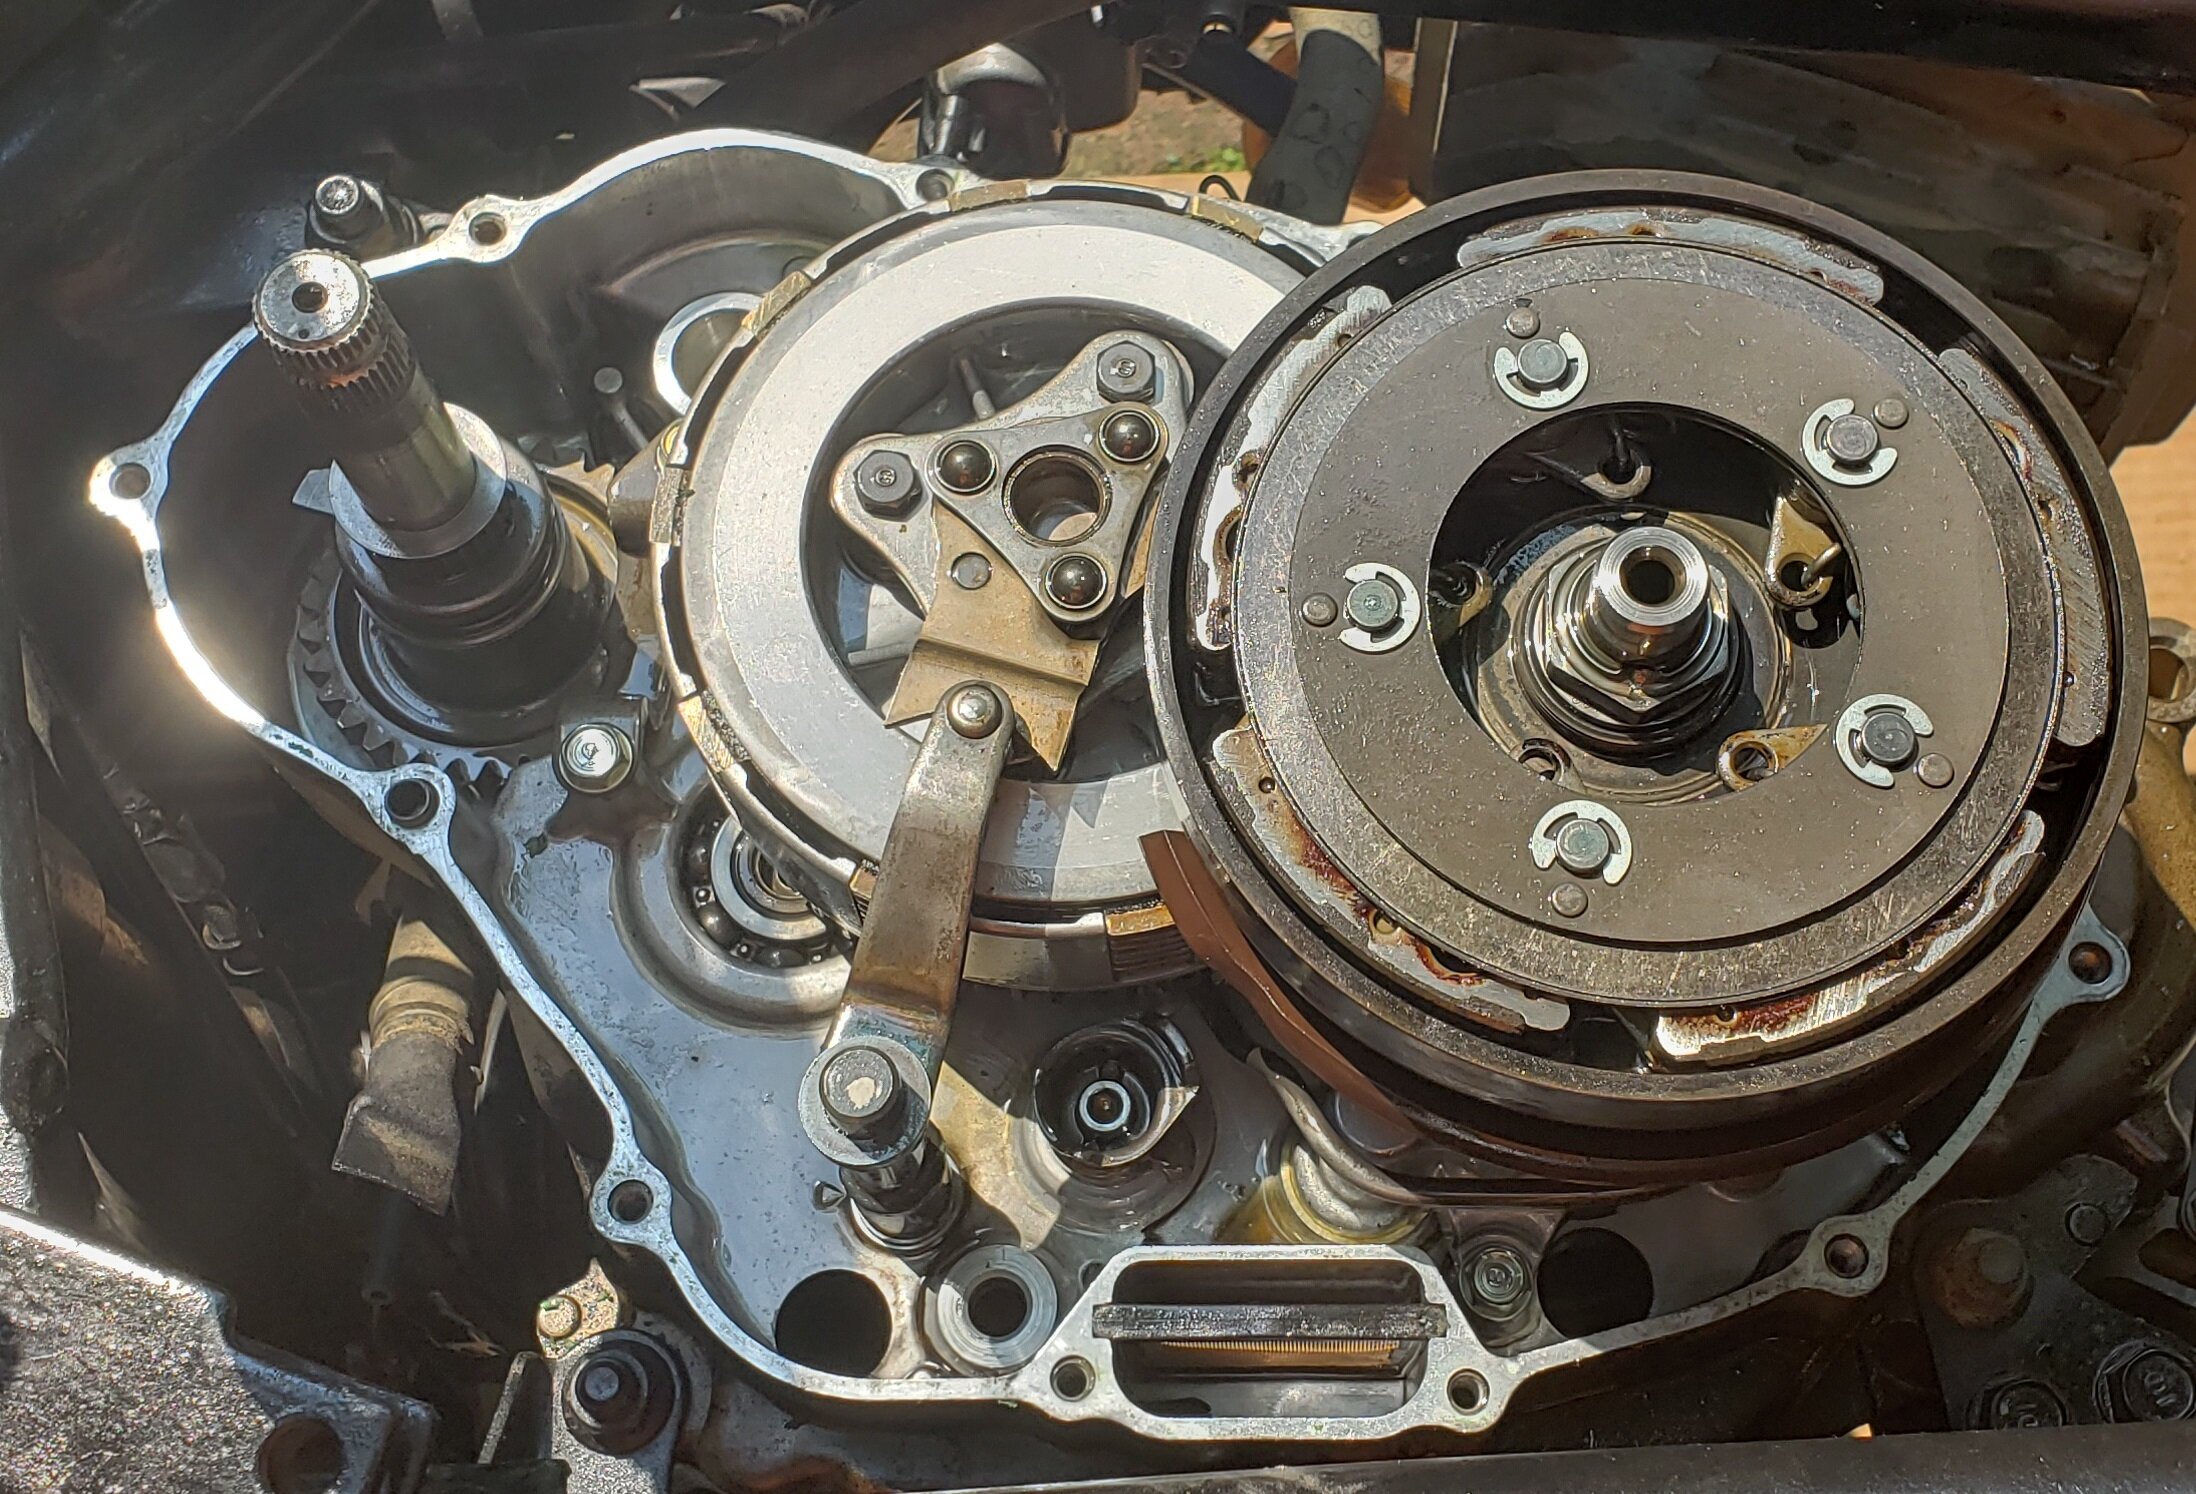
Remove the observe the shifter orientation and the triangle shifter system over the secondary clutch. (note that the dot on the shifter shaft lines up with the arrow on theface of the case for reassembly)
Step 7)
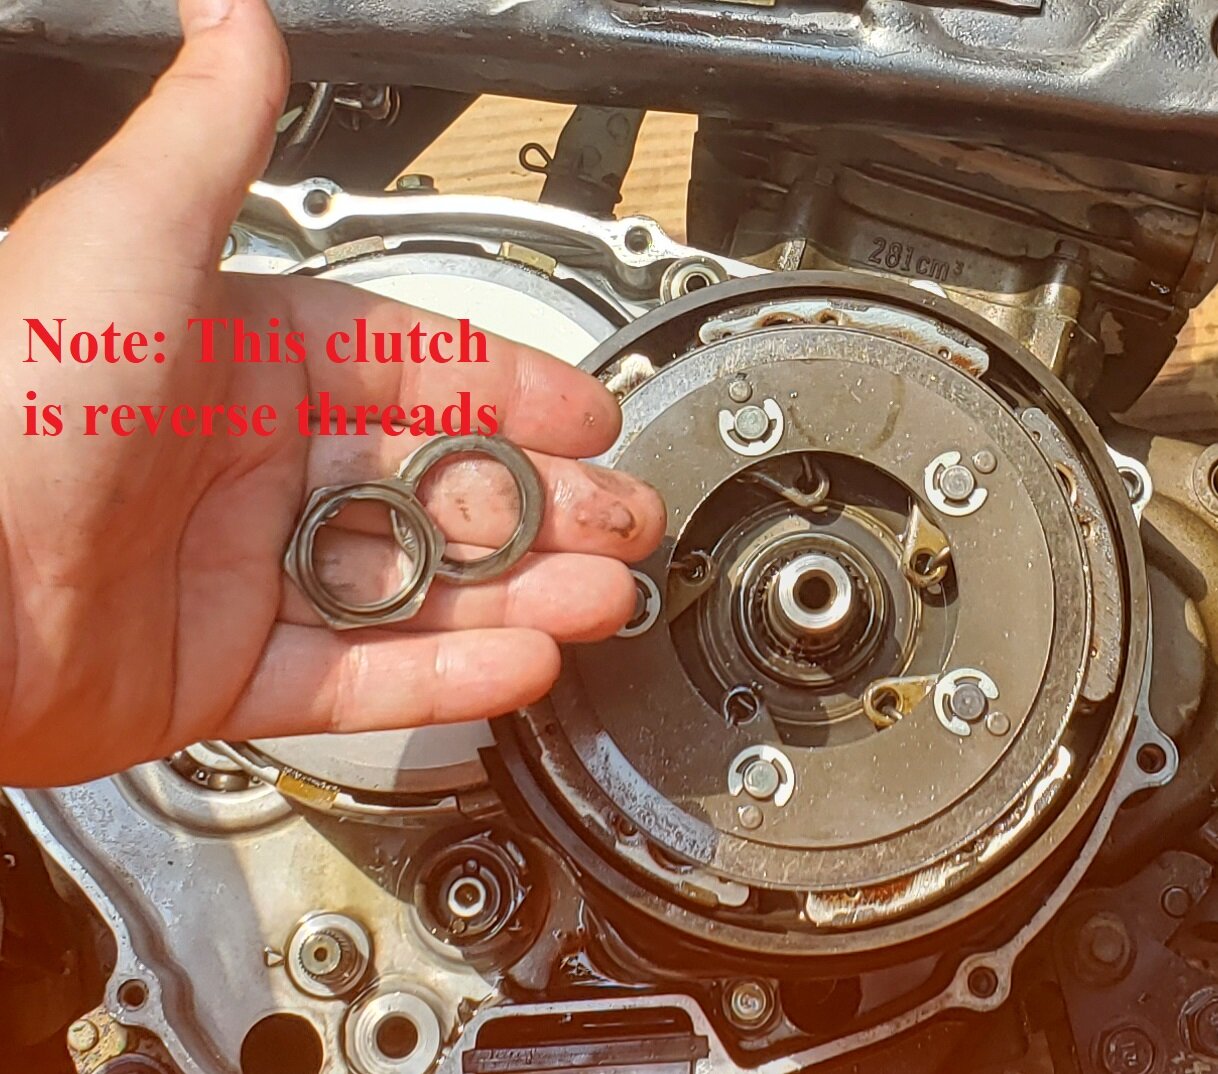
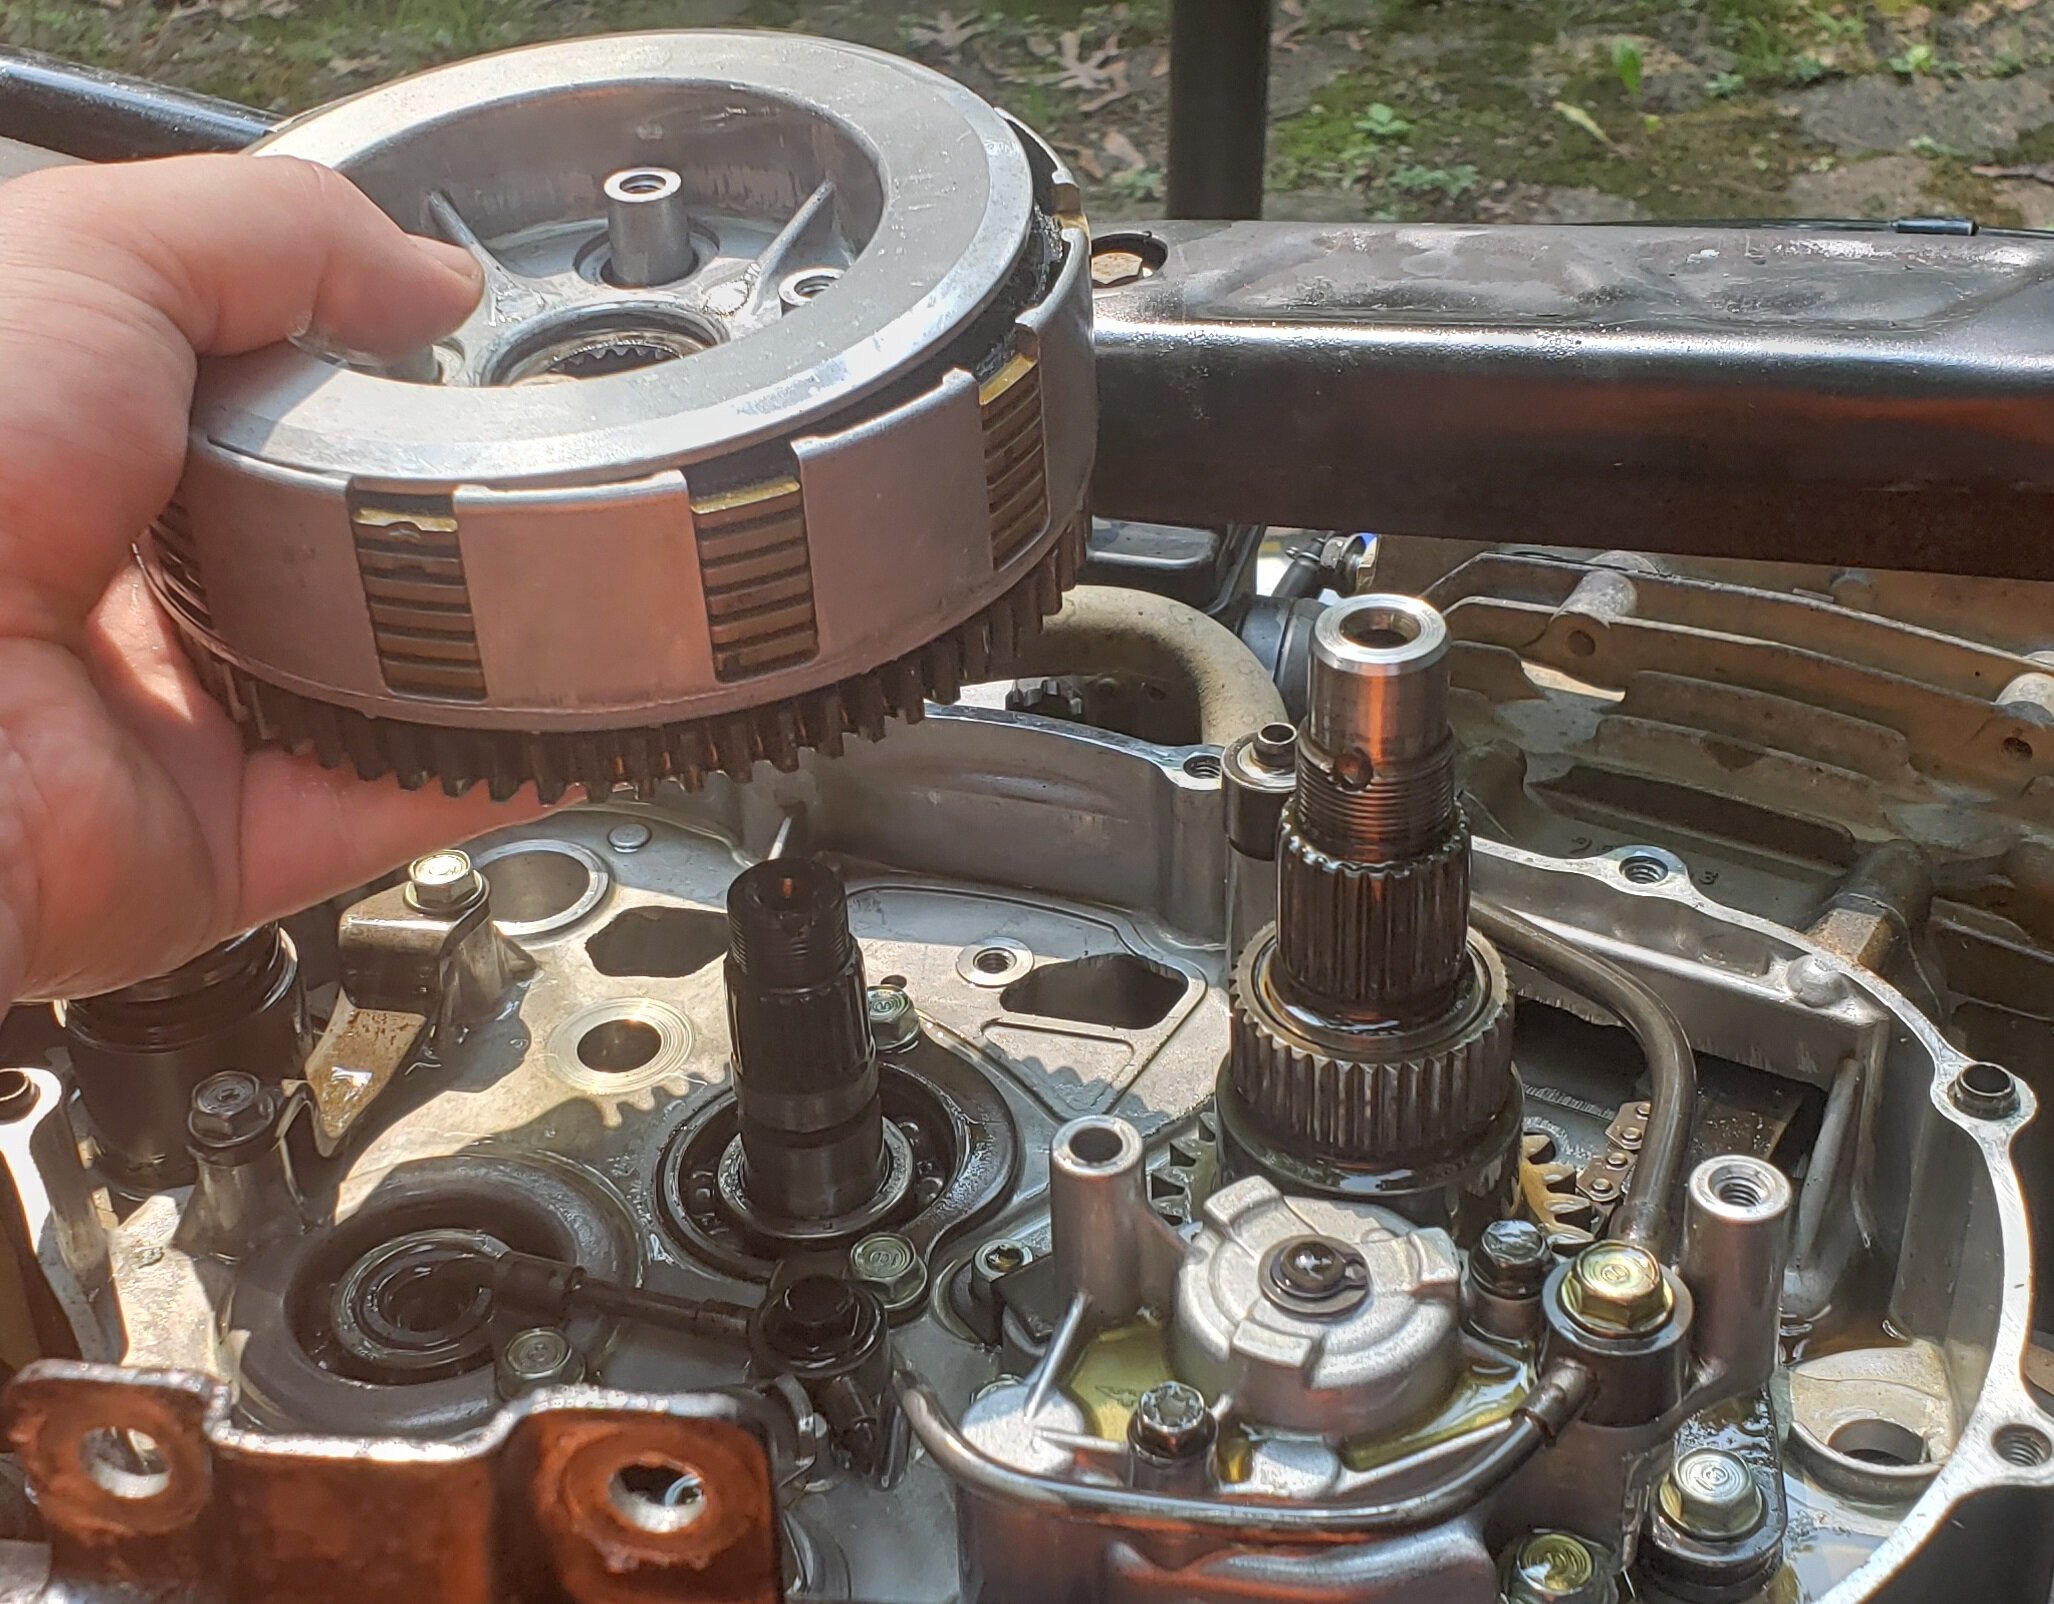
Remove the primary clutch nut (27mm bolt) with an impact. This is reverse thread, so right is loose, and left if tight.
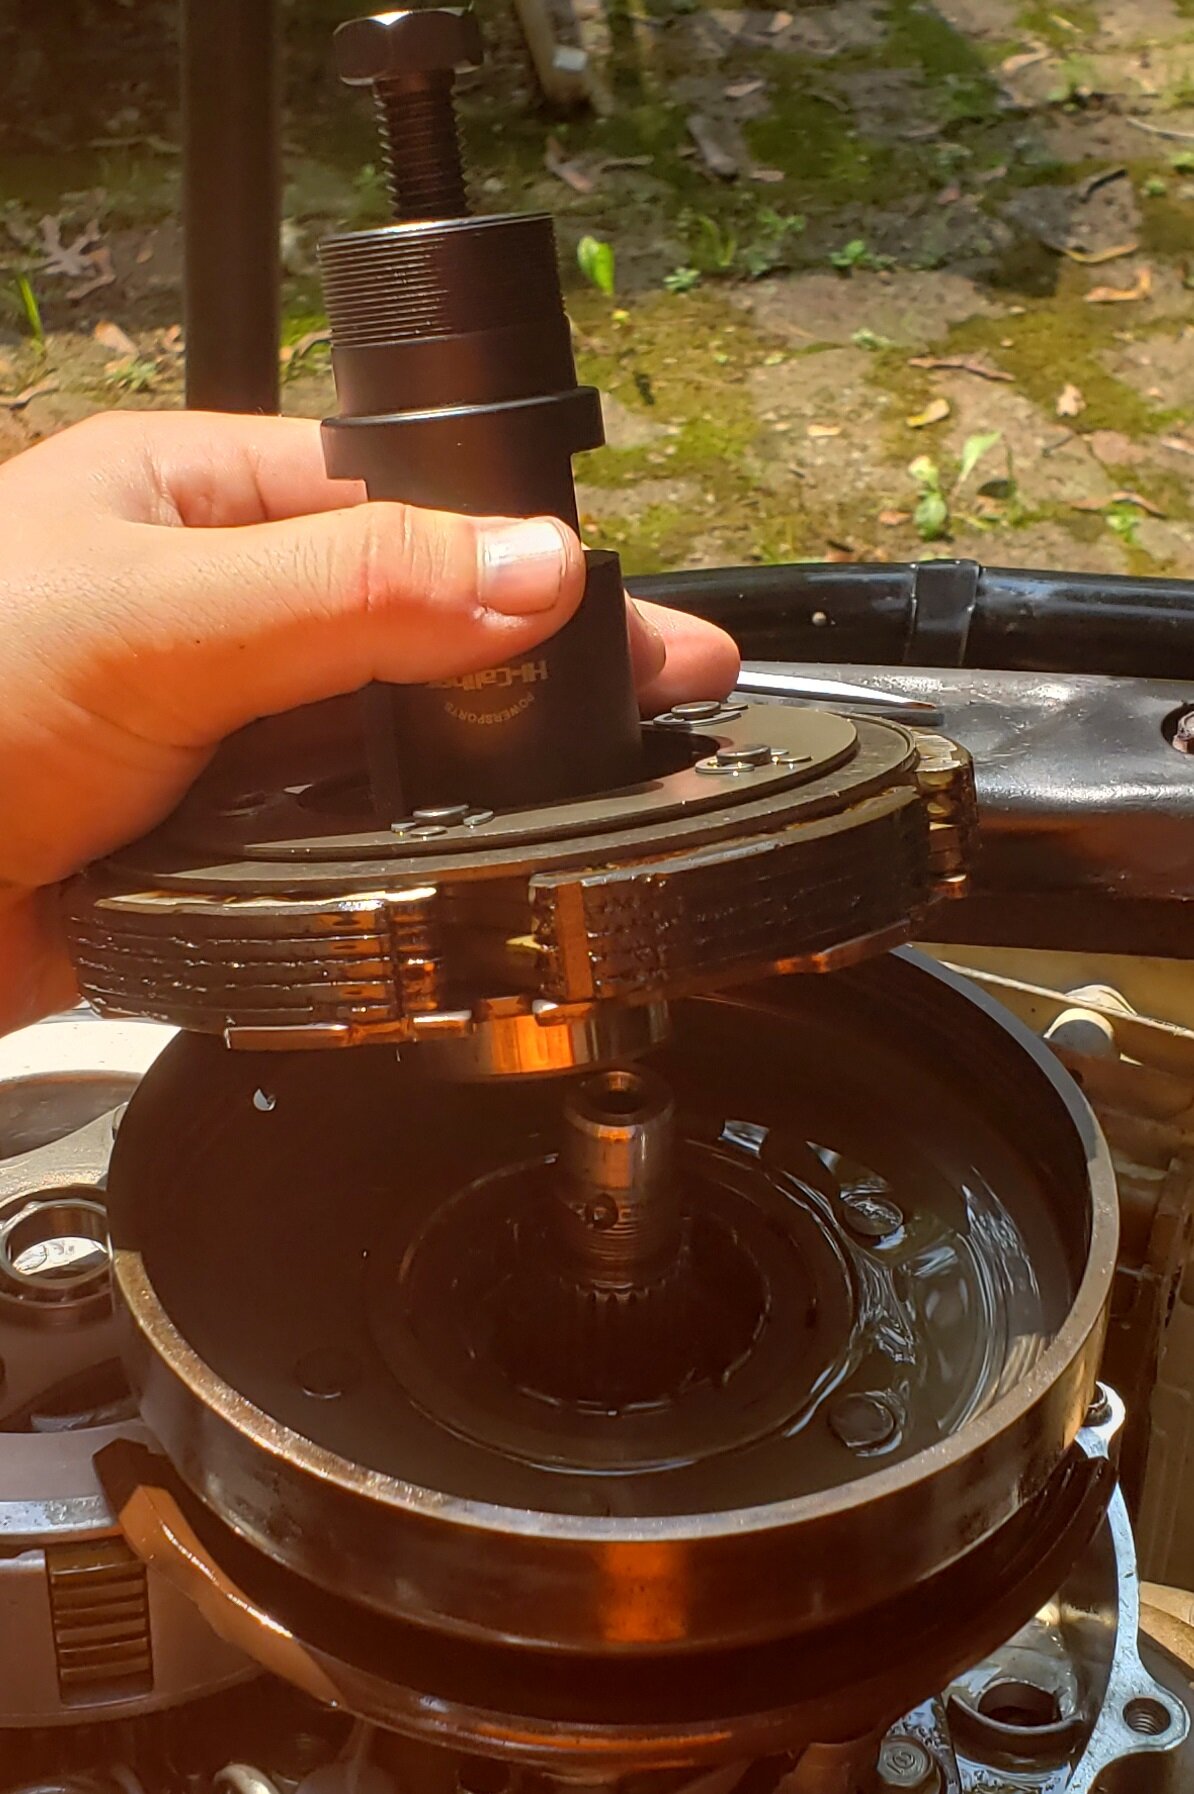
Once the nut and washer is off, use a clutch puller to pull the assembly out.
Remove the assembly cup.
Unbolt and remove the splash flap/guard (2 bolts)
Step 8 )
Loosen the 4 bolts (10mm) on the secondary clutch in a criss-cross pattern until you can remove the plate and springs.
Remove the nut (27mm, normal thread) and washer holding the clutch assembly on.
Pull the assembly out.
Step 9)
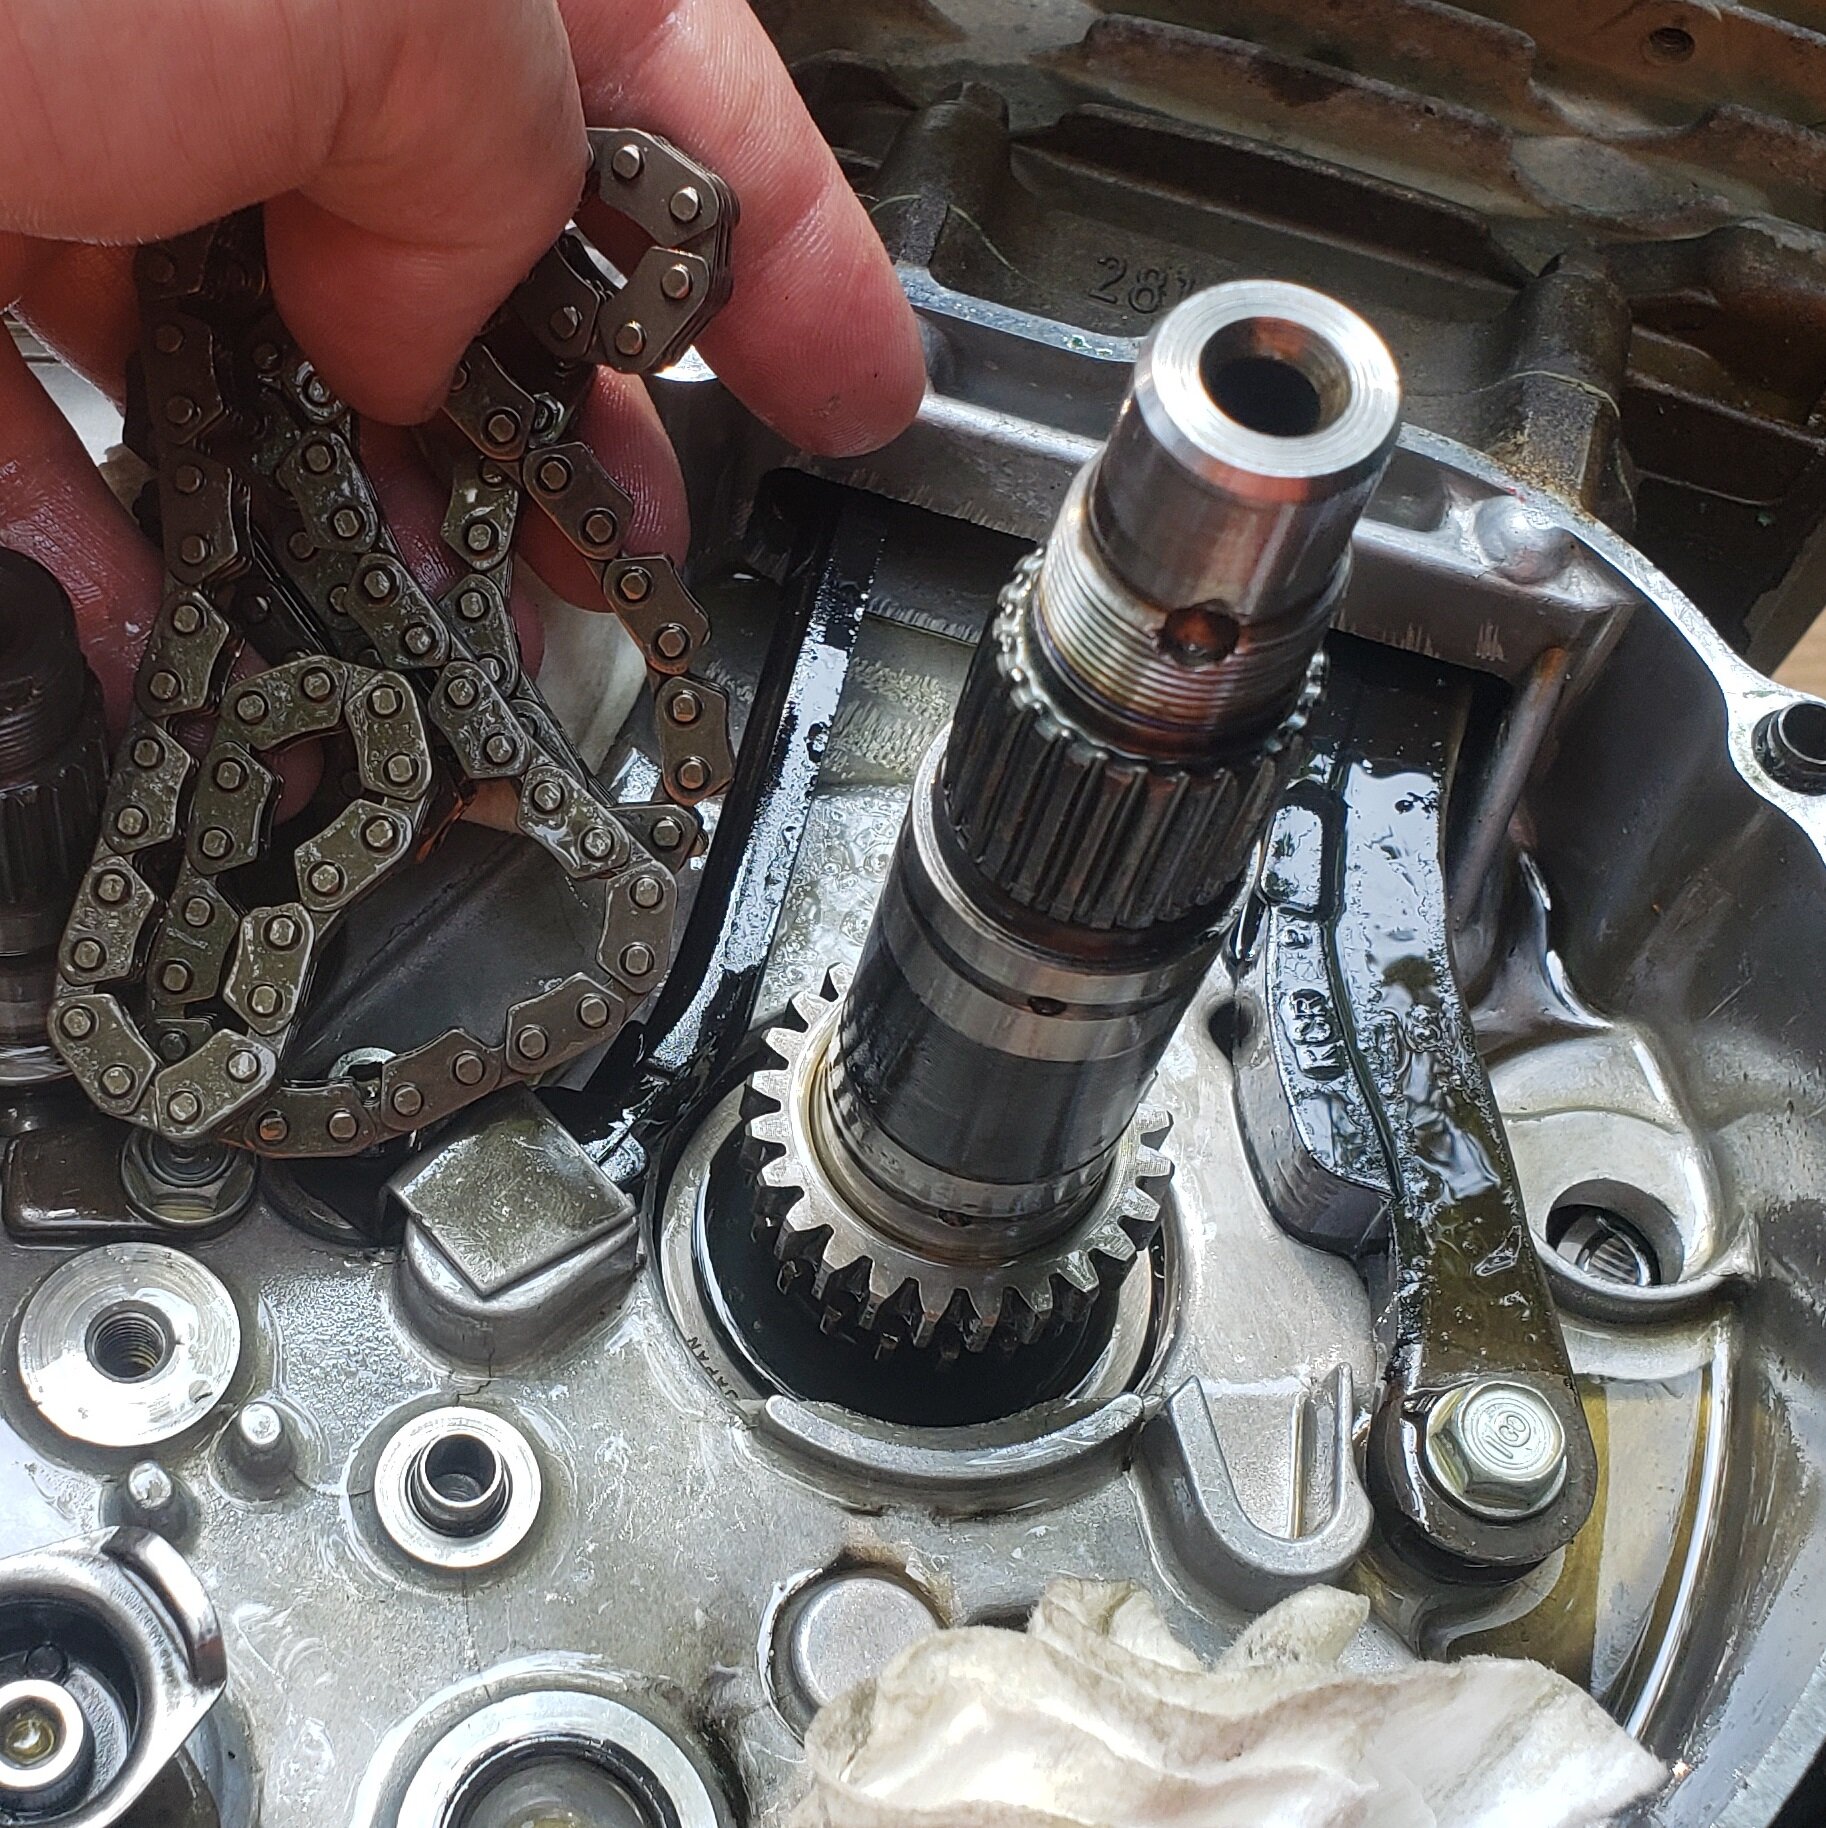
Unbolt and remove the internal oil line (10mm)
Unbolt and remove the oil pump (10mm)
Step 10)
Remove the gear adapter piece.
Untie chain, and fish it out.
_____________________________________________
And that's it!
You can now replace your chain with a new one.I really hope it helps someone else who needs to break their engine down to replace the timing chain.
Let me know if it helped!
This post took quite a while to write up, in addition get the pictures taken, organized, edited, and compressed for this thread.
So if you like it, how about hitting that like 🙂
_____________________________________________Here are some tips for reassembly:
- Make sure to tie the new chain up just like you did the old so when you flip the bike upright to re-install the cam and sprocket, the chain does not fall back into the engine.- double check the orientation of the reverse shifter and kick starter shaft before reinstalling the crank case cover.
- When installing the cam, make sure the piston is on the T mark on the inspection timing port, then install it with the cam lobes down (at the 7 and 4 o'clock position or so). This will automatically make the valves/piston be at top dead center compression stroke (TDCCS) for when you check the alignment & timing of the system.
- Ensure the 2 hash marks on the timing gear are in line with the top of the cylinder jug edge, and that the punch mark is at the 12 o'clock position. When the piston is at TDCCS, the T timing mark (timing inspection port) should be alighted, and at the same time, so should the 2 lines and the punch on the timing chain sprocket._____________________________________________
update:
So honored to have my post pinned!
Glad it helped 🙂
-
6
-
3
-
-
Just now, Fishfiles said:I would say , an oil cooler without a fan blowing over the fins is about as useful as nipples on a bull hog ----
Well, I agree and disagree.
It will help dissipate heat better than no oil cooler, but certainly not as effectively.
With no fan on them, its effectiveness curve would be all about the speed, your going (and airflow obv) just like on bikes.
As far as i know @Wheeler also does not run a fan, but it benefits his rig.-
1
-
-
1 minute ago, Fishfiles said:I was talking with a guy that knows the 300 mods well , asked about the 350D side cover as far as the oil lines go , he was telling me :
" I have a 350d case and was looking at it next to my 300. All the bolt holes don't line up. I read awhile back that , for it to work the bottom section needs to be modified where the screen slides in with some welding and grinding I also wouldn't mind the factory oil cooler lines that the 350 has. Have also read you have to use two gaskets to get proper clearance ,which is a good chance of a leak "
Ah thanks.
Ya he mentioned something about someone mounting a 350 crankcase to a 300 for oil cooler lines instead of doing the mod, and I asked for the source.
Guess it was word of mouth type thing.
Appreciate the forwarding.-
1
-
-
Just now, Fishfiles said:He sent a couple of PM for you to me by mistake
Ah.
Well if you can forward them on to me that'd be nice.
Least I know where they went 😛 -
4 hours ago, _Wilson_™ said:@Orvis25 sent you a PM.... mines not working good so let me know if you get it.
No pm in my inbox.
-
Just now, toodeep said:I didn't even get my 350 build 300 completely done and I was tired of replacing all the other parts of the machine. It did win a lot of mud races though. I'm glad those days are behind me on now it's the kids problem to spend all that money.
On topic: Nice job, simple but does the purpose. All I ever ran was a cooling fan but most of the time the motor was under water so it was "water cooled".
"water cooled" hehe 😛
Thanks though, glad you liked the write up. -
10 minutes ago, Mac102004 said:
not the 350 Rancher head, that wouldn’t work. The older 350 Foreman head and cylinder will swap as an assembly, you do need a reverse grind cam and will have to custom build an exhaust and top motor mount. It’s much the same as swapping over a 300EX head. The whole thing is quite involved and I think there are some new big bore kits on the market now that are probably a better option. Although you wouldn’t be getting that 4 valve head.Ah, ok good to know info.
Forman 350 head on trx300fw is not compatible without accommodating modifications. -
30 minutes ago, Fishfiles said:I can tell you from experience , the cooler does practically nothing without the fan blowing thru the coils , and that is with double stacked coolers and relocated to unobstructed flow of air on top the rack
I know this cause with the coolers relocated I can grab the upper hose with my hand while I am riding , untiI I hit the fan switch , there is very little cooling going on , then within seconds of turn the fan on , the hose gets cool
Iv never owned a bike or atv with cooler fans. Are they all "over sized" or do they also sell like side by side units to meet the length of the radiator?
-
16 minutes ago, jeepwm69 said:It's a 350 rancher cylinder installed in the 300 fin section, so when (not if, but when) you need to do a rebuild, you order an oversized 350 Rancher piston and have the cylinder bored oversized.
If you do any of the other big block kits you're looking at all custom stuff.
It's about $400 last time I checked. Once you buy it, you can get replacement 350 Rancher pistons, and when the cylinder gets too far gone to bore, you can put in a new 350 Rancher sleeve and start over again.
@Mac102004 at one time had stuff to put a 4 valve 350 Foreman top end on a 300 bottom end. Don't remember what all was involved but it was $$$$ and a lot of work.
So the OEM 350 rancher cylinder head a direct swap bolt on with a new piston for a 300 lower?
Might look into that when I have to do a piston replacement when mine starts to go.
I know to do some other "cheaper" bbk options you need like reverse ground cams and stuff (like 300ex BBK head swaps) . -
1 minute ago, Wheeler said:I’d just fab my own..
Ya, kind of figured, let me know if you do though, would like to see how you come up with it.


Trx300FW - Timing Chain Replacement Takedown Guide (Right Side Crankcase & Rocker Box)
in Engine - Drivetrain
Posted · Edited by Orvis25
Thanks!
Glad to hear it's helping people 🙂
Remember to check out that thread I made for how to recover the washer (I dropped mine too).
(https://atvhonda.com/topic/1528-trx300fw-kick-start-rear-washer-recovery-method-no-engine-splitting/)