
Orvis25
-
Content Count
133 -
Joined
-
Last visited
-
Days Won
1
Everything posted by Orvis25
-
Trx300fw - Homemade Differential Lock Nut removal Tool
Orvis25 replied to Orvis25's topic in Engine - Drivetrain
Heyyyyy, Good to see you again brother. Thanks 😛 -
cheers.
-
TRX300FW 1994 Front Diff component compatibility question.
Orvis25 replied to Orvis25's topic in Engine - Drivetrain
I have heard that running geese is higher maintenance and can cause issues (like premature wear) for "normal" users (like trail riding and normal utility use), that and it requires higher (and longer if you want to totally replace) maintenance, so I never considered it. Just on you gut, would you recommend using anti-slip additives right off the batt, or just put the washers in, use recommended oil, and run it "as is" (what I'm thinking)? Ps: never got clarification, did you run this washer mod? How did it work out for you if so? -
Updated OP with link to the tutorials if anyone cares.
-
TRX300FW 1994 Front Diff component compatibility question.
Orvis25 replied to Orvis25's topic in Engine - Drivetrain
"Same part different number: Appreciate it, That's what i figured, iv had this happen before. I just hate buying parts with different model numbers and trying to guess/hope it works as the other one that looks identical. -
appreciate it man 🙂
-
hehe, hey got to start somewhere. That trx200sx video is over like 11 years old now i think. I feel so "immature" in it, and looking back, could have explained it so much more concisely with better the better knowledge i have now. Oh well... We all start somewhere.
-
Always willing to help when i can. I know my stuff is generally not super professionally done, nor well put together or well shot, but i hope it helps in some capacity 😛
-
Alright ya'll. Just spent the last 2 hours transferring all my old tutorials, home made, and how-to's to this websites forums! Go check'em out if ya like, no major changes, Just wanted to make sure they got on here since I will be using this forum site now that the old one is kind of dead and all the "knowledgeable" people are now here.
-
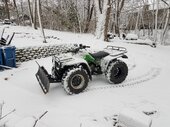
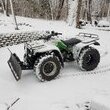
Repost of my old forum post from old website ___________________________ Hey guys I thought i should just share a video on how I made my own custom winch mount for my 86 TRX200sx as none (that i can find with hours of Google search) made a bracket for this ATV. The other video is of my TRX200SX plowing some snow using my modified plow, and my homemade winch mount. Note: The plow mount came with the ATV and is un-labeled, so I have no info on manufacture or origin. Please keep in mind I am not at all really into vehicle mechanic's and what not (Or tools) so this DIY project that i am trying to explain was like 95% trial and error with no help from my father aside from the welding. It took me 9 brackets to get one that worked. If anyone wants info on this project that is not said in the video let me know and I will try to get it for you as i never really drew this design out, i do not have a lot of specific information. Most of these parts I used were just scrap I was able to get for free, and bolts and stuff my father had in his mess of a basement (he is a pack rat). My Mount: Plowing:
-
Trx300fw - Homemade Differential Lock Nut removal Tool
Orvis25 posted a topic in Engine - Drivetrain
Repost of my old forum thread on prior website ______________________________________ Hey Guys! So as promised to @shadetree, I made a tutorial (as there is not one on this forum, or on the internet that I can find) in appreciation of him helping me figure out how to make this tool (much simpler then the plans i was making to remove it). So here we go! Quick video showing / Explaining how it works: Parts: 1) 1 1/2 x 1 1/2 in square metal tube 2) Metal file 3) Pipe Wrench Optional (only if need): 1) large Flat piece of metal 2) drill How to make it! Step 1) Take your metal tube and file around the tube gently so it is much smother (can also use sandpaper afterward if you want even smother) Step 2) Insert into the 60mm lock nut (P/N: 90244-HA0-000) and turn Counterclockwise Step 3)Remove the lock nut from differential housing, and pull out the pinion and bearing Step 3) This is the most important... Send me some money for beer!!! AND THERE YA GO! YOUR DONE! To install it, just literally do this in reverse! For the optional tool, all I can say is to do this: Step 1) Take a piece of cardboard. Place some grease on the tips of the 4 bolts sticking out of the differential, and press the cardboard to them to stain it were the bolts are. Step 2) Place the cardboard over the flat piece of metal, and drill out the 4 bolt holed through the cardboard. Step 3) Cut a 2" hole in the center of the 4 bolts on the flat metal Step 4) take a piece of scarp metal and weld it to the bottom of the flat metal so it can be placed in a vice And your done! If this helped please thumb up my video and say thanks! Happy Repairing guys! Edit: A tip on taking the pinion nut off: * this tip should allow to skip buying the pinion holder tool 07924-HA00001* Here is what i did. I took a vice (with rubber grips, but just put something like a few rubber bands in there so it wont get scratched up, and sticks better), and with the side panel off the differential (exposing the ring gear) i put part of the tube that comes out of the ring gear (were rear axle goes through) in the vice and clamped it down. That way the pinion wont rotate because the ring gearl is holding it stationary (if one turns, the other turn's). Now you can take that pinion bolt off freely without the need of that $120 tool ! -
Update 2 Also, as promised, here is a photo of my retrofit 18w led floodlight headlights at late dusk. Much better than stock.
-
Update. So the cheap led bulbs i bought to replace indicator and rear light fit and work. Camera struggled with glare. IRL, The led is about 2.5x brighter than stock at about 1/2 the wattage of a stock bulb.
-
Repost of my old thread on the old website ________________________________________________ Here is a quick video I did on the headlight installation using the china 18w lights I bought. I do not have the ATV assembled yet to the point where I can do night time footage, but they do seem at least 25% brighter minimum. Enjoy!
-
Repost from my old thread on old site. _________________________________________ I had some issues installing mine, with messed up instructions and misslabled parts, so I decided to make a tutorial once i figured it out. For referance, superATV themselves admitted that the packaging and instructions are sub-par in my old thread, You can find it here if you want: https://www.hondaatvforums.net/threads/my-experience-with-superatv-not-good.124540/#post-1238550 Hope it helps someone !
-
Repost from my old thread on old site. _________________________________________ Hey guys, So in preparation of taking my ATV off-road camping (still trying to find some good trails) I wanted to mount some water and fuel cans to my ATV. I know that those Rotopax and other products exist, but my issue was that they are very expensive and take up storage rack space (if you don't buy the additional extra mounting options things). So i came up with something SIGNIFICANTLY cheaper, so here it is! Parts: total at end in "($XX)" - 2x "HFS R Gas Can Holder" ($58) - 1x Scepter 5 Gallon ECO Jerry Can ($35) - 1x Scepter 5 Gallon Water Container ($8) - 2x Mini-Carabiner clips (free) - 1x Spare sticky foam (free) - 2x Handle Velcro anti jiggle straps (hand sewn, Free) - 4x 1/4" x 3/4" U bolt (top bar, $3.50) - 4x 1/4" x 1 1/8" U bolt (Bottom Bar, $3.50) -total $107 after tax & shipping What I did: - The gas can holders requires modification. I had to cut off the bottom riser bracket, and then cut the unit in half, and weld on an extra 1/4-1/2" (eyeballed it) extension (made from the bracket steel i cut off) to make it wider for the gas cans (the Specter ones have a slightly wider bottom than official military Jerry cans). - Drill new 1/4" holes on the Jerry can holders so that i can mount them on the rear storage wrack, using the top and bottom bar of the rear rack. - Mount the gas cans to the rack using the U bolts and used blue thread locker on the nuts + crush washers. - Power wash the thing (remove overflow thread locker) and then painted over it. Why I did it this way: - it was SIGNIFICANTLY CHEAPER than buying the roropax option for a of-rack mounting option with cans ($107 VS. $350+) - Universal and uses hardware store parts. - I can also mount lighter 2.5 Gal cans in there also. - Wanted all my rear/front storage rack space - Does not block my rear light, or impede with opening the rear storage case. _________________________________________ Hope it helps or gives others ideas! 🙂 _________________________________________ Acknowledgements from old thread: 1) yes this affects center of gravity, however, not enough to warrant concern under "normal" trail riding situations. Unless your going at extreme inclines, stability does not seem to be affected in that major of a way. Drive smart. 2) The rear rack is rated for 133LB of weight. Yes, it is off-center i suppose, but given people put 250lb of human weight on those when popping wheelers, or mudding/snorkeling to keep the nose up, i do noy see a major failure issue.
-
TRX300FW 1994 Front Diff component compatibility question.
Orvis25 replied to Orvis25's topic in Engine - Drivetrain
The YT video is actually the reference I had for wanting to do this mod. ps: Is @Fishfiles actually "The honda outlay" on ? youtube, or just coincidence you posted both as a reply? -
yes you used to post on some of my "low cost" mods and tutorials for my ATV. I am working on transferring them now to the new site.
-
TRX300FW 1994 Front Diff component compatibility question.
Orvis25 replied to Orvis25's topic in Engine - Drivetrain
Thanks, Yes I didn't want to "lock" the front diff, just get into engage 4x4 more often. Sometimes it only does 3x4 even when its stuck or under a traction situation. I'd lock it, but I cant get ahold of a 424 kit, mor would I want to dump that much cash in ($400 424 kit + $500 torq front diff locker) $17 in cone washers hopefully will "help" a bit. -
TRX300FW 1994 Front Diff component compatibility question.
Orvis25 replied to Orvis25's topic in Engine - Drivetrain
That's what I thought myself, but wanted at least one other person to confirm it's either yes, or "most likely". Ordered me 2 oem new 88 year ones from Ebay for $17 shipped. Cheers. Ps @Fishfiles : if you can provide clarification on the front diff comparability of different years for archiving sake, that'd be cool. Edit: also @Fishfiles if I do the washer mod, am I clear to use regular manual "reccomended" gearbox oil, or do I need to mix in additional anti-slip additives? (There is some debate on this) -
Quick question that i cant seem to get an awnser on. Do the front difs from the trx300 line have interchangeable parts all the way through 88-2000, or are there specific years that only work with others? I am trying to do a simple diff mod to "tighten" the engagement of the front diff (so it slips less and diverts power properly more often) by installing an extra "DIFFERENTIAL CLUTCH CONED" washer to each side. I found a good deal on the part number 42535-HA7-671 version, but partzilla says it only works in the 88 year trx300fw front diff. Can I buy them and still use them in the 1994 model, even though the part number for it (for that year) is actually 42535-HC5-000? I know sometimes honda changes the parts numbers even though they are identical parts. Thanks.
-
Hey yall! Orvis25 is back from the dead! after 5 years of not logging in to hondaATVforums, I found the community dead (in terms of the experienced people) and was re-directed here by JeepMW69 (thanks btw). Look forward to helping ya'll like I used to when i can, and getting help too. I might be transferring my old tutorial posts to this site, just to help draw more attention to this forum site, which is community run (instead of cooperate). So, look forward to that possibly if you care. Anyway, Good to be back! *salute* _____________ Update: Spent over 2 hours transferring all my older tutorials to this site. Check em out if you care! Hope they are as useful as they where on the old site. Update 2: Added an additional TWO, never seen before on the forums tutorials & how-to videos. Homemade TRX200SX Winch Mount: Trx300FW - LED Headlight upgrade Tutorial: Trx300fw - Homemade Differential Lock Nut removal Tool: How To Install SuperATV Front Disk Brake Conversion Kit (1994 TRX300FW): TRX300FW Fourtrax - Cheap Jerry Can Holder build: Trx300FW - How I Installed Tusk Digital ATV Heated Grips & Thumb Warmer: How I Installed the Cheap StreetRays 2" lift kit - TRX300FW:
