

Misterclean
-
Content Count
380 -
Joined
-
Last visited
Posts posted by Misterclean
-
-
4 hours ago, toodeep said:Good advice but I thought you made a maintainer harness to maintain known good batteries. To use it to revive a battery all the other batteries would be unhooked from the system. That was my understanding anyway.
You are correct but at my shop ( my profession) I had a battery that that went down and my charger at my shop is a smart charger and it will not charge a dead battery because it thinks its a bad battery. Wanting to bring it back with a non smart charger I considered my battery tender set up and then I caught the error about to happen.
-
 1
1
-
-
I just thought of a weak point in the design of my custom battery charger harness. It hit me when considering putting a slow charge on a dead lawn and garden battery. I realized before hooking it up that I would burn wires in the harness.........why you ask? The wiring harness will act as a jumper cable too..........you have all the amps of all the batteries sitting there in a huge reservoir that will dump down the harness to the dead battery. That 16 gauge wire and "roach clip" sized clips will fry. So, please add batteries that are already charged to the point where the the gauge of your wire can handle what charge may be introduced to the system. Was this clear?
-
2
-
-
That is a classic too. Points just ground the ignition coil for a moment which generates a spark at an exact time. Just sand the points so they make contact squarely with each other. Check with an ohm meter for perfect continuity and it should spark. If not the ignition coil may be bad. Also determine whether it is a magneto ignition or battery ignition. Magneto ignitionakes it's own power from a stator and the battery ignition gets its power from the battery.
-
I just got caught up on this thread. It read like a mystery novel with a happy ending!
-
 1
1
-
-
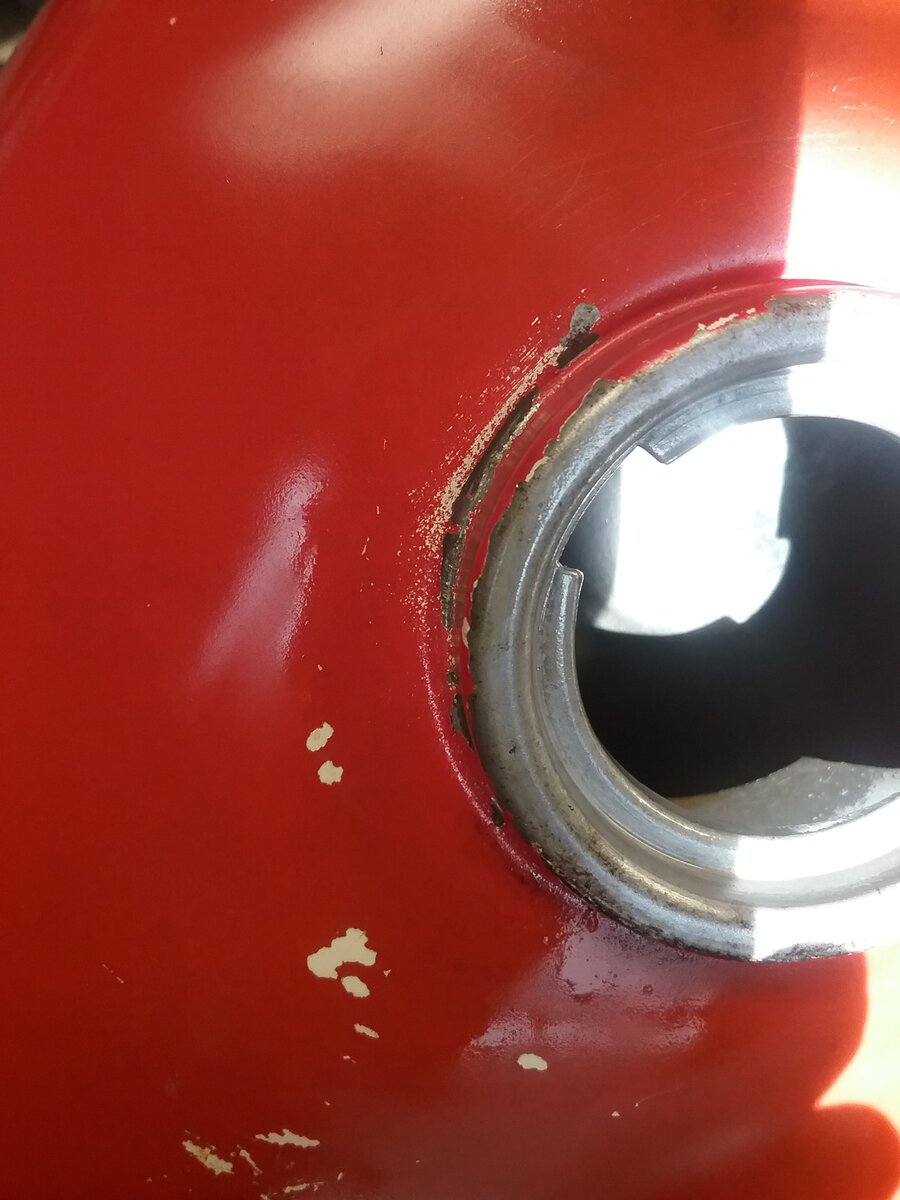
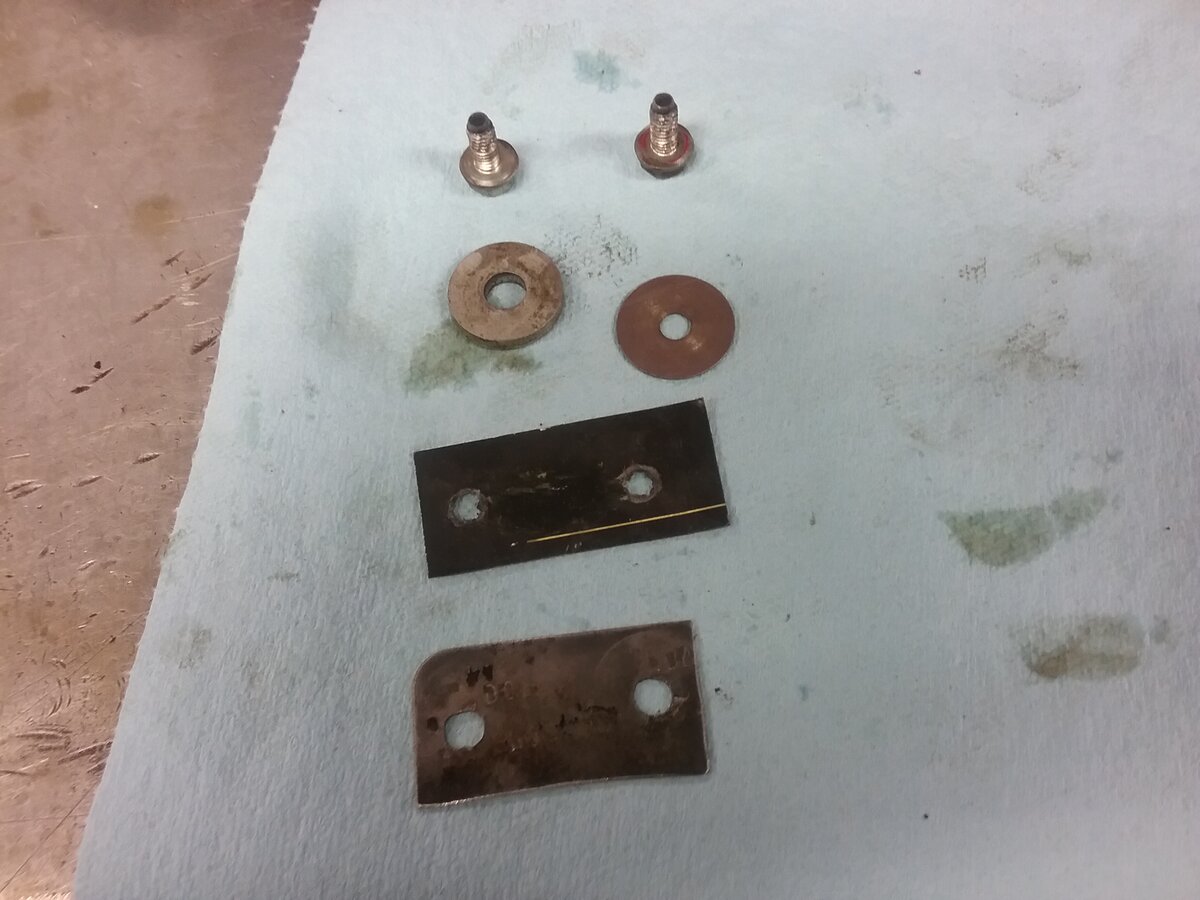
I will try to post two pics. Last time only one posted. One pic is of the cap I made so the Muriatic acid wouldn't drain from the tank and the other is proof of a very clean tank. The cap is some sheet metal drilled for the mounting holes, a business card cut up as a gasket and two mounting screws with big washers to spread out the clamping surface pressure to prevent a leak. It worked as planned. Soaked for about 30 minutes, rinsed with water and a final application of PB Blaster to arrest any rust. I'm ordering the intake boot to the air box if its available and a 22.5 pilot jet because the 25 will not tune with the air screw enough to be crisp........I hate a poorly tuned two stroke.lol


-
2
-
-
Those 350 fours sounded great.
-
I got it running after cleaning the carb. Tested the transmission and clutch.....good. It needs a lot of love though. The wiring is super hacked, the intake boot is so stiff it's unusable. The seat pan is rusted pretty bad, the seat foam and cover are brittle and the fuel tank is rusted. I cleaned the petcock and got it functioning. Going to soak the tank in Muriatic acid tomorrow. After that I will order the tank liner from O Reilly. If all that works out then we will strip it down and restore.
-
Yeh Fish, I remember those fenders that stuck straight out. This particular model is one of the better looking models in my opinion.
-
1
-
-
Welcome Patrick!
-
That's right.......a new to me, 1972 TS 185. A friend gave this to me a few days ago for repairing his lawn mower. I've had my eyes on it for several years now and he knew I was interested. So this is going to be winter project. I'm so very slow this time of the year that it is with joy I accepted this gift. It has less than 3100 miles, good compression, every thing looks stock with almost everything unmolested. If it checks out good them me and my oldest son in law will do a ground up restoration. I've never done a complete restoration so this will be interesting. My son in law got excited up on seeing it because it is so cool and a good bike for my oldest daughter.......his wife. He offered to help so we're doing it!
-
3
-
-
How are you cooling the engine? I heard that 440cc has a serious overheating challenge.
-
Most of the accidents while riding dirtbikes always seemed to happen within the first 15 to 30 minutes. I theorize that your mind had to get right which takes a while . We usually rode hard and fast. 80 percent to 100 percent so it takes an adjustment period to get things prioritized in your brain.One friend had a very bad habit of riding a full 100 percent during the first few minutes. I witnessed him crash hard and get hurt just by not thinking first. On three occasions (twice in 3 minutes) he crashed when the trail had a huge wash out going across it too wide to jump. The wash outs weren't there the time before but here now. Each time we were riding next to a creek where the natural run off from a hard rain cut across the trail. I'm not talking about a small wash out. Two were about four or five feet deep and 6 feet across. One was about four feet deep and fifteen or twenty feet across. I'm not sure if better judgement developed after thirty minutes or the forward thinking kicked in.........I just know if we made it 30 minutes usually nothing bad happened. It was the same for many different groups many different times. Riding the river at high speeds a friends called it "getting your river legs" because the skills were unique to river riding. We could skim the water on dirt bikes if the speed was a minimum of 30 MPH. The longer and the deeper the crossing the faster the speed required. We were doing this back in the late eighties or early nineties before videos of this appeared. We even made a video of spray patterns from the bikes on the water so we could start experimenting with skis below the fork tubes and swing arm and perhaps a plates under the engine. My friend quit his job at the machine shop and the development never got started......neither of us wanted to spend the money buying equipment to fabricate aluminum. Now there are videos of the same thing. We were about 25 years ahead of our time! LOL
-
2
-
-
19 minutes ago, jeepwm69 said:And on the end of the orange wire you put a quick connect to hook to the tender?
Yes, or clips of any size. I made five drops. .......Two have the quick connects, two have small alligator clips and one has a medium clip for the automotive battery. You could put quick disconnects on every drop and install quick disconnect on every battery that is clipped......just solder the quick connect pig tail to the clips. This would be best but more expensive. I got impatient one afternoon and just threw it all together from what was easily available.
-
1
-
-
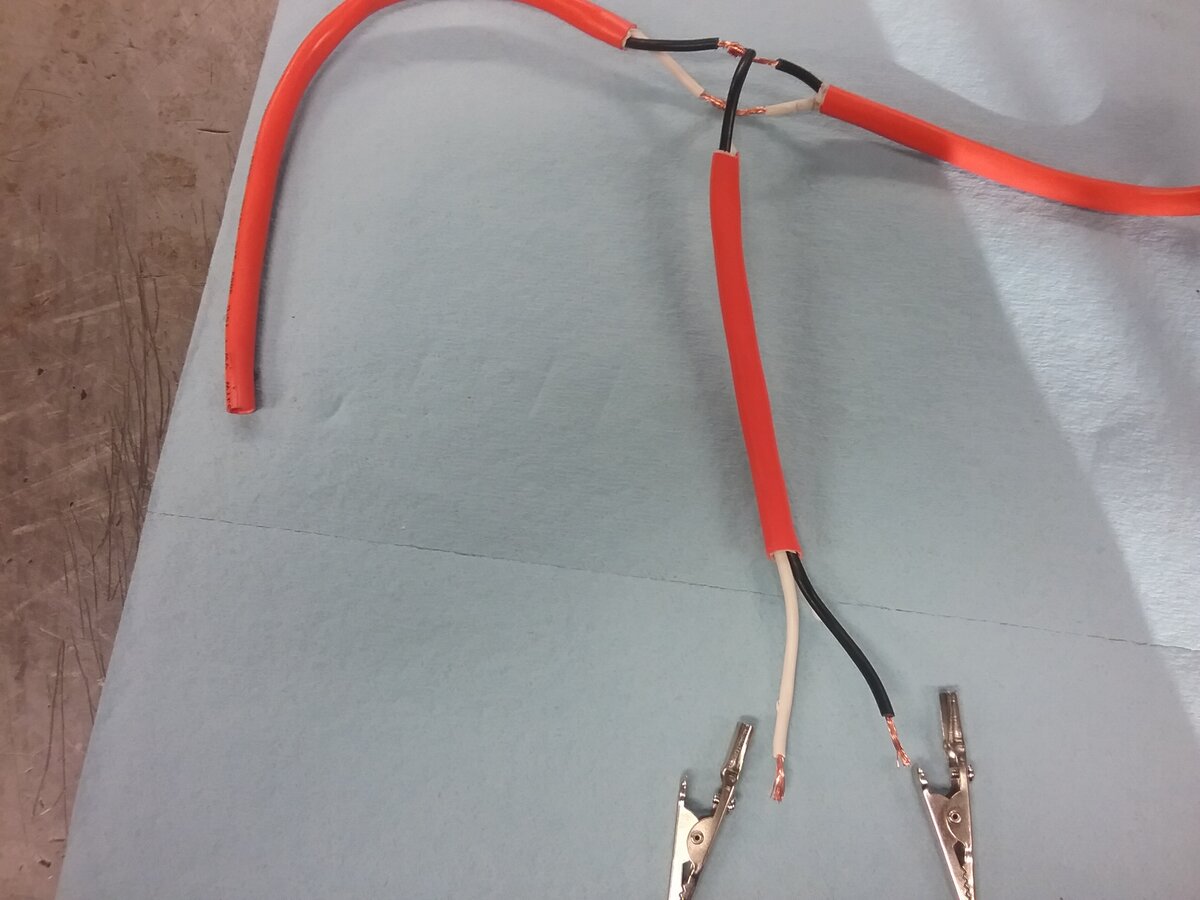
I hope the log in problem repaired. Let me try to download the pics. Ok good. Looks like two were successfully downloaded. These are just some models that I made quickly just to demonstrate the idea. One shows the drop tied in as a tee. This requires a little patience because the insulation needs to be stripped without cutting the wire. I recommend this version because I actually did the version in the other pic and regret it. It is ugly but quicker to do.
-
1
-
-
I took some pics in my barn of the harness and then took some pics of some models that I built for clarity but my phone wouldn't let me log in. My password was incorrect and now I'm locked out for 14 minutes. I'm not sure what the problem is but my laptop is fine. Anyway.......let me explain what I did in case my phone doesn't allow me access to the forum. My plan was to splice into an uncut run of wire that ran the length of the harness to each machine/battery and strip the insulation away from an uncut wire leaving about one inch of bare wire so i could solder my drops at a ninety degree tee down to each machine/battery. That seemed too time consuming so I ended up cutting the wire and splicing my drops that way. The was an ugly choice because instead of a clean ninety degree drop I ended up with three wires soldered and taped parallel to each other. This junction requires two of the three wires to loop down and away from their bundled connection. One looped down to the battery and the other makes an even harder loop 180 degrees back the other way to the next drop. I used heat shrink where I could and taped the junctions heavily because I didn't want the weight of the drops to break after years of hanging from the rafters.
-
1 hour ago, toodeep said:I can about imagine what he did and there would have been a couple ways to do it depending on the layout of parking spaces. Either run the cord over to a junction and drop the 5 leads down or run the cord the length and have 5 different junctions tapped into it at various locations dropping down. Each battery could be individually charged if just one was plugged in or the group would be maintained with them all fully charged and plugged in.
Only question is, what color of extension cord.. lol
Orange. LOL Two black leads with the quick disconnect type because they were assemblies. Again....ugly.
-
Plus my phone doesn't post easily for me. I always log in from my laptop from work. Using my phone usually takes me much longer than I like. LOL
-
Jeep, my pride won't allow me to post pictures of my mess.......let me think about this a little.......maybe, maybe not LOL
-
1
-
-
Sam, as you may remember.....me and the wife love Colorado. We try to ride off road there every year or two if possible. I rode there twice in two weeks two years ago! We also ride Mena Arkansas and Red river motorcycle park in Bulcher Texas. I've been to Cloud Croft New Mexico a few times to ride off road there.....first time was the infamous 911......wow, that was an experience. I love to hike and explore but my knees are shot, We hiked the Grand Canyon down to "Plateau Point" and back up in about five hours back in 1984......thirteen miles! I want to drive around and do something similar to what riverc did but that's in my future. My dream vacation would to load the wheelers and my YZ 250 in a small "Toy Box" trailer and travel without any hurry or specific agenda. Perhaps take several years doing it too! By the way Sam.......are you and the wife and Baby X still planning on a trip to the States when " the money's right?" If so just let us know. I'm sure several us us can help/accommodate.
-
1
-
-
As some of you may remember a few weeks ago I asked about hardware availability for a custom harness. Well I built it yesterday and installed it yesterday evening. Specifically, I needed to put a battery maintainer on five batteries and didn't want to spend a small fortune on four more Battery tenders. Because my Battery tender usually shows the green light (which indicates a full charge) ,I reasoned that it could maintain several more at the same time.......it does. I hooked it up to two TRX 420's, my riding mower, my Yamaha scooter and a spare automotive battery for my wife's horse trailer. This morning the green light was on indicating a full charge! Whoo Hoo!,. I bought a 50 foot extension cord for $15 at my local True value hardware store.and soldered it together. First I installed a 120 receptical in the rafters so my tender would be out of the way. Then strung out about 16 feet of extension cord and attached it to the rafters too. Then dropped five cords down on top of each machine where they are normally parked. Each drop has it's own special end to accommodate each battery's needs. The four wheelers have permanent pig tails attached to their batteries so their drop had the opposite quick connect to make it easy to unplug. The scooter and rider have small alligator clips for their terminals and the spare automotive battery has a set of larger clips. The harness looks like a cheap Redneck did the work but functions well enough for me. It cost approx. $30 and several hours of my time.
-
2
-
-
Hey Jeep. I Googled "wiring diagram for honda es3500 " and found what you need. It was in the thumbnails
-
Welcome bro!
-
1
-
-
Welcome Kevnic! You will find many kind, funny, entertaining and knowledgeable friends here. LOL I had to Google how to spell knowledgeable.
-
I'm very happy for this site. A huge thank you to those who put in many hours of careful thought and work. This is truly a "Happy Thanksgiving" for me.
-
3
-


1972 Suzuki TS 185
in Motorcycles
Posted
Some don't realize that points also set the timing........too close is too advanced...........too wide too retarded. LOL Sounds like some of us huh?