Reebs 27 Posted September 2, 2020 Hello- I had posted this issue in 2016 on another forum site that I believe several of you were on before this site so I decided to post it here. I could use some advice again. The “cap” that is part of the Shaft RR. Propeller came loose after I bought my Rancher years ago. It was suggested back in 2016 when I originally posted this is not the first time some of you had heard of this cap coming loose on some models and to try some silicone or JB Weld. I used a product called Dap Auto & Marine silicone. It does the trick but only lasts about 6 months or so before it starts to break down, and then I have to clean it all off and apply again so I wanted to try and get a longer-term fix. In looking at this more closely I realized I may have been putting the epoxy in the wrong spot. The key question I have is the “cap” intended to sit in a FIXED position on what I believe is the “Case Sub Assy RR Final Gear” (according to the part diagram) or is it intended to spin with the Shaft propeller? I am attaching pics for reference. Pic 1 shows how freely the cap in question just slides off when there is nothing holding it in place (defective shortly after I bought it new). When it starts to come loose I always remove the old glue/epoxy and clean it up real good) and apply again. Pic 2 shows where I have been applying the epoxy right at the neck where the cap slides as far forward as it can (in its correct spot). Applying the epoxy here does a decent job, but in this scenario the cap is “fixed” to the propeller shaft and therefore the cap spins with it when the quad rolls. I always thought that is how it is supposed to be. Then last night looking more closely I realized when I pull the cap snugly into its correct position (kneeling from behind the Quad), the cap, letter “A” in pic 3 stays in place “fixed” on letter B, and doesn’t spin when the quad rolls (keep in mind the cap doesn't stay in place but a few feet before it comes loose which is why I need to fix it). Is the cap supposed to stay fixed and not spin? If so, I need to either 1) try a better epoxy than Dap Auto Marine silicone And/or put the glue on the perimeter of the Case Sub Assy (letter B) and slide the cap onto the glue and into position. Or, I was thinking do I try some high strength tape and just tape “A” to “B” (in pic 3) around the entire circumference and know I will need to replace it fairly often given it is going to get muddy and wet all the time, but maybe that is the path of least resistance? Wonder what this group of forum members would do if this was their quad? Please let me hear some advice and let me know how that cap is supposed to sit (fixed or spins). Thanks! Share this post Link to post Share on other sites
oh400ex 629 Posted September 2, 2020 (edited) Welcome! If I'm wrong about this someone will call me out ASAP but I'm pretty sure it is supposed to be fixed to the shaft. Edit: Fixed to the shaft would be spinning. I'm sorry for the confusion. My understanding is that it is basically a dust cover for the bearing inside. JB Weld is a different beast from what you are using and would absolutely hold in this context. Prep (with most things) is the most important part. Shine that up with rough sandpaper first and give something for the JB to bond with. Do not use quick. Original JB only. Push the JB very hard into the surface to give it a "skim coat" and encourage bond. Make sure you mark or remember the OEM position before sanding as you will lose your wear mark. Also leave enough gap for no rubbing to occur. Edited September 2, 2020 by oh400ex Share this post Link to post Share on other sites
Wheeler 2,530 Posted September 2, 2020 Hi. Welcome to the site.. I'm not familiar with the 420 but from your picture & what I see, there I'm confused as to why that backing plate I'll call it isn't attached to the driveshaft, & looks like it is there to keep dirt off the seal... Personally, I'd cut er off & call it a day.. It serves no real to me purpose... 2 Share this post Link to post Share on other sites
_Wilson_™ 6,603 Posted September 2, 2020 yeah that's what it is, wheeler ... just a shield for the rear end pinion seal... doesn't really do much of anything ...sence most of them come loose anyways .... seen alot guys cut them off... 1 Share this post Link to post Share on other sites
Reebs 27 Posted September 2, 2020 Thanks for the replies. You guys know a lot more than I do, but if cutting it off is an option, I'd consider it to not have to deal with it. However, for a novice like me I would think it is meant to keep sand and water out of the slight opening that would be revealed with it gone (from my first pic) where the shaft inserts to the rear diff...which I would think is bad? 1 Share this post Link to post Share on other sites
oh400ex 629 Posted September 2, 2020 If the other stuff lasted 6 months JB will last 6 years. Just pull the trigger on cleaning and applying JB and get back to it lol 2 Share this post Link to post Share on other sites
Reebs 27 Posted September 2, 2020 OK- appreciate the help. Thanks! 1 Share this post Link to post Share on other sites
_Wilson_™ 6,603 Posted September 2, 2020 (edited) personaly would like to know why.... they were not better attached ... @shadetree is who i would ask... Edited September 2, 2020 by _Wilson_™ 1 Share this post Link to post Share on other sites
Reebs 27 Posted September 2, 2020 Makes two of us! I am heading to my local dealer to ask. I want their take on why this happens, but I also want to see if they can definitively tell me if the cap is supposed to be fixed to the shaft and spin or to the rest on the rear diff and remain fixed (not spin). They don't have any Ranchers on hand in inventory where I could just go see it for myself, but I trust Service will know. I figure if I am going to try and JB Weld it, I mind as well glue it down in the right spot. I can report back what I learn. Share this post Link to post Share on other sites
Wheeler 2,530 Posted September 2, 2020 I really would save your self the time & headache & cut er off... You won't be hurting anything... It's like a heat shield on a exhaust... But that's just my 2cents 3 Share this post Link to post Share on other sites
_Wilson_™ 6,603 Posted September 2, 2020 yep... it's suppose to be fixed (rotate) with the drive shaft. 2 Share this post Link to post Share on other sites
shadetree 6,036 Posted September 2, 2020 it's a splash shield, its suppose to spin with the drive shaft, keeps crap out of the pinion gear area. 3 Share this post Link to post Share on other sites
Reebs 27 Posted September 3, 2020 Dealer/service dept said he had seen this before, but not often so he didn’t think it was super common. As several have already stated/confirmed it is supposed to spin with the drive shaft. I decided to try one more time and fix it so I bought the JB Weld today, mostly because I want to see if I can get it to hold longer than what I was using previously and based on your feedback, it should! Figured it was worth the $5 and a little more of my time and have the cap do what it was designed before I think about cutting it off. Appreciate everyone’s help...great forum here. 3 Share this post Link to post Share on other sites
Wheeler 2,530 Posted September 3, 2020 (edited) Make sure u sand it up really good for the JB weld to bite on. & maybe even brake clean after u sand it. Edited September 3, 2020 by Wheeler 3 Share this post Link to post Share on other sites
_Wilson_™ 6,603 Posted September 5, 2020 be sure to update us on the fix.. 1 Share this post Link to post Share on other sites
Reebs 27 Posted September 5, 2020 Absolutely! I was definitely going to. Plan to take some picks this weekend for you. I applied the JB Weld Thursday night and didn’t touch it until last night. Haven’t ridden the quad yet, but from the looks of it and feel of it, it looks like it came out awesome. Wished I had used JB Weld from the get-go! Be in touch with more follow up. Appreciate your follow up too! 2 Share this post Link to post Share on other sites
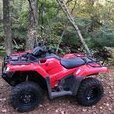
Reebs 27 Posted September 8, 2020 Here is a look at my JB Weld repair. Labor Day weekend was busy so I didn’t get to take it for a ride like I wanted to, but I wanted to at least get some photos posted. The JB Weld set up amazingly well (at least for me never having used it). The Dap auto/marine would work, but it was still softer to the touch even days after application which you can see why it would break down over time. The JB Weld looks and feels like it was the right repair...it is molded very well around the cap and the drive shaft and came out hardened and completely ridged. I am confident this should work. I’ll update after a ride or two and then again 6+ months from now. Thanks again for the help. 3 Share this post Link to post Share on other sites
oh400ex 629 Posted September 8, 2020 (edited) That's a "I mixed up this much and i'm gonna use it" job if I ever saw one! 🤣 The bigger the gob... the better the job! Great work and I think you are right when you say it will hold very well. Edited September 8, 2020 by oh400ex 3 Share this post Link to post Share on other sites
Fishfiles 20,148 Posted September 8, 2020 If you dip your finger in alcohol , you can smooth out that JBWeld with it sticking so bad to you finger and get a smoother look 3 Share this post Link to post Share on other sites
_Wilson_™ 6,603 Posted September 8, 2020 thanks for the update .... you can dress that up a tad with a drimmel...... still should hold good ... 1 Share this post Link to post Share on other sites
Reebs 27 Posted September 8, 2020 Haha...yeah, I’d say I put so much on I was going with the “more is better” mentality to hopefully solve this issue once and for all. I knew it was going on thick, but I wish I knew about the alcohol trick on the finger. Tough application laying under the quad trying to figure out how to apply that around the whole circumference. But unless you are really looking from the side above the tire, it’s not super noticeable. I’ll keep you posted! 2 Share this post Link to post Share on other sites
oh400ex 629 Posted September 8, 2020 2 minutes ago, Reebs said: Haha...yeah, I’d say I put so much on I was going with the “more is better” mentality to hopefully solve this issue once and for all. I knew it was going on thick, but I wish I knew about the alcohol trick on the finger. Tough application laying under the quad trying to figure out how to apply that around the whole circumference. But unless you are really looking from the side above the tire, it’s not super noticeable. I’ll keep you posted! It is basically Bondo (Epoxy Body Filler) so it sands and paints like a dream. Not that you need to... but you could shave it with a razor then use sandpaper and get it to a great surface finish for painting. You could wrap painters tape around both sides of where you want to paint and hold a piece of cardboard that you cut a semi-circle in to fit around what you are painting. Let it dry and take off the painters tape and you will not know if you look close of not. 🤣 I wouldn't worry about it personally. 1 Share this post Link to post Share on other sites
Reebs 27 Posted September 8, 2020 Ok, good to know. I may do that. Nice to know I could improve the “professional look” if I wanted too! 2 Share this post Link to post Share on other sites
Fishfiles 20,148 Posted September 8, 2020 If your brave , LOL , you could jack it up on stands , put it in gear , let the drive shaft turn , slow of course , wrap some emery paper around the shaft or even grab the shaft with some emery paper in your hand and shape it to perfection >>>>> I wouldn't worry about it either , paint it 4 Share this post Link to post Share on other sites
_Wilson_™ 6,603 Posted September 8, 2020 if i was going that way .... I'd go with a ! cut round file ...you'd get more of an abrasive surface the paint will cling to. 2 Share this post Link to post Share on other sites