
retro
-
Content Count
4,007 -
Joined
-
Last visited
-
Days Won
70
Posts posted by retro
-
-
Welcome Chewy, be sure to replace worn/failed parts with genuine Honda parts. Aftermarket parts (china knockoffs) do not work on Honda's, they're garbage. You can use a genuine Shindy carb kit to freshen up the carb though as they are quality parts by a Japanese company. Looking forward to following your project.
-
 1
1
-
-
6 hours ago, Coyote251 said:Makes a bit more sense to me now, the higher compression then is only be caused by the bike sucking in a larger volume of air when the throttle is open. Where as it has a smaller volume of air to compress when the throttle is closed.
Right, you must open the throttle whenever you are doing a compression test, else the cylinder will not fill with air completely, which gives you a false measurement.
-
I think Jeep was referring to attachment of the fishing line to the towing hitch, then take the string around the rear tire and then extend the string out in front of the ATV.
Here is a video showing the concept of the string wheel alignment method.
-
4
-
-
You should adjust the valves while you have the carb off. It's possible that the previous owners never touched them.... if the valve lash is loose that could explain why the decompressor isn't working.
-
The decompressor is on the camshaft and it works by slightly holding the exhaust valve open at starter motor cranking RPMs (resulting in low cylinder pressure), which are usually about 400-500 crankshaft RPMs (camshaft spins at half the RPMs of the crankshaft, so about 200-250 RPMs). After the motor starts the camshaft is spinning at half of the crankshaft RPMs (~1500 idle RPM = 750 camshaft RPM) which results in centrifugal force disengaging the decompressor. There is no return spring on the decompressor cam, so sometimes it can be stuck in the disengaged position while cranking the motor with the starter, resulting in higher than specified cylinder pressure. It's nothing to be concerned about.
-
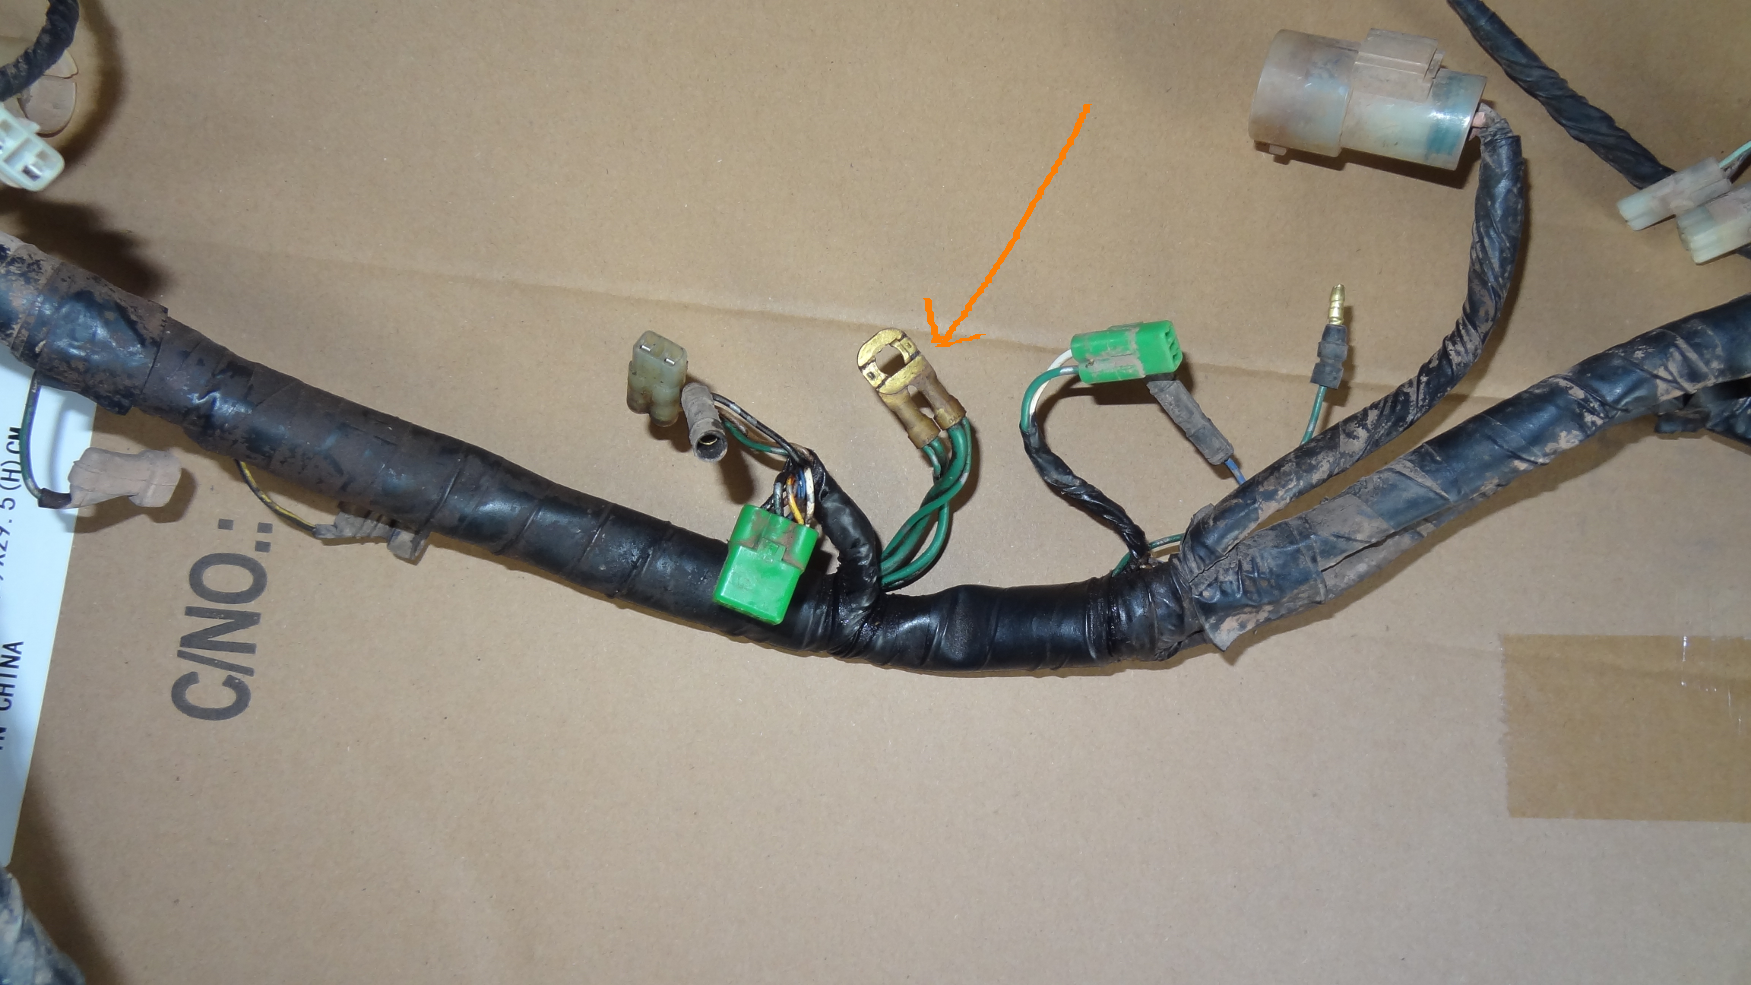
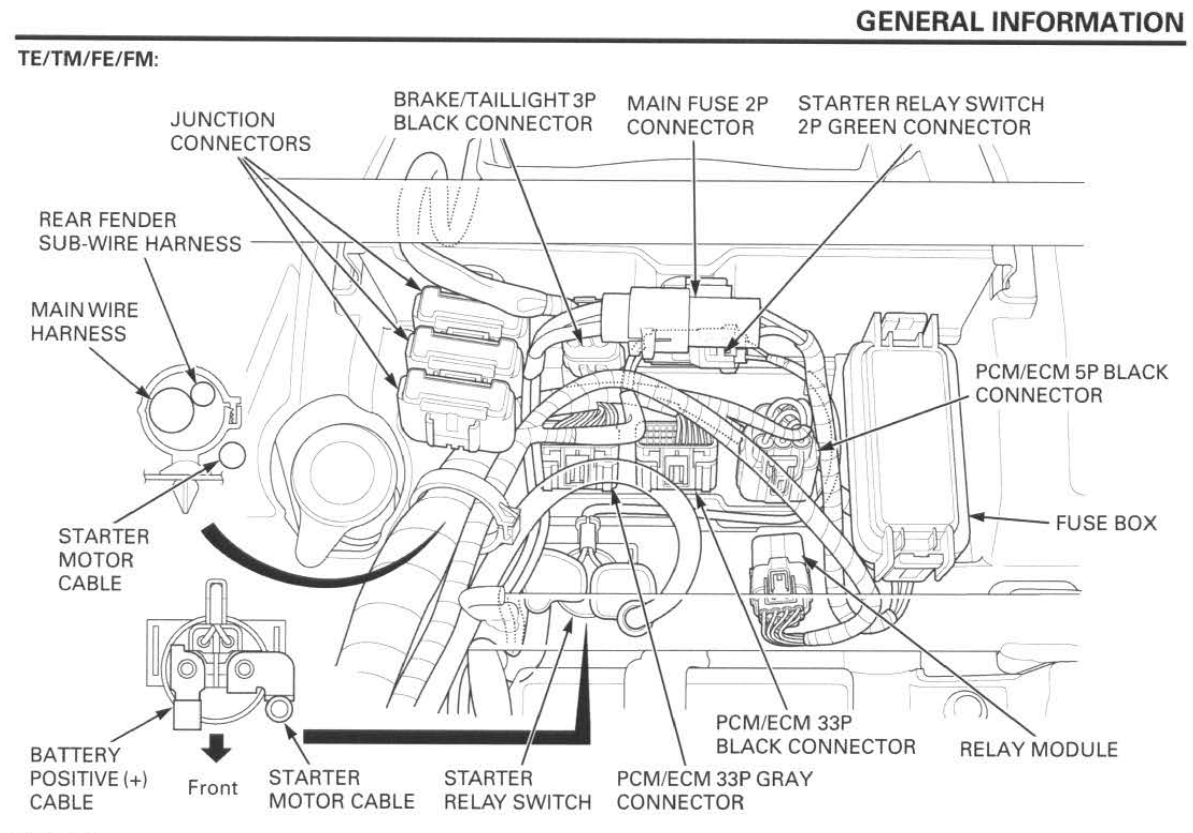
You're looking for three wires (Green, Green, Green/White) exiting the main wiring harness with a brass eyelet.

The harness ground bolt is located on the left side of the frame in the area where several harness connectors are clipped to the frame. You'll find the ground bolt hidden amongst those several connectors, about 9"-10" behind the left upper shock absorber mount.
This is what you're gonna see.... note the ground wires coming out of the wiring harness where the orange arrow is pointing in this image.
If you have some dielectric grease on hand coat the frame, bolt and brass eyelet with dielectric grease after you shine up the frame bolt location. Also unclip from the frame and open each of the harness connectors that you can reach to dielectric grease those connector terminals and waterproof sealing areas. All harness connectors should be prepped with dielectric grease to insure that issues won't arise in the future. Honda does NOT waterproof connectors at the factory.
-
2 hours ago, bigcountry78 said:or should the front of the front tires be closer together? I know there’s a word for that but it escapes me.
Toe-in or toe-out.... cars and trucks are generally toe'd in 1/16" to 1/8" while Honda 4WD ATVs are generally toe'd out.
Personal preference often comes into play on a Honda ATV, they handle decent through a wide range of adjustment. I personally like the toe on my '00 Rancher straight up since I ride in 2WD most of the time, which results in the easiest steering effort. I still see fast front tire wear on asphalt no matter if it is adjusted to zero toe, or toe'd in or out, so I go for the least steering effort in 2WD mode.
Your riding environment, choice of tires, or personal preference may differ greatly from the way others like their steering set up.
-
2
-
-
Yeah, Partzilla is useful for looking up OEM part numbers and they list the other years & models of Honda ATVs that each part number fits. So we reference their site often when helping folks find parts. But Partzilla sells parts way above the retail prices that you can find elsewhere. They're a very expensive supplier. And Partzilla is very slow to ship parts and they are full of excuses. We avoid them except to use as a parts interchange reference.
One of the best OEM parts suppliers is Rocky Mountain ATV. They sell at reasonable prices, they ship out orders immediately and they use quick delivery services like Fedex or Priority Mail, with tracking numbers provided.
https://www.rockymountainatvmc.com/oem-parts/Honda
For used OEM Honda parts Powersportsnation is the best supplier. They ship quick, provide tracking numbers and they stand behind every part that they sell. Great folks, great service.
-
3
-
-
Congrats! Thanks for letting us know that you fixed it!
Make sure that your ignition coil (and all other electrical parts) is a genuine Honda part, else if it is an aftermarket part it will fry and possibly/likely will destroy your OEM CDI. Have fun!
-
Sometimes (on a few models, not all) china knockoff parts will work for a few minutes, but they always fail very soon after installation. Often times when they fail (or don't work at all) they short out circuits that pass through other expensive electrical modules, frying them as well. Shift ECMs are an example part that can be destroyed by excessive current due to a short - they cost several hundred bucks each!
China knockoffs are the number 1 issue that we experience here on an almost daily basis, by far. We see china knockoffs on dead Honda's so often that we feel like we are mistreating folks immediately after welcoming them, when we gotta explain that cheap china parts are bombs. Sometimes I don't respond to a new member issue right away (this thread for instance), hoping that someone else will provide the bad news. We feel like crap every time, takes the fun outta helping folks fix their Honda.
-
1
-
-
Good move.... you'll need to replace the china Regulator/rectifier too, before you plug in the used OEM CDI. When the charging voltage exceeds 16 volts the CDI may fry.... also if the charging voltage is mostly unrectified AC the CDI may fail. So the china regulator/rectifier is a potential bomb. Its not a matter of "if", but when with china knockoffs.... we see it all the time.
-
3
-
-
On 12/10/2023 at 3:09 PM, trailcutter said:the cdi and rectifier were made in china.
I hate it when I gotta be the bearer of bad news but you can't fix a Honda with china knockoffs. We can't help ya at all until all parts on your Foreman are genuine Honda. You can probably find good used parts on powersportsnation.com if you prefer used versus new.
-
Ahem.... it's a $150 prepaid Visa, 50 bucks more than ya thought! :)
Might be enough to keep your lights on.
-
2
-
 1
1
-
-
Wow, 33% more AH capacity with 20% higher CCA in the same plastic case!
-
Ok, the Blue/yellow wire resistance (the pulse generator) test is within spec. But the ignition coil primary windings resistance measured out of spec. The coil primary is supposed to measure between .1 & 1 ohms.
Has the ignition coil been replaced? Is it an original Honda coil?
Try this: Unplug both wires from the ignition coil (note the wire color/terminal location so you can plug them back in correctly) and disconnect the spark plug cable from the spark plug. Measure resistance between each wire terminal on the coil while probing with your other multimeter lead inside the end of the disconnected spark plug cable. Let me know what those two resistance measurements are.
-
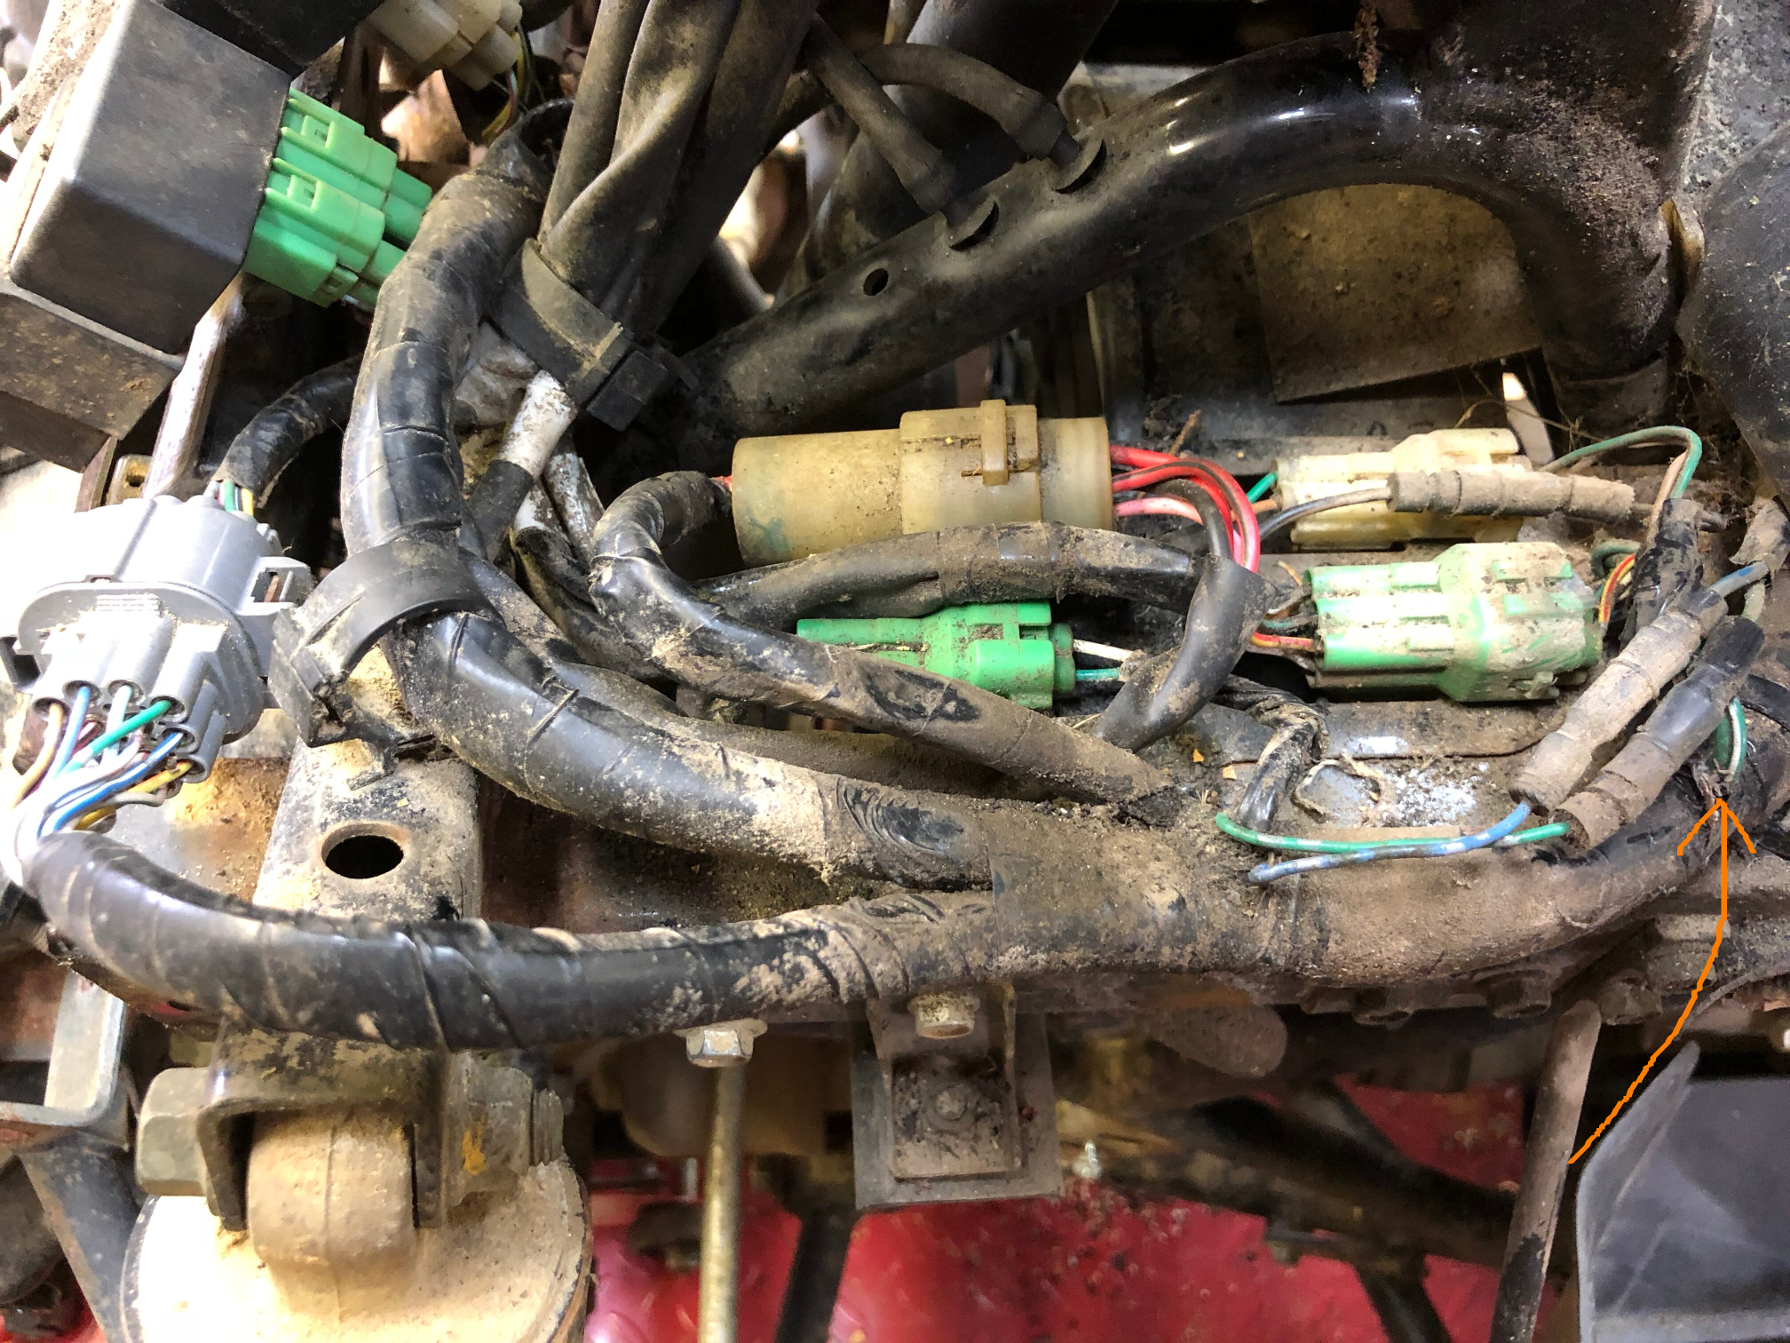
You may as well remove the racks and both fenders because we'll likely be snooping around at both ends of the wiring harness. While you're tinkering you may as well remove the bolt that holds the grounds wires/cable down to the frame and shine up the steel around the bolt hole and shine up the wire & cable eyelet ends. You can use sandpaper, a stiff wire brush or whatever ya got handy to remove rust & corrosion. Once clean, bolt those ground wires back down to the frame. See the image for grounds bolt location.
If you have a desktop computer, laptop or a tablet you can view a copy of the service manual for reference.
https://drive.google.com/drive/folders/12hzs10L_Gwu0aVyp8vhmEXNdf2N2P7tk
The title of the manual you need begins with: 5101394-Honda_TRX420_Rancher_420_[...]
-
51 minutes ago, Mach 1 said:in well that fuel pump relay sits, there are 3 black squares with lids, is one of them the engine stop relay??
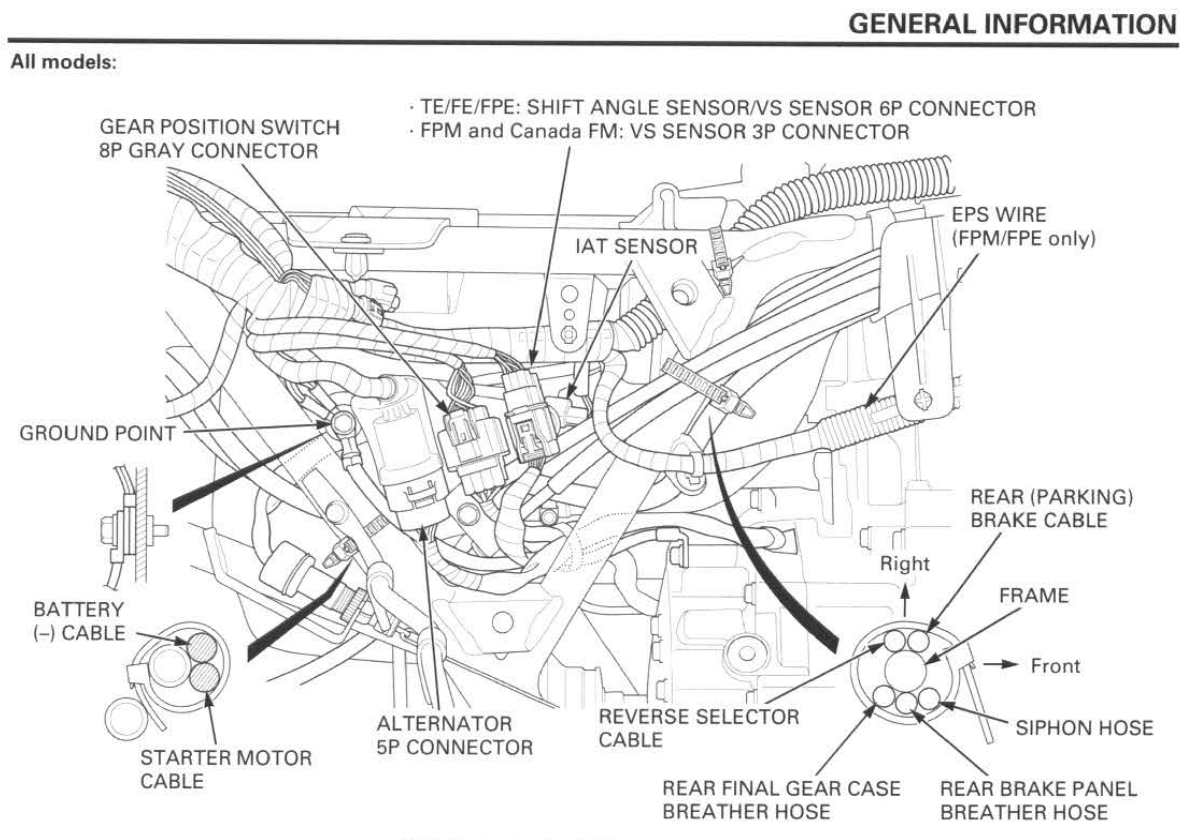
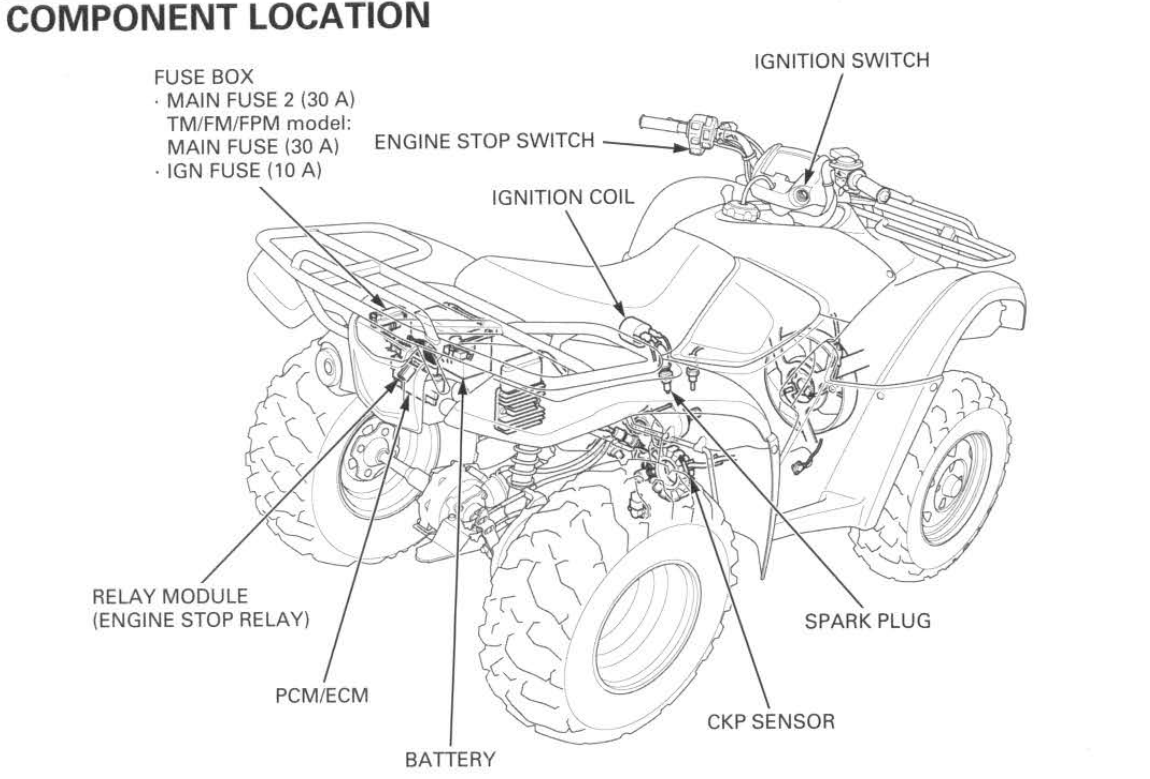
Those might be the wiring harness junction connectors? See the component location image:
54 minutes ago, Mach 1 said:Also, is the PCM under the cover in the back below where rear tail lamp is?
Yeah, see the image above
55 minutes ago, Mach 1 said:guessing coil and fuel pump relay being disconnected will not affect any readings?
Yeah we are only looking for a short, either in a component, or in the wiring harness. So we're just tracing circuits out for now..... verifying that they're intact (no broken wires) and are not shorted.
59 minutes ago, Mach 1 said:Thanks for working with me, really appreciate it !!
This is challenging and fun! I oughta be thanking you! :)
20 minutes ago, Mach 1 said:Also, after each test do I reconnect the component removed before moving on the next test?
Leave components unplugged unless I instruct otherwise. I gotta know where you're at... else we'll get out of sync and make mistakes.
4 minutes ago, Mach 1 said:In thispic what are these 3 things, I have ablue fuel pump relay, big square, is engine stop relay somewhere below all this ??
Those three inside the circle are harness junction connectors. They are used to connect common wiring together, such as ground wires, power wires, etc. The relay module has an 8p connector... 8 wires going into the connector plug.
-
1
-
-
1 hour ago, Mach 1 said:though none of those don't mean squat with no key/dash.
Right, we're gonna find out where the short is now. You can purchase OEM parts later on if you wish.
Ok, I am going to be providing instructions for troubleshooting in a step-by-step manner. After each instruction that I post here I will await your response before proceeding to the next step. We won't be jumping around or speculating on things, each step will be deliberately ordered and I'll provide images for your reference wherever possible. This diagnosis will take some time to complete, possibly days... tomorrow the 14th I will be unavailable for part of the day, but I'll be here at some point.
Disconnect BOTH of the battery cables from the battery and leave them disconnected until/unless I ask you to reconnect them.
1st test --
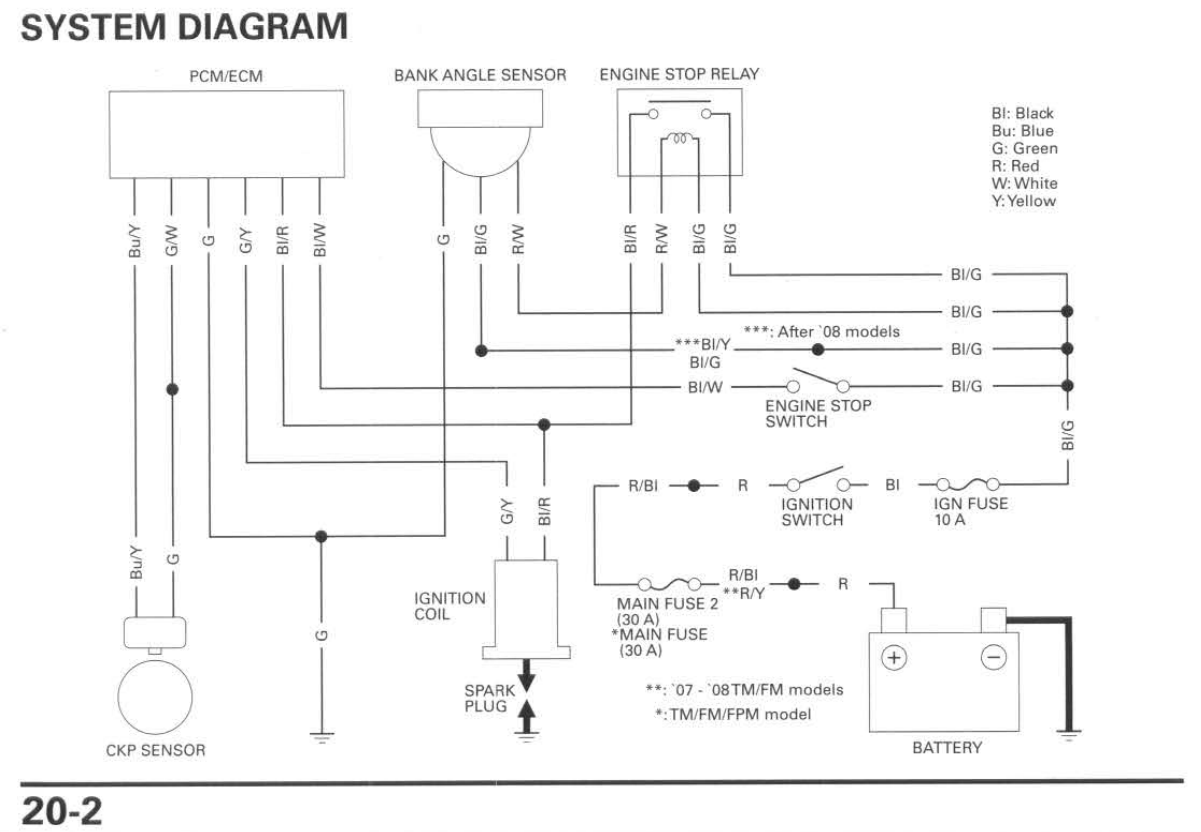
With your multimeter in Continuity mode, probe the positive battery cable terminal eye (that is disconnected from the battery) and with the other multimeter probe touch BOTH of the Black/green wire terminals inside the Engine Stop Relay (NOT the fuel pump relay) connector. You should measure continuity on both terminals. Let me know those results.
Then, with your multimeter in resistance mode, touch one multimeter probe to frame ground, then probe each Black/green wire terminal inside the Engine Stop Relay harness connector. You should measure resistance through one Black/green terminal but not the other. Let me know those results.
Then unplug the PCM/ECM Gray connector. With your multimeter in Continuity mode, probe the positive battery cable terminal eye (that is disconnected from the battery) and with the other multimeter probe touch the Black/red wire terminal inside the disconnected PCM/ECM harness connector. You should measure continuity, let me know that result.
Then, with your multimeter in resistance mode, touch one multimeter probe to frame ground and the other multimeter lead to the Black/red wire terminal inside the PCM/ECM gray harness connector. Let me know that result.

-
I've got to go outdoors and do my chores. I'll be back in a bit with instructions for the 1st test.
-
Just now, Mach 1 said:Sorry, I put both those numbers in there search and come up empty
Using the dropdown buttons on this page (scroll down):
https://www.rockymountainatvmc.com/oem-parts/Honda
- Select: All-Terrain Vehicle (ATV)
- Select: 2010
- Select: TRX420TEA (10) All-Terrain Vehicle (ATV), USA VIN# 1HFTE344- A4300001
- Then on the next page select from the dropdown list: Wiring Harness
Find the two parts you need from the list and complete your purchase.
I'll stand by until you've removed those two parts and you're ready to test....
-
Let me know when you have finished removing the china relay and the fried OEM ignition coil from your Rancher.
-
3 minutes ago, Mach 1 said:still don't get why one minute gave dash, power, fuel pump, etc..come inside, come back out with coil disconnected no power to anything, been throwing parts at it, how could it go to cranking over with no spark to no power with all fuses good?
As stated earlier, the reason why all 'ell broke loose is because you installed aftermarket china parts on your Rancher. No one gets away with doing that!
-
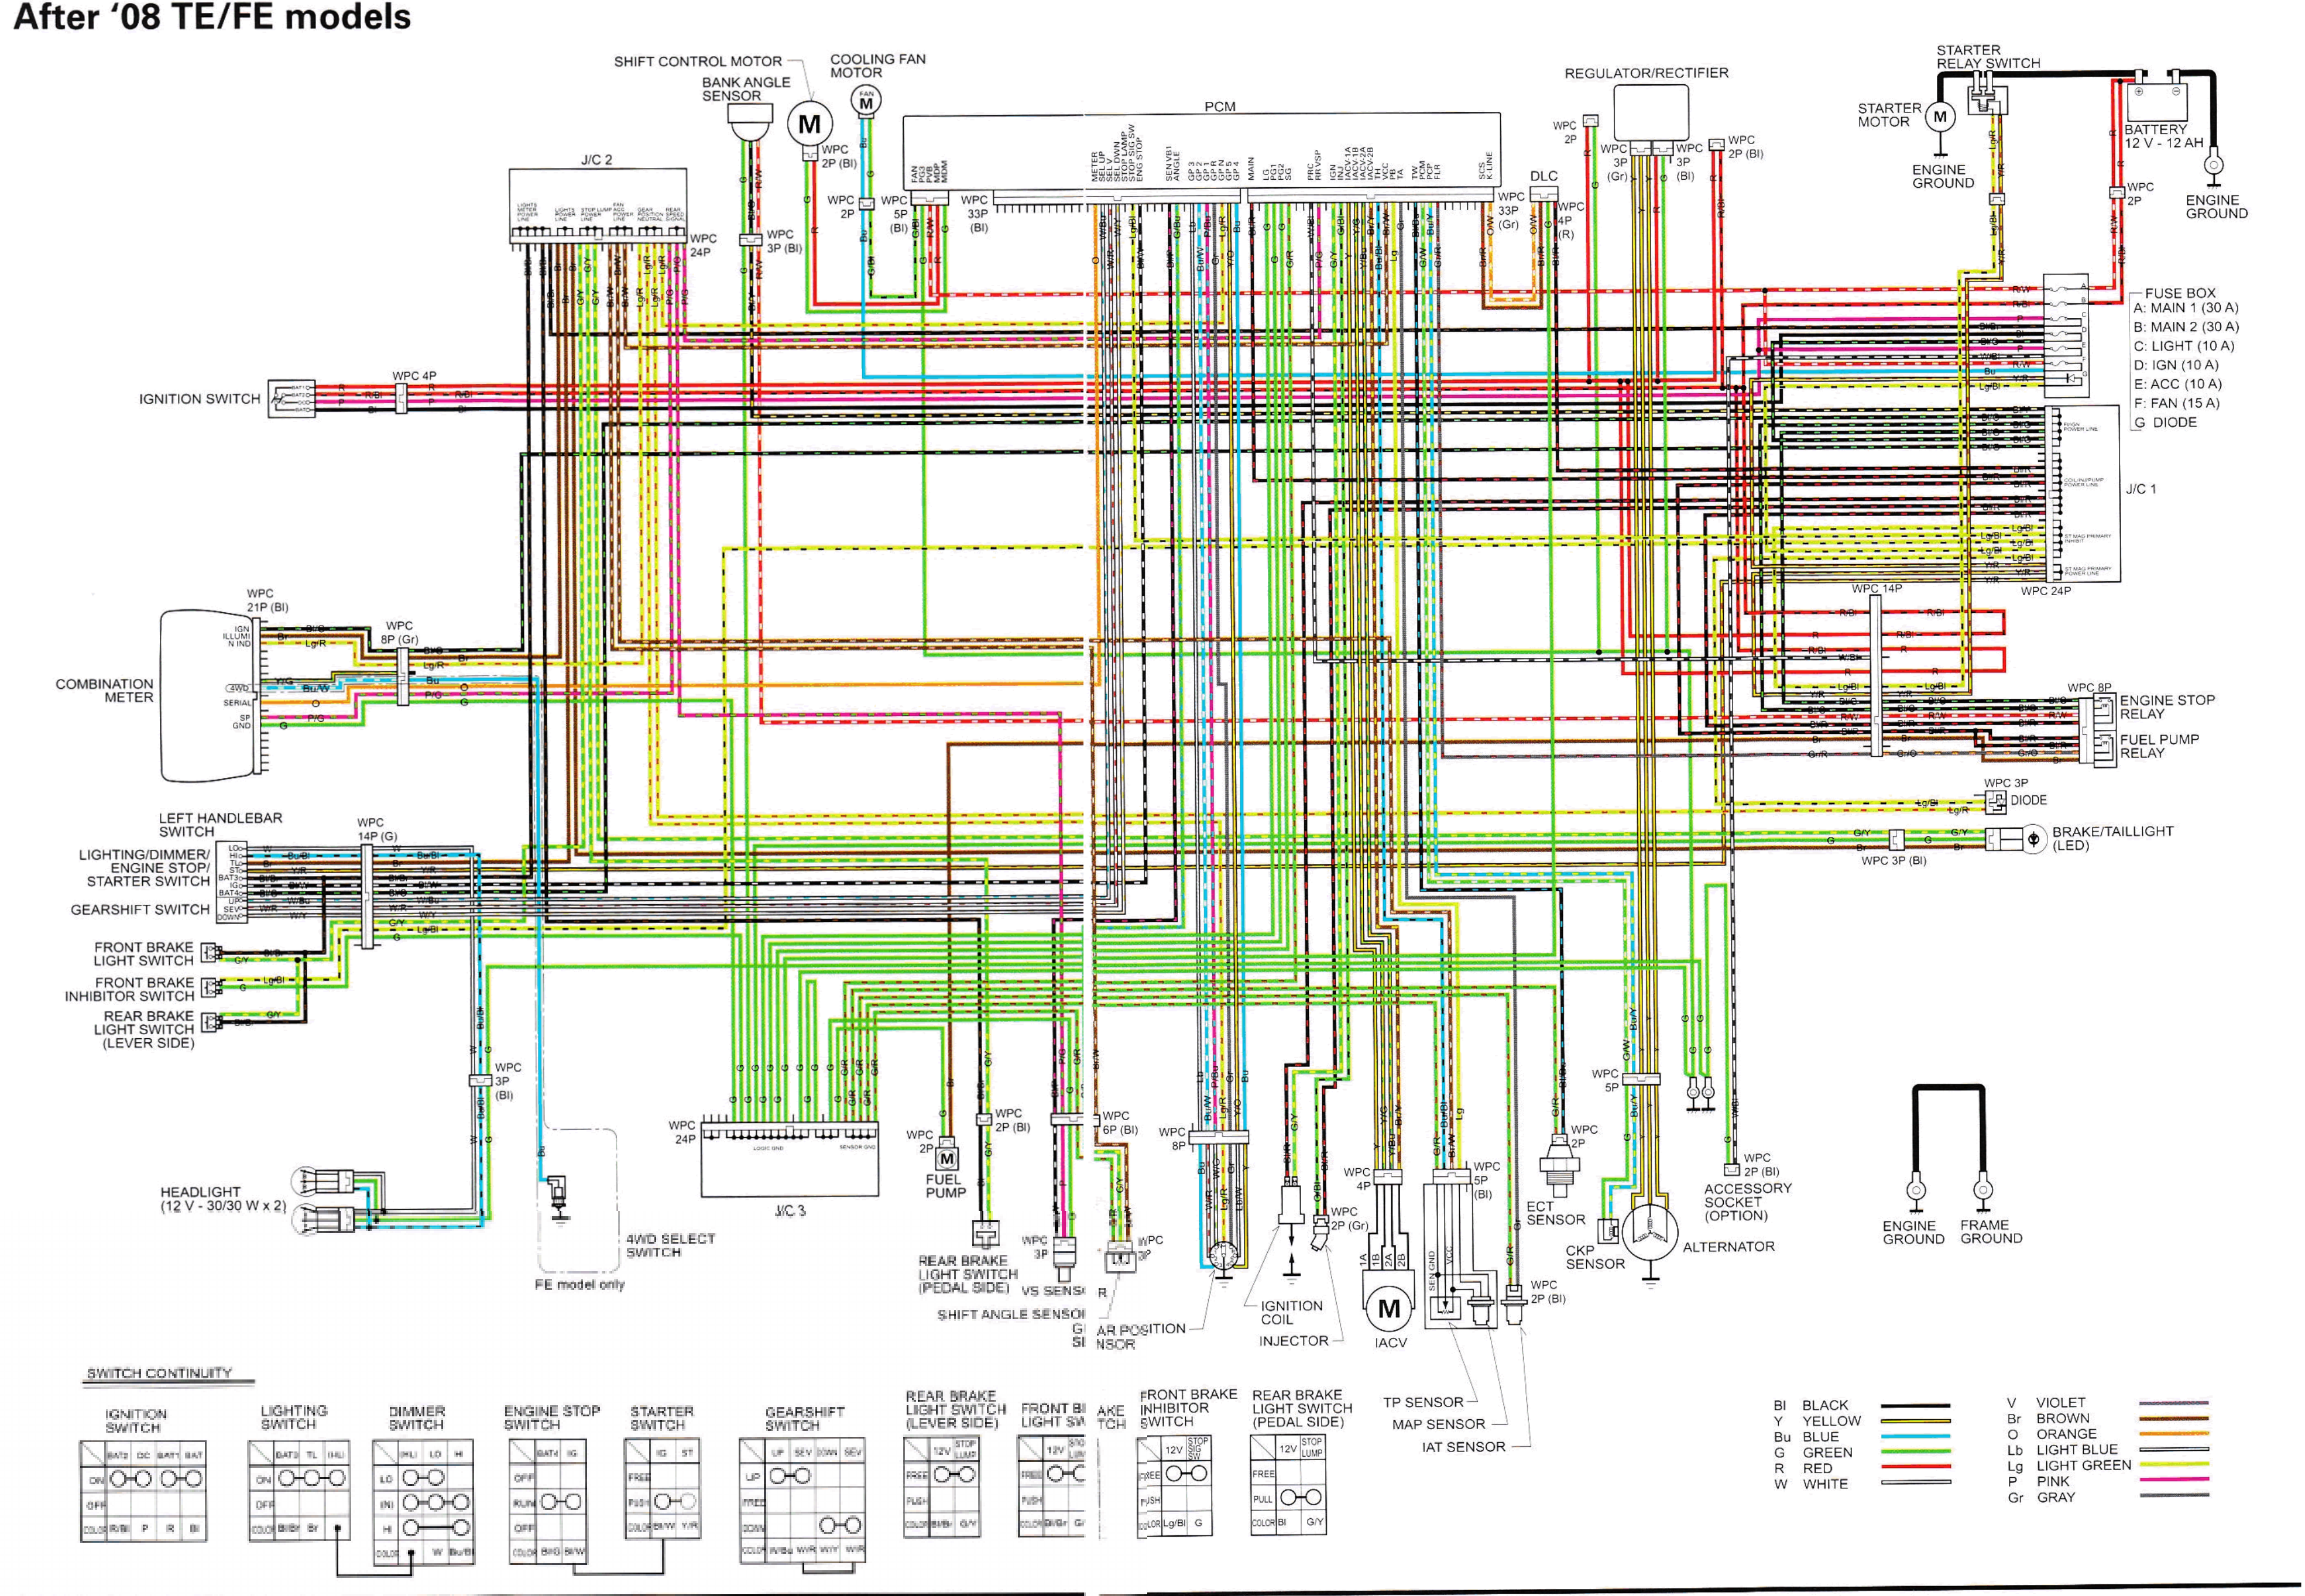
Here are images of the wiring diagram and the ignition circuits diagram that I'll be referring to while testing..
-
Ok you'll need to buy a relay and ignition coil. You can get fair prices on OEM parts with quick shipping at Rocky Mountain ATV:
https://www.rockymountainatvmc.com/oem-parts/Honda
You'll find the two parts that you need on the Wiring Harness parts fiche. The ignition coil part number is 30510-HP5-601 ($56.03), it is labelled as part 1 on the parts fiche. The relay you need is labelled part 14 on the fiche, the part number is 38580-HP5-601 ($37.33). Both parts are in stock and if purchased together, shipping is fast and free.
Stand by for a minute while I make a copy of the wiring diagram.....

2010 Honda Rancher 420TEA ignition fuse issue.
in Electronics
Posted
Yes, the Fuel pump relay and the Engine stop relay are in one module with an 8p connector.