

freebo86
-
Content Count
498 -
Joined
-
Last visited
-
Days Won
1
Posts posted by freebo86
-
-
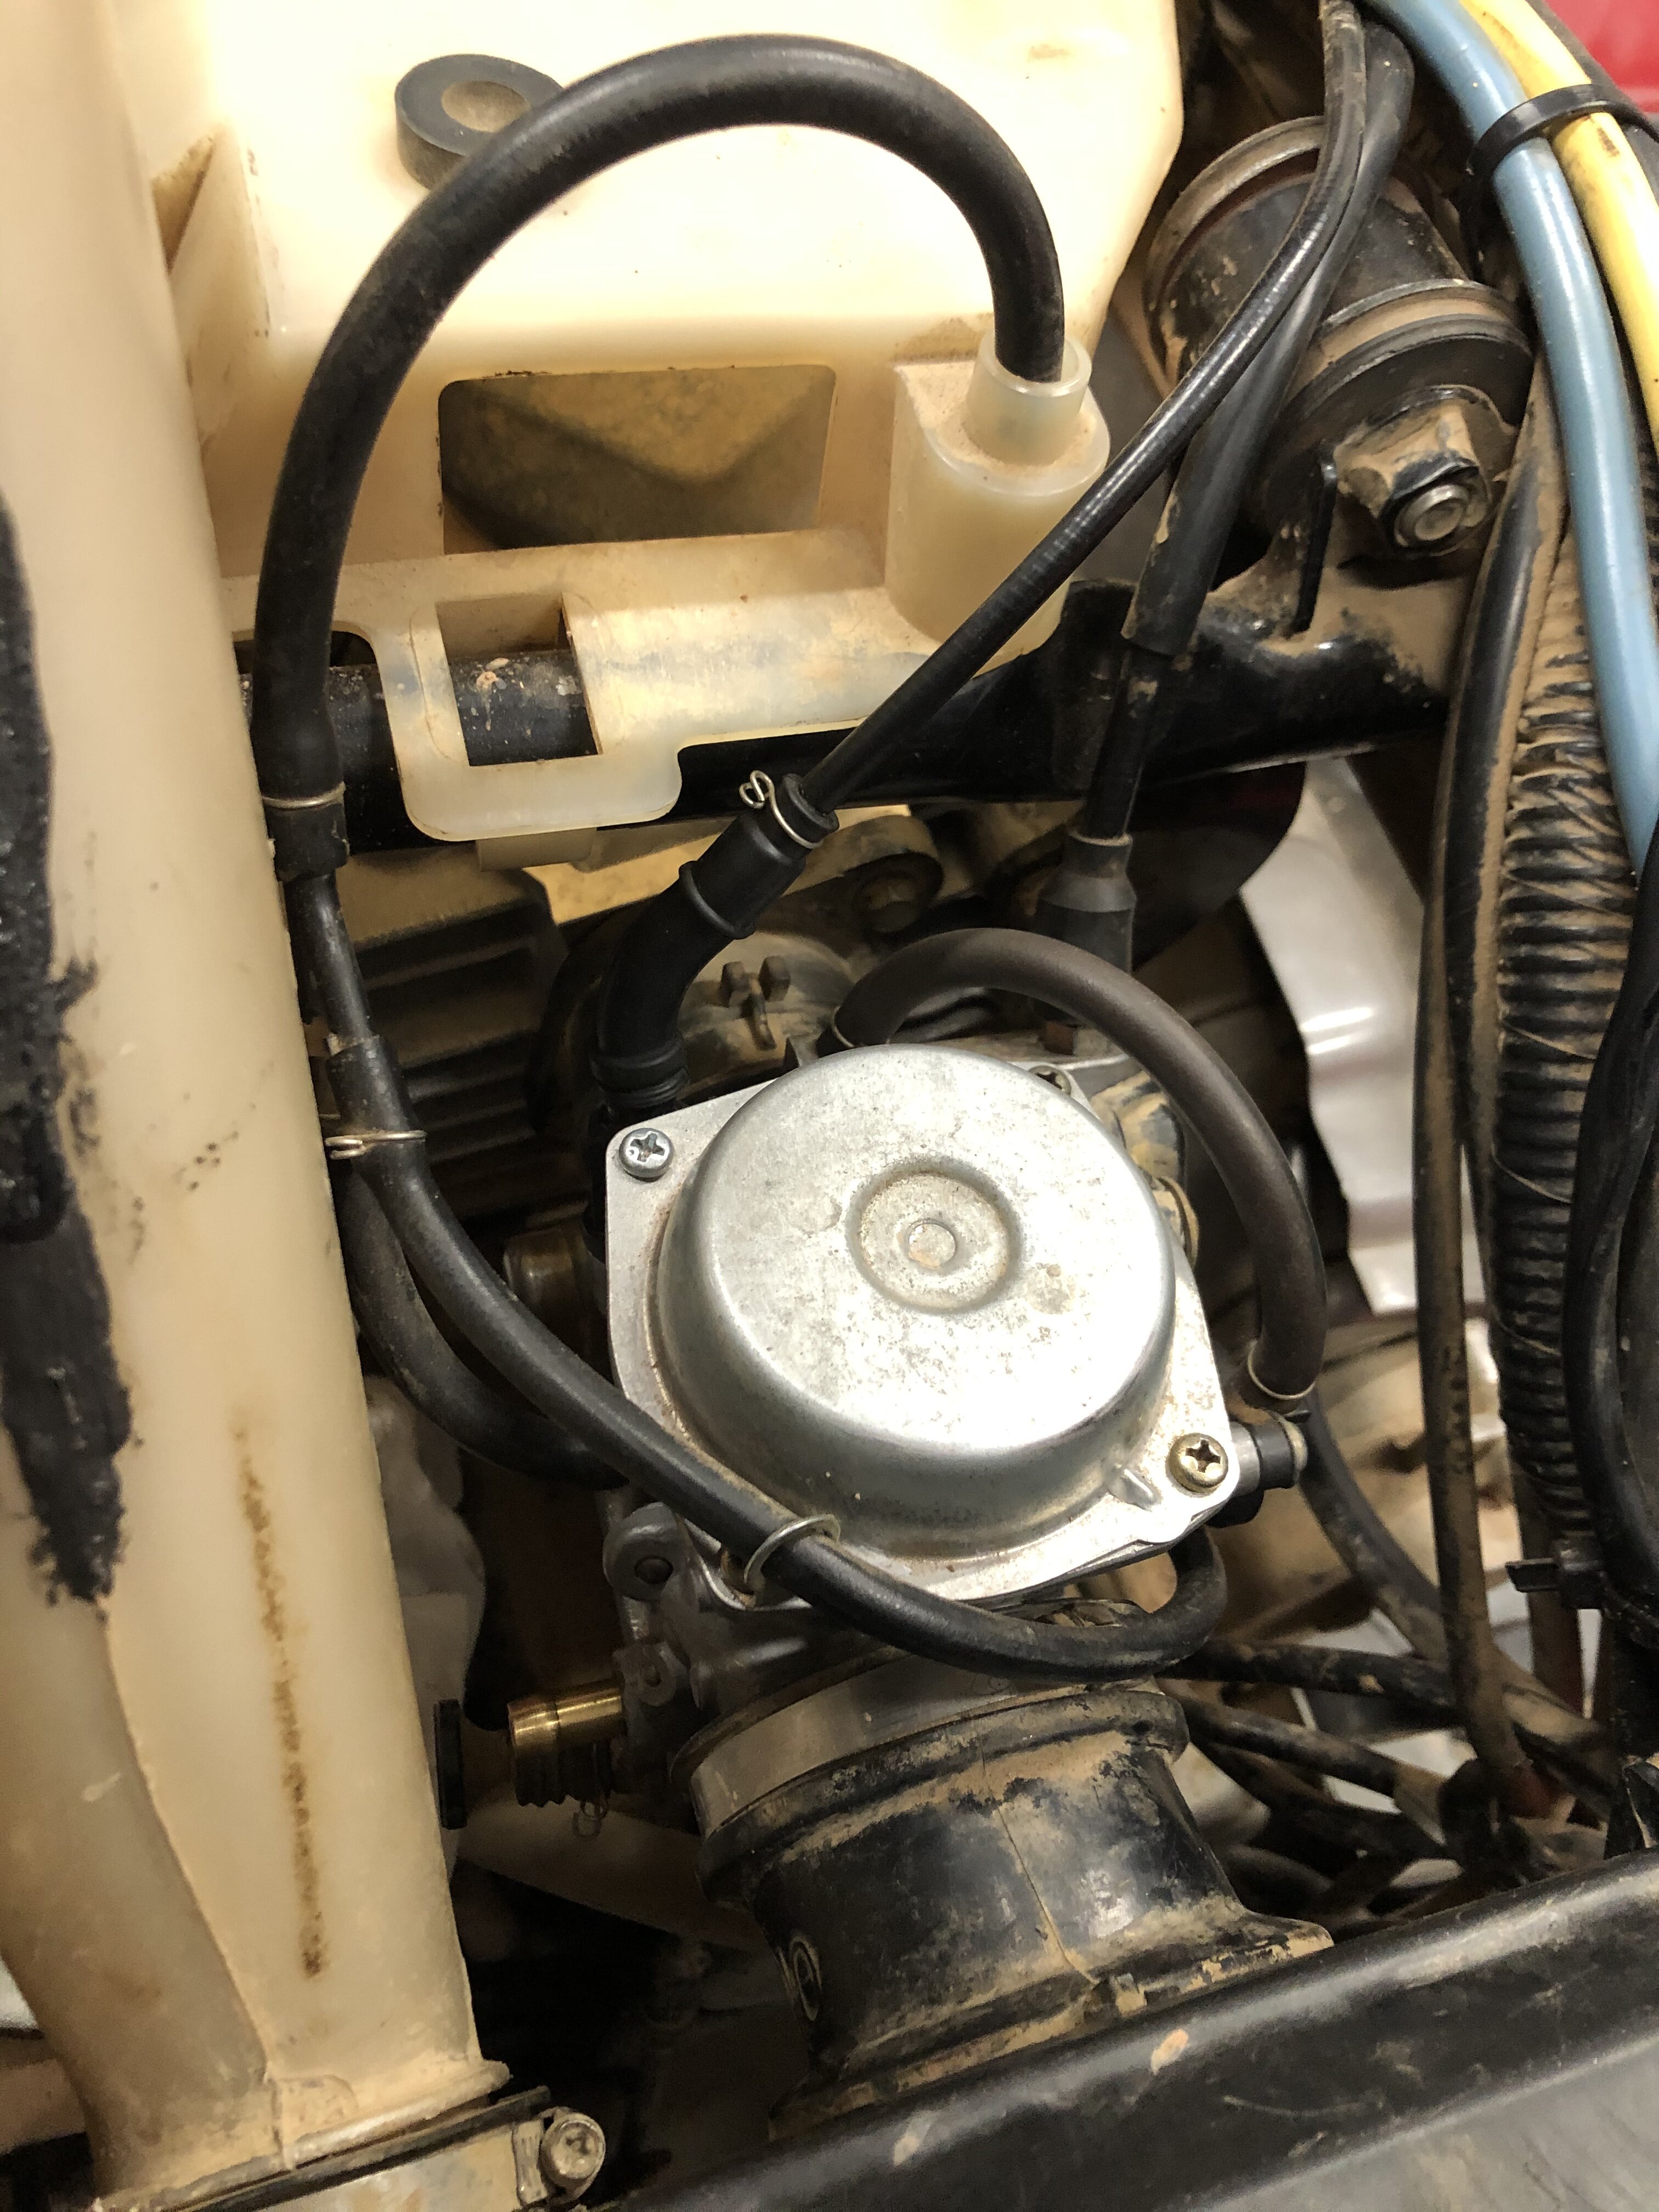
1 minute ago, retro said:Those fan motors are not meant to be serviceable, but I drill a tiny hole in the end of the motor housing centered over the armature shaft (you can see the bump in the tin where the shaft is centered by the bushing, drill right there) then pump a tiny bit of synthetic grease into that rear bushing. After it is greased I clean up around the drilled hole with alcohol and glue the hole shut. Step two: behind the fan blade there is a rubber lipped seal around the shaft. You can use a thin syringe & needle to carefully slide a needle in between that rubber seal & the shaft and squirt a couple drops of syn oil into that front bushing.
Interesting. I thought I saw a exploded view of it on the service manual?
-
Well next thing on the list that is clean out the fan motor. Going to dismantle it to whatever level it can be and clean, grease and seal it.
Should of done this when I had the oil cooler out but I'm hoping this fan can come out without the removal of the top plastics but just the little black side piece.
-
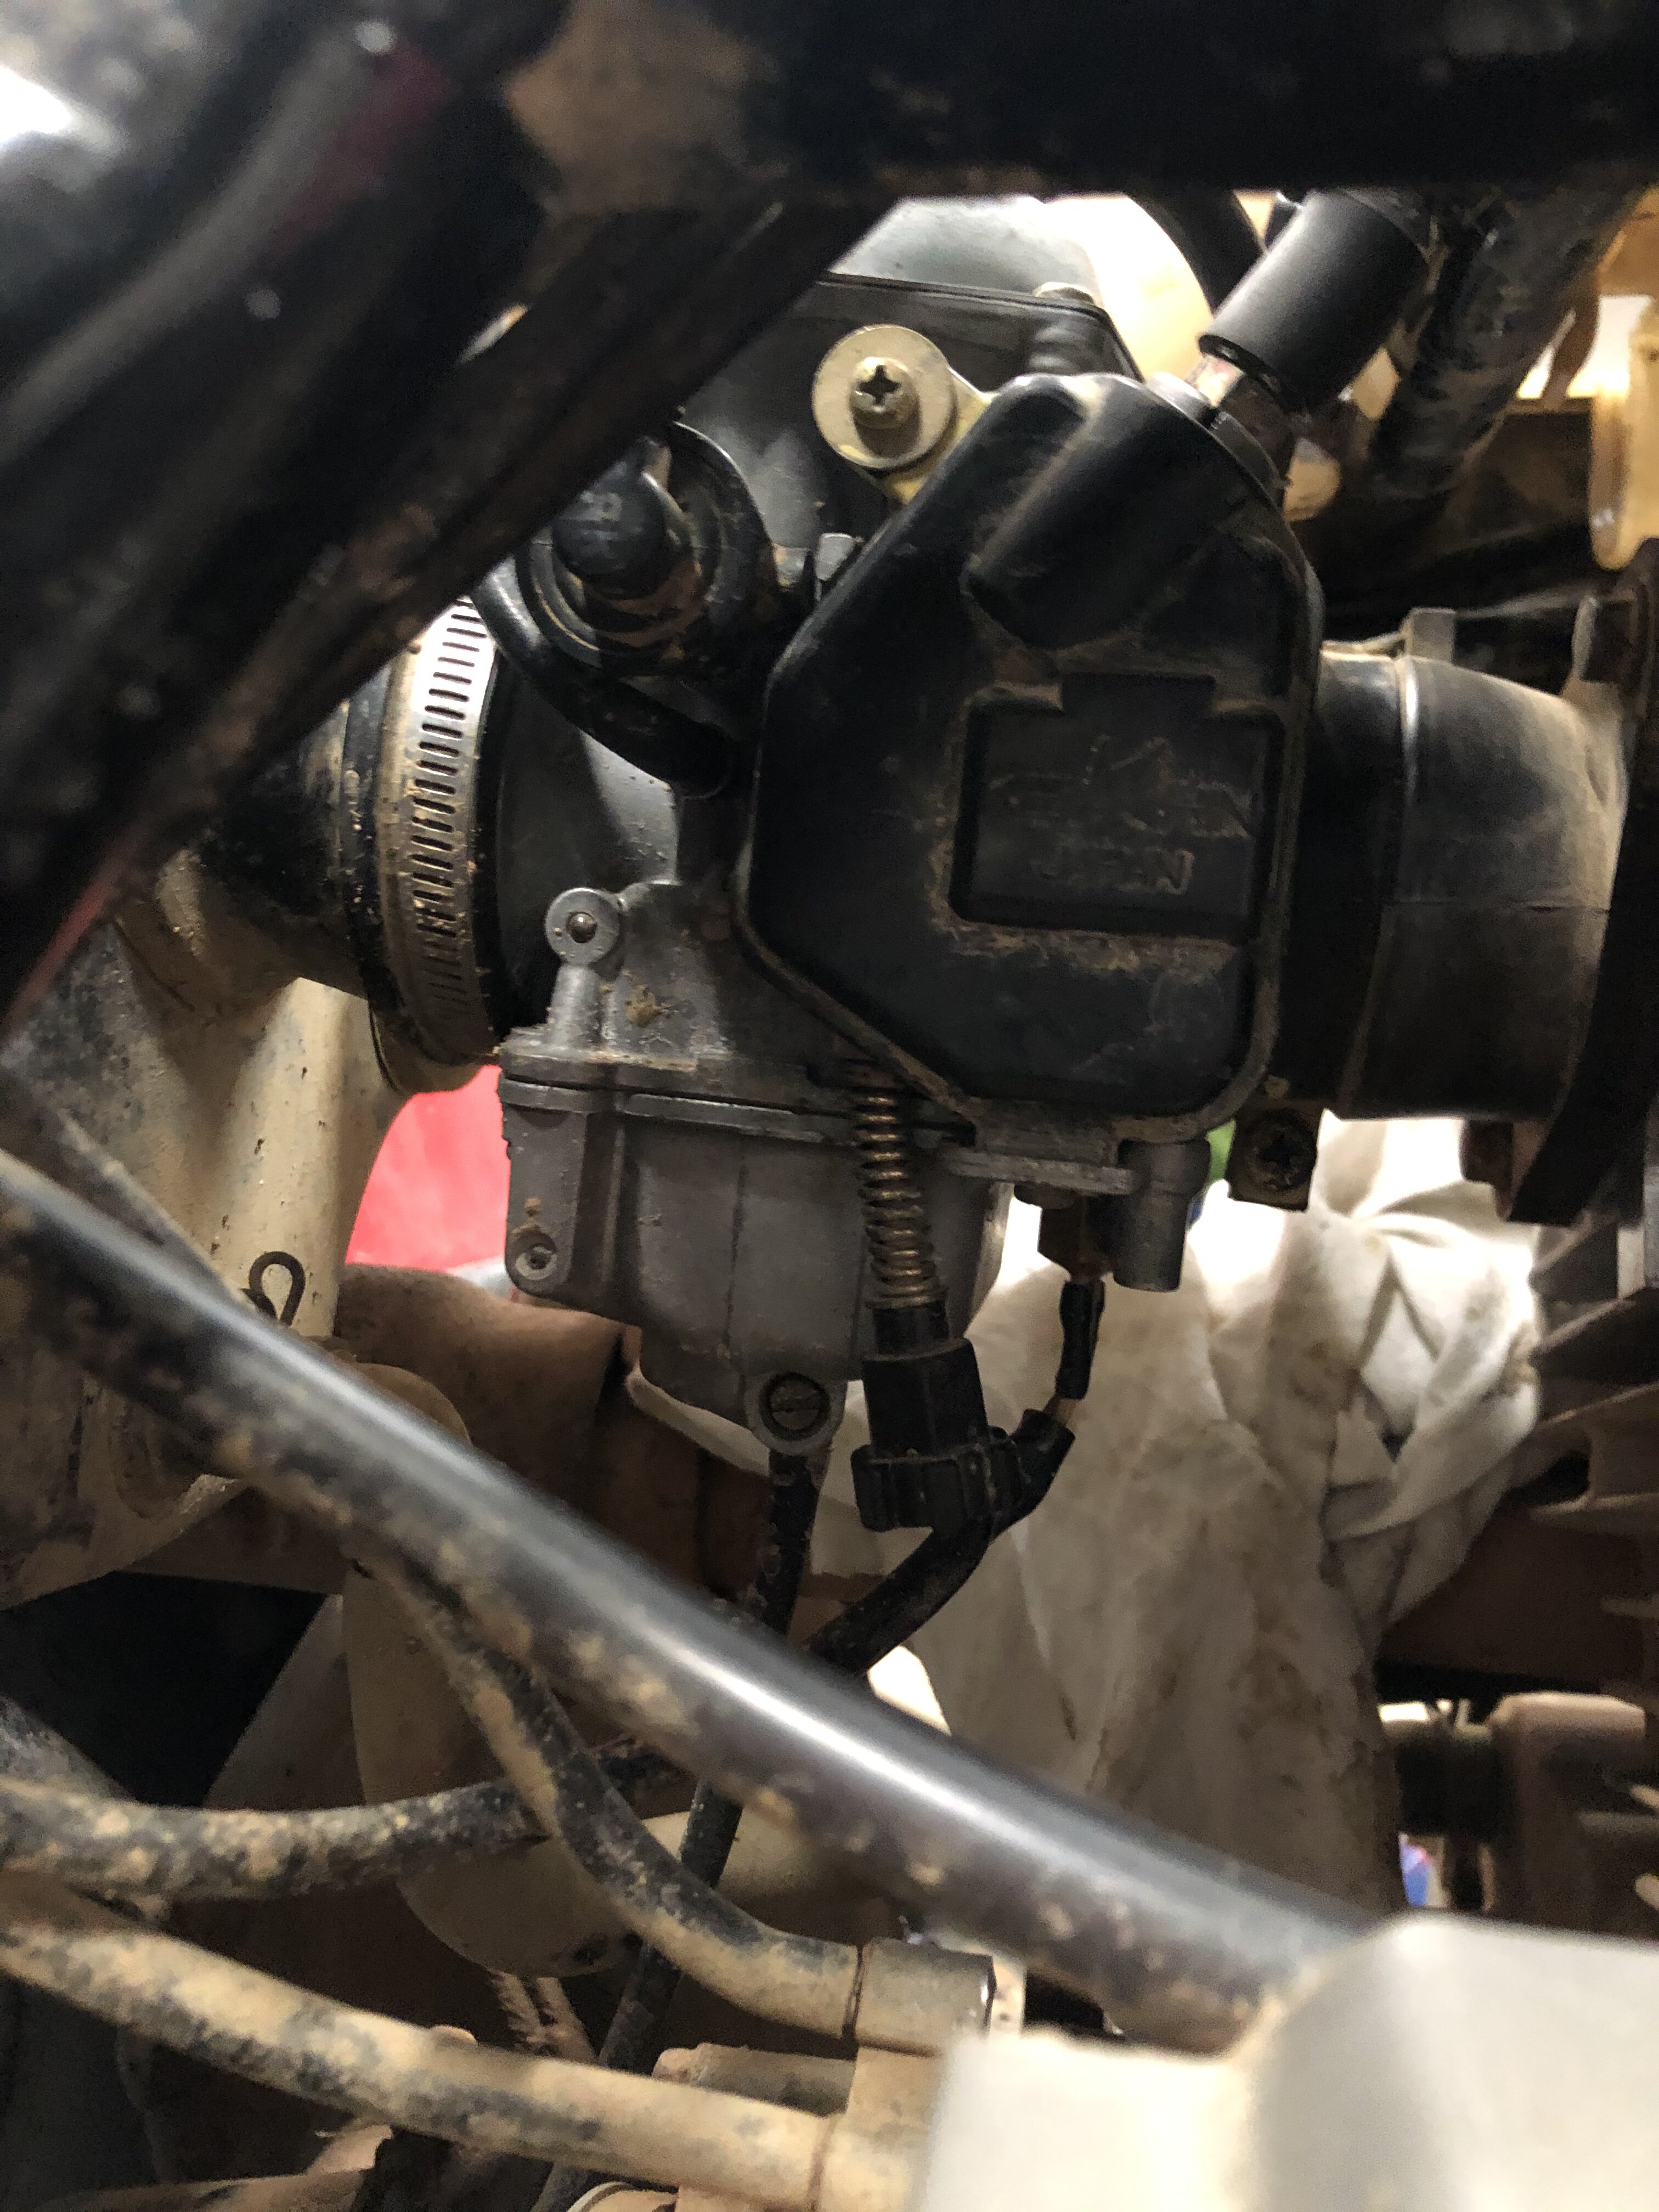
On 4/9/2021 at 11:59 PM, retro said:The outer hose supplies vacuum, the inner hose vents to atmospheric pressure. See the explode view above for reference.
Yo ur right. I went looking tonight and only ONE hose actually is connected on the air cut off valve. I was getting the lower hose confused that’s connected on the carb itself thinking it was on the air cut off. Here are the photos of the hoses and how their connected. I’m pretty sure those is correct.
So your suggestion is to disconnect the hose between air cuff off and carb. The one that’s at the top. Does it matter what end? Plug it and see if there is a difference?

-
1 hour ago, dadhustle said:Hi @Fishfiles I don't follow do you mean, that I need be certain the battery is fully charged?
Yes and that the battery needs to be healthy and able to provide its capability. -
What’s with limiting to no stock on ATV tires? Is this the after effect of COVID finally taking a toll on supplies and manufacturers not able to keep supply?
-
 1
1
-
-
7 hours ago, jeepwm69 said:You can get savant/ strong made metal footguards, but then you'll need to buy the flaps to go with them (the footshift 450's didn't have floorboards, just flaps and pegs, so you'd need footshift 450 flaps).
Were it me I'd just get replacement floorboards. They hold up ok for what they are, and if you go with metal floorboards you'll have to buy new flaps anyway.
yah, maybe getting replacement boards is the best approach.
5 hours ago, Fishfiles said:These floorboards on the 450 are for a 300 , did a little modification on the mounts , added some angle brackets to tuck in the fender flares after cutting them down some
I do like that idea. May get the feet a bit dirtier but maybe these could be found fairly cheap in classifieds.-
1
-
-
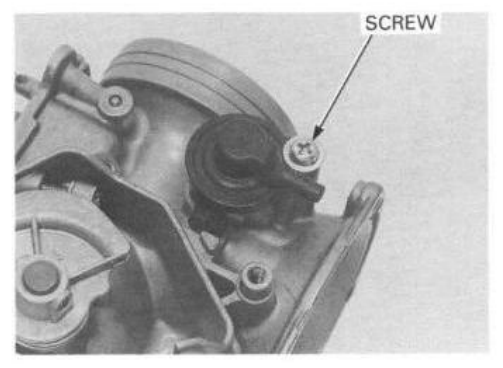
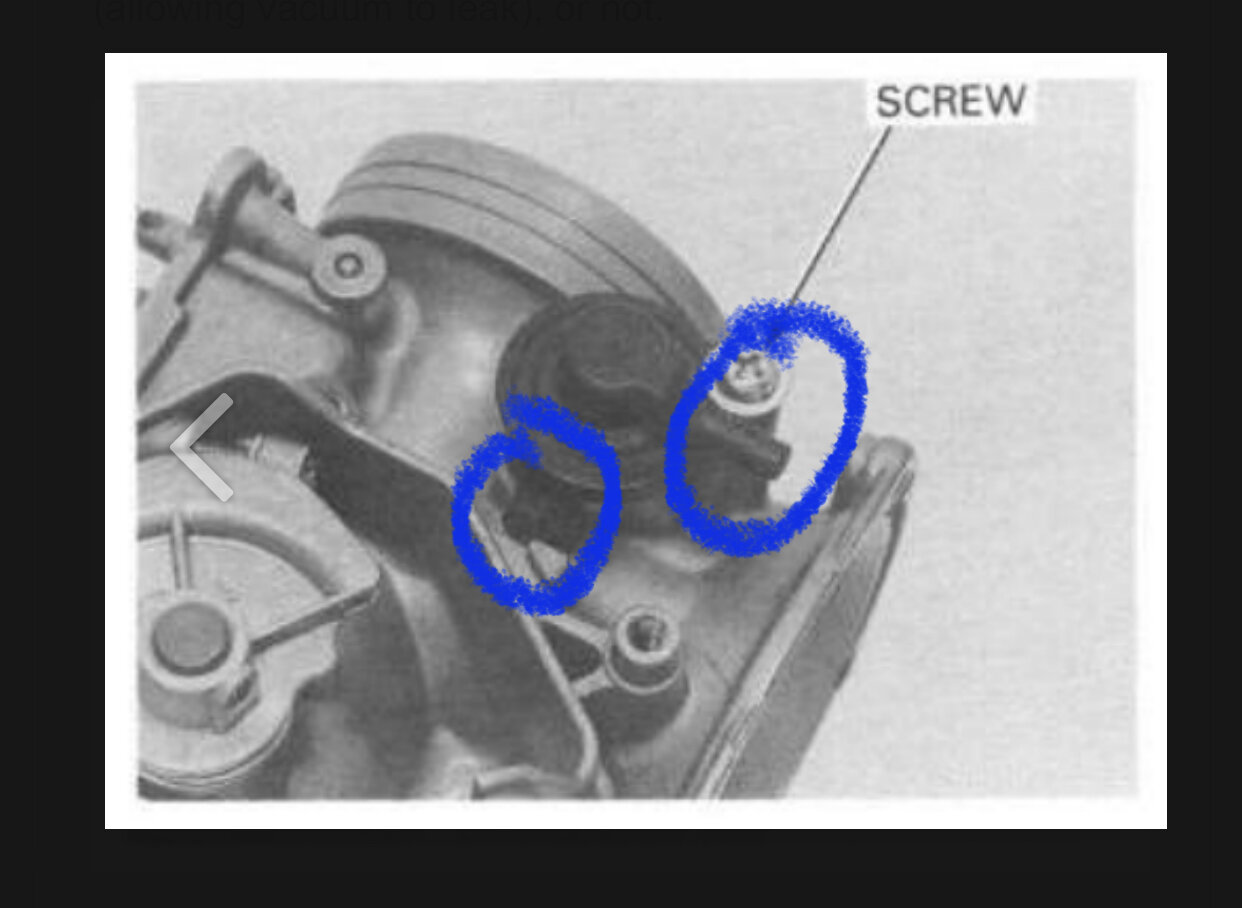
27 minutes ago, retro said:There is only one vacuum hose that connects to the air cutoff valve. Disconnect that hose and plug it temporarily. You are testing whether the air cutoff valve diaphragm has a hole it it (allowing vacuum to leak), or not.
There is two places that a hose connects to on that air cut off valve... both locations goes to opposite side of the carb.
which one are you referring to?
-
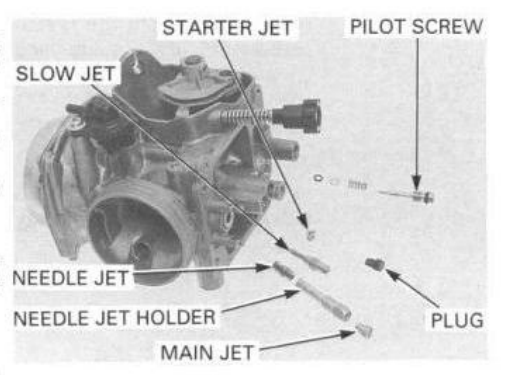
1 minute ago, retro said:He is referring to the needle jet holder. It emulsifies fuel after fuel passes through the main jet. :
Good clue... try bypassing the air cutoff valve vacuum supply by disconnecting the vacuum hose from the carb and plug that vacuum port. Then turn the pilot screw in & out again to see if the idle quality becomes more responsive.
the holder is there. From memory it threads in so not sure how it could fall out?
Does it matter which vacuum line I pull out to plug? It connects on either side of the carb. -
On 4/6/2021 at 12:39 PM, retro said:Is the idle quality responsive to pilot screw adjustments? Try adjusting the pilot screw per the manual and let us know how that procedure goes. The final pilot screw setting should be 1/2 turn out from decaying idle. If adjusting the pilot screw doesn't seem to make the idle quality respond like the manual outlines, then there is probably a rich condition in another circuit to diagnose.
Playing with the pilot screw does alter the idle. But it almost seems like it’s at the extreme on both ends. Like wide open (almost fully out) or almost fully in..
On 4/6/2021 at 11:57 AM, toodeep said:By chance did the seat for the throttle valve (main jet holder holds it in place) fall out while working on the carb? That would give it unrestricted fuel spray and when you remove the EV it's possible it lets in the little extra amount of air to help make the flooded motor start. All the enrichment valve does is open another passage to let extra fuel/air mixture in to aid in cold starts (unlike a choke that blocks air causing a richer condition).
Which holder are you referring to? The white plastic little piece that sort of just sits around the main jet?-
1
-
-
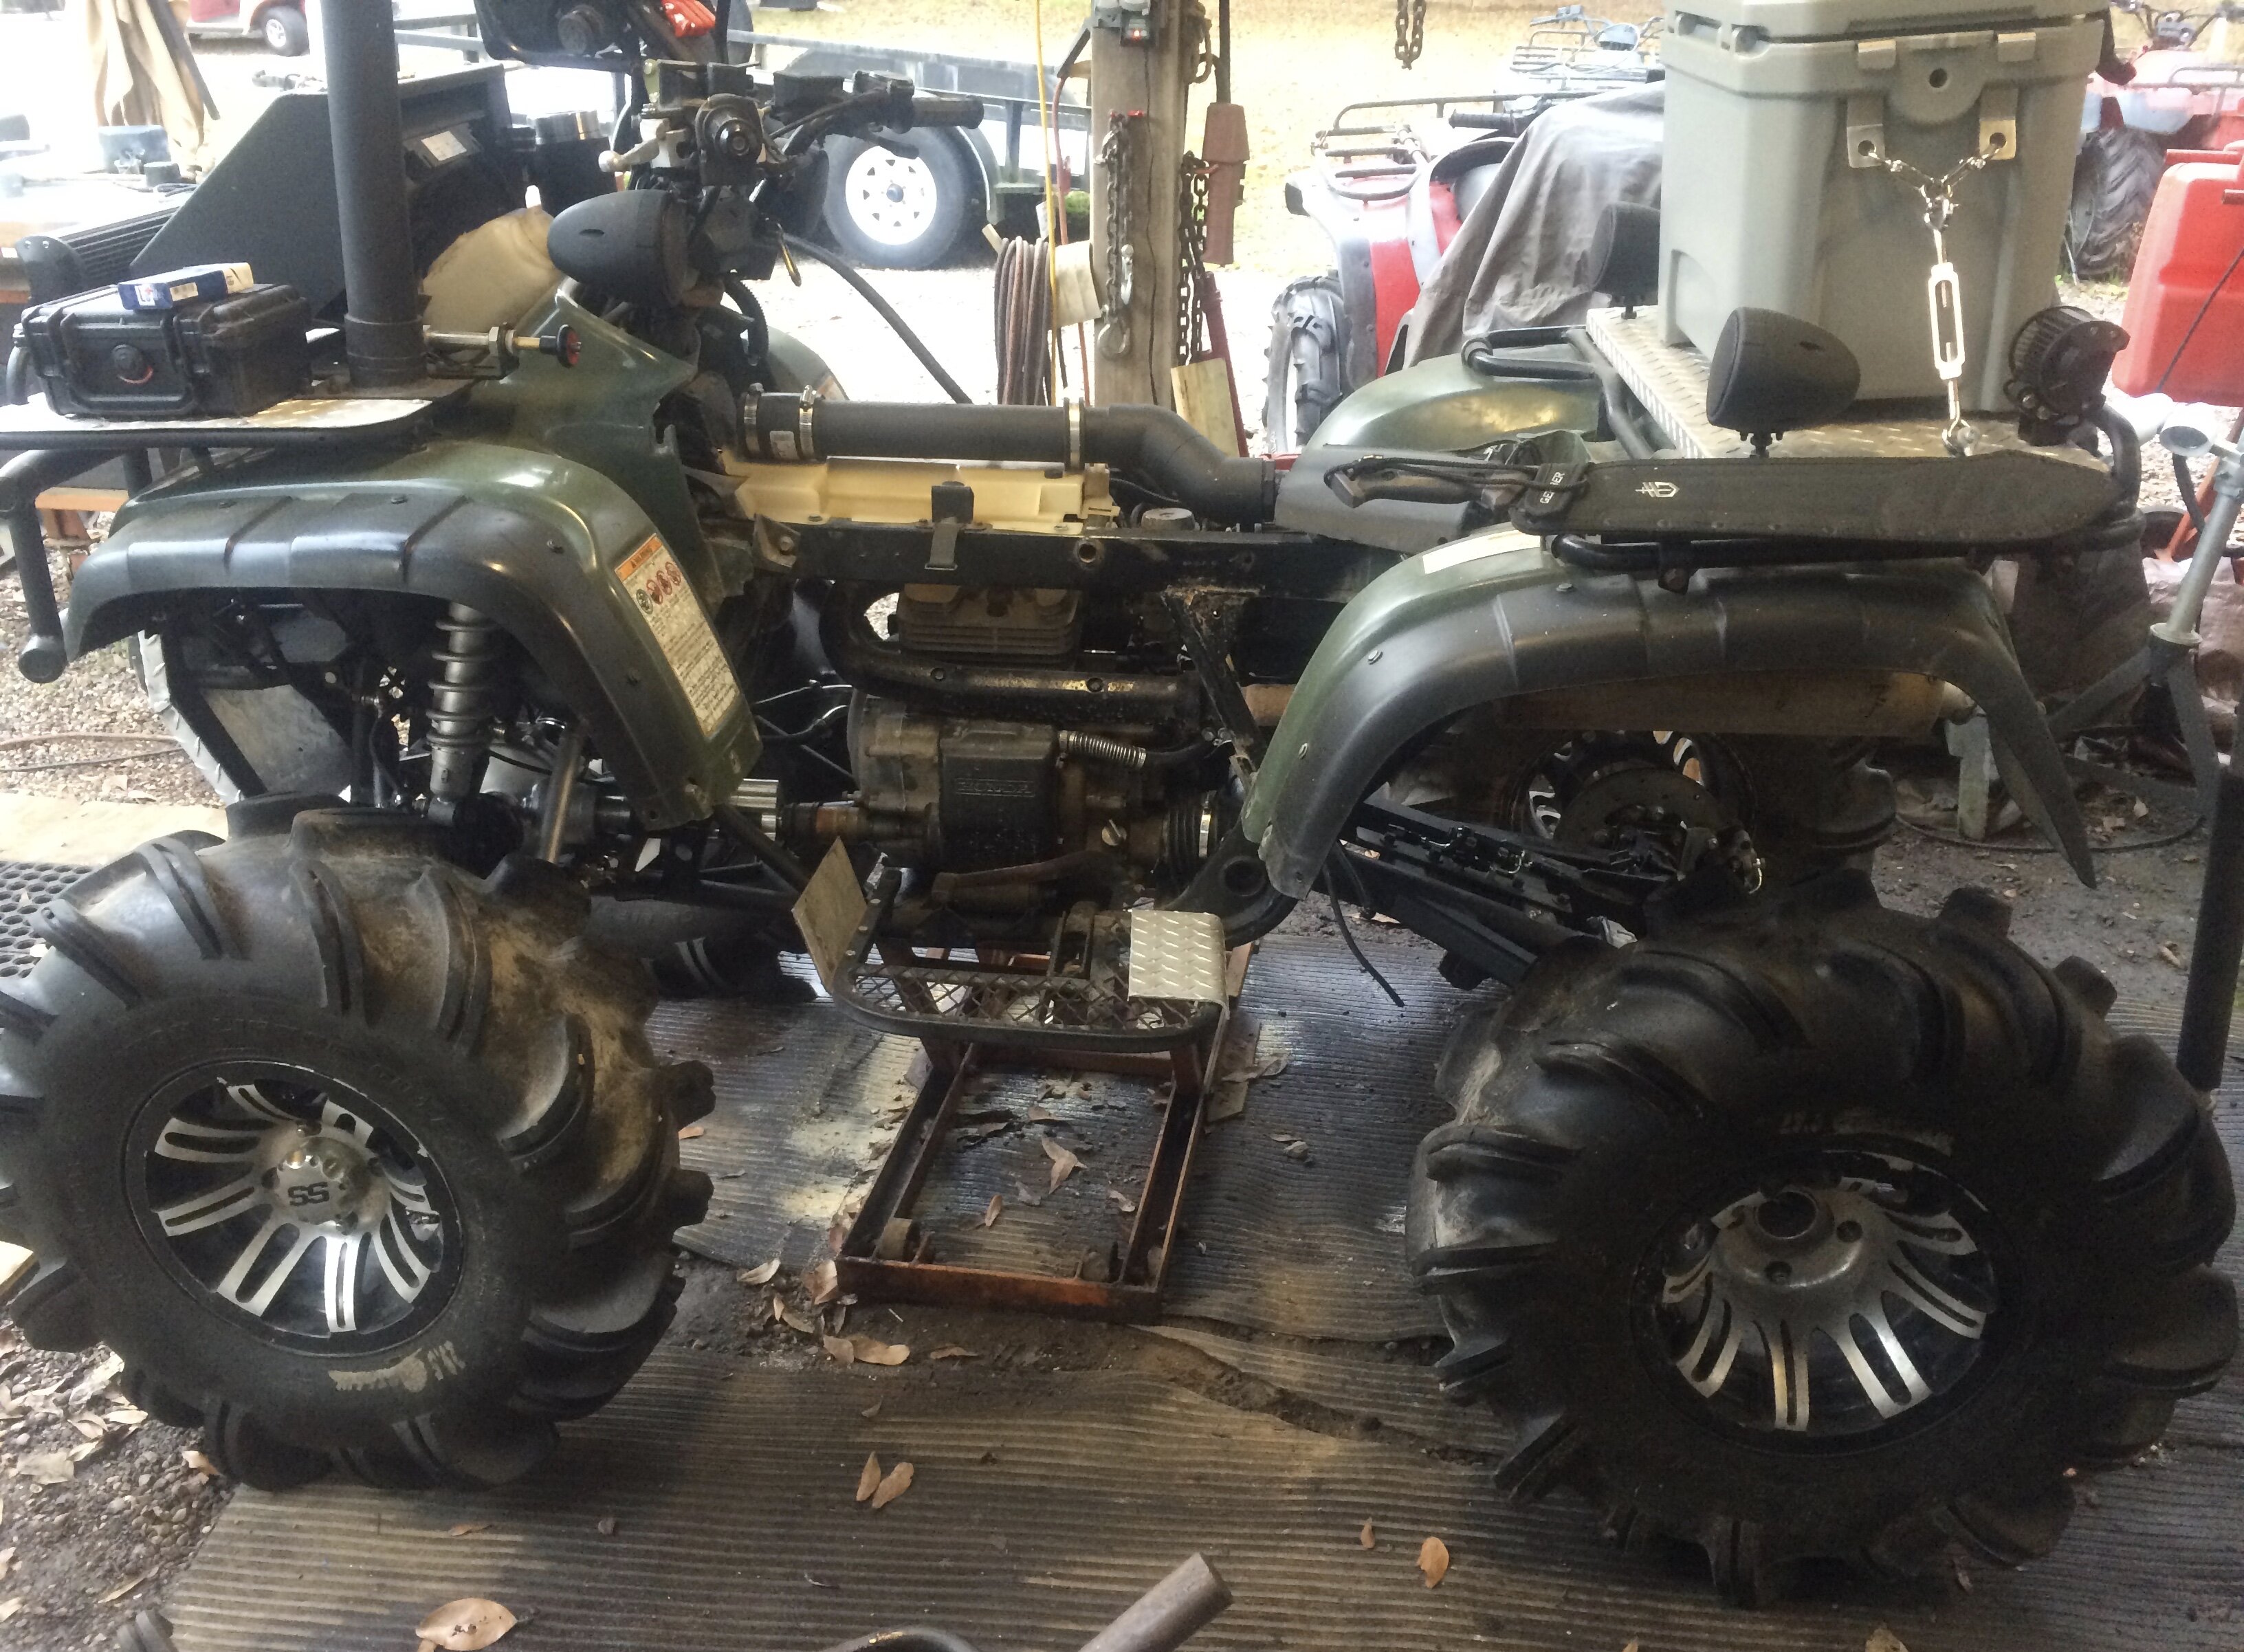
So since I got the ATV I’ve spent a fair bit of time underneath it.. and I found it odd that the skid plate ended short before the shift motor and that the front portion wasnt really protected. After closer inspection I realized that it appeared that the skid plate wasnt quite complete and he broke part of it off.
The two front mounts were ripped off (nuts gone), the OEM plate was held on by the 3 rear most bolts.
So out came the grinder and some 16 gauge metal.
Once I get my gas back for my welder I plan on trying to reweld the two broken nuts on. For the time being this thing is held at the very front mounts and I welded on some side tabs that bolt onto where the footwell rails go. For the rear this thing slides above the OEM plate by about 2-3”. I drilled the two holes out in anticipation for when I fix the OEM mount location.
The other random hole in the front end is for front diff drain.
Excuse my make shift paint both. primer drying before we hit it with black.
-
5
-
-
10 minutes ago, dadhustle said:Thanks guys,
hmm, I didn’t realize I could be showing T in the flywheel inspection opening, but be wrong. Saying back what I’m understanding:
I could be at the underline of the T but not be at tdc? By another revolution and mark at base of the T and I’ll be on tdc?
The red hot arc at the starter; could be bad ground? Any thoughts on why the battery has no reading on my multimeter? - cable was really hot near the battery.
At TDC compression couple of things you will note,- You can wiggle the valves a bit back and forth by hand. On exhaust stroke TDC they will be very tight.
- your cam lobes will pointing down.
Sequence of events as you turn the flywheel or pull the starter rope:
exhaust valve opens, exhaust valve closes - T shows up but this is exhaust stroke.
intake valve opens, intake valve closes, T shows up again. This is compression.
Run through turning the flywheel and watch the valves for a few revolution and you’ll get it bang on which stroke is what. Took me a while too.
Are you able to get a reading across the battery on your bench? with the ATV cabling completely removed? If no, battery is toast and probably internally shot.
If it it works on bench but not ATV then I’d say some cabling is fried that’s breaking your connection. Most likely a ground.
-
1
-
-
So I noticed the brakes on the front felt a bit spongy, so my curious self decided to open the master cylinder and see what’s going on and inspect the brakes. Well the front brakes are shot, the PO installed Disc Brakes upfront (Quadrax). The master cylinder fluid looked fairly dark and looked dirty. In the process of trying to loosen the two Phillips screws at the top I stripped one to the point it had to be drilled out to remove the cover, the other I managed to pull out barely.
Got new pads off Amazon, we’ll see how long they last. The fluid I sucked up from the cylinder and cleaned it out, then filled with new DOT3 and pumped and bled the brakes till new fluid came out. Handle now feels much firmer and grabs right away.
Old pads, basically none left..
The “guide pin” if we can call it that...Cleaned up well, applied a bit of grease over it also.
For the screws I went to Home Depot, they didn’t have M4x.70 pitch in my store. Closest I found was 8x32. I grabbed a couple of those in stainless steel. Got home and used my Tap&Die set and cut the screws to a M4x.70 pitch to fit into the master cylinder. The 8x32 are just a bit thicker so there is some ‘meat’ on them to allow you to cut them to the M4 thread type.
At this point the machine has new fluids all around.
I got another update as I’m in the process of painting something I build for the ATV. We’ll see what you guys say.
-
3
-
-
1 minute ago, Goober said:Very possible you’re simply running rich. How many turns out are you on the pilot screw? Quite possibly a sticky cable OR if cable was replaced—it’s too short.
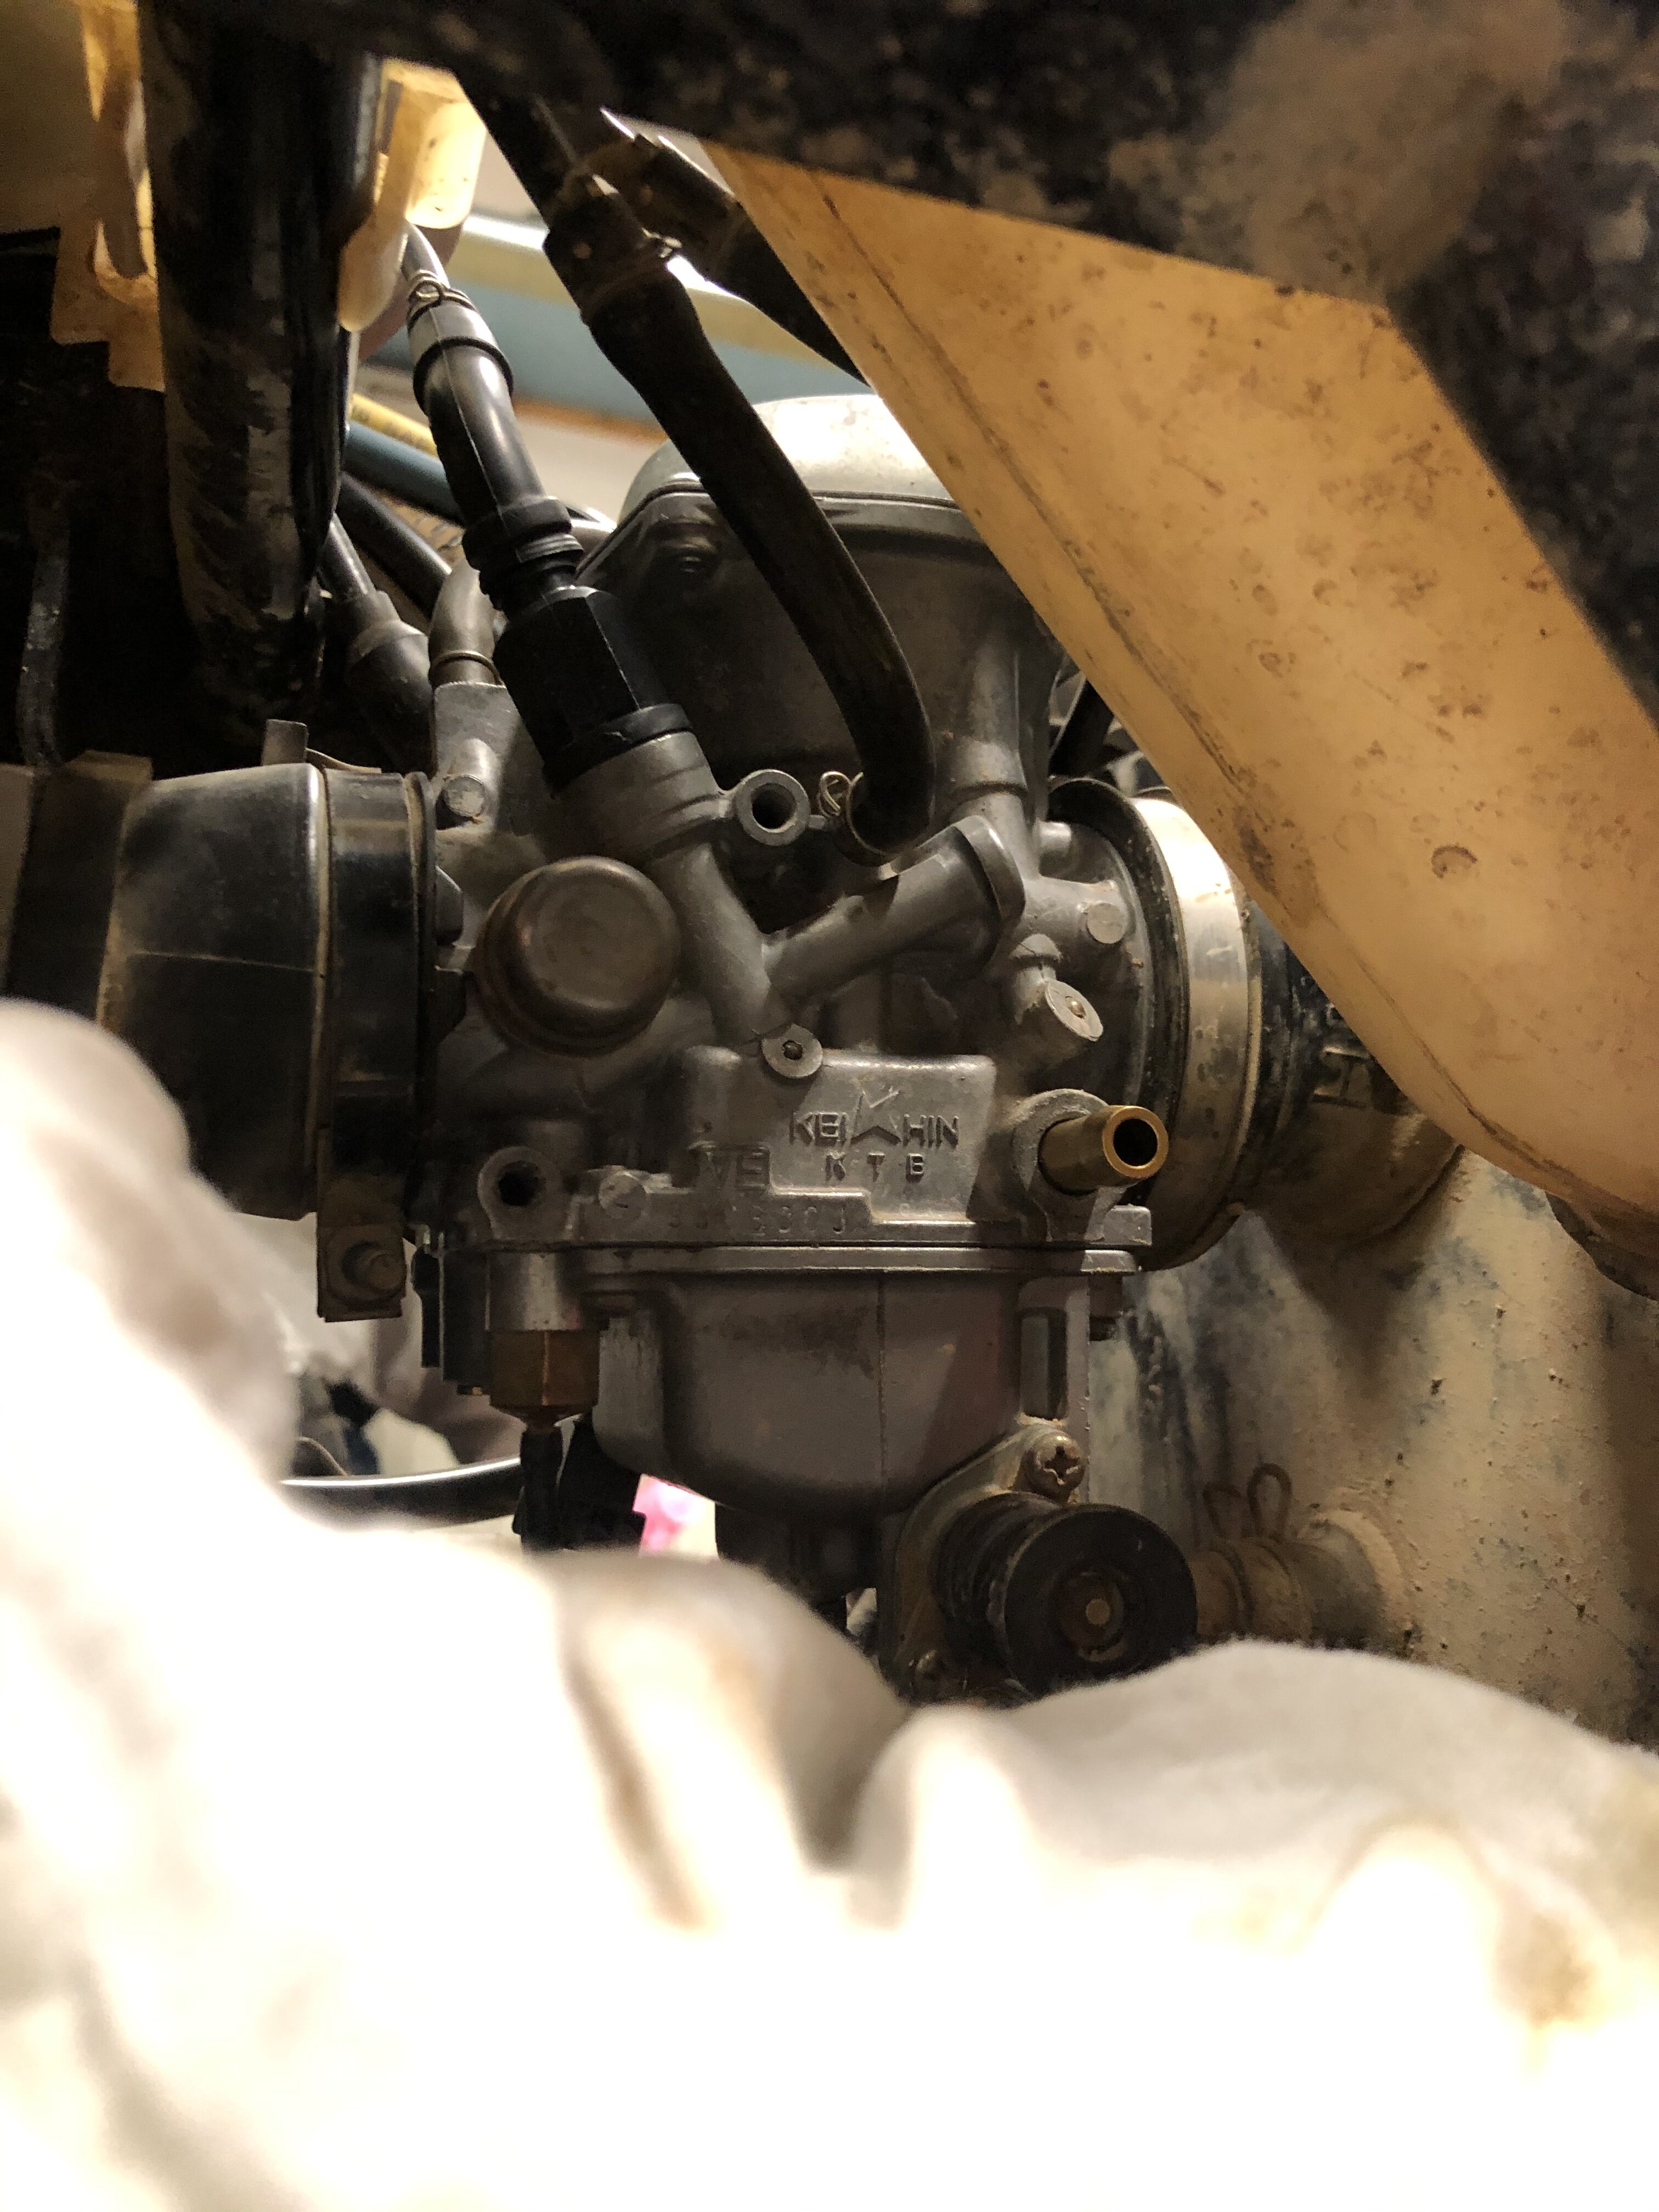
im pretty sure way back you proved this was the OEM carb.
Yes, oem carb.
2.5 turns out. Cable is smooth moving. Already checked this out.
-
1 hour ago, Fishfiles said:Seem to remember the plunger is what got you running a while back , might not be 100% right just yet ---- what carb do you have on the atv ? the one that came with it ? Did we ever check the code to see if it is the correct carb ? --- what about the cable being messed up and holding it back a bit ? Is the cable smooth or sticky
I had to bite the bullet and buy a carb new OEM for my 450 in the past , never could get it right
OEM carb, checked the number on it that it’s in fact the OEM one. @retro confirmed this a while back with me. Carb has been cleaned and rebuild (shindy kit). Plunger is OEM Honda from the dealer.
Cable is smooth moving. I checked it as well.
unless something with the enrichment passages is still a bit buggered/blocked?
-
Thanks. The plug is wet and dark when I try to start it and it won’t actually start. So it’s getting fuel.
So if the enrichment valve isn’t sealing good against the carb bore you would think it would still start? Because when I remove the enrichment valve completely it runs and I feel the air sucking in the carb bore where it was. So with the enrichment removed it’s getting extra air, no?
I will try and lean out the mixture and grab the other type of sparkplug
-
9 hours ago, _Wilson_™ said:just asking but did you ever tackle the rear brake backing plate ? i had forgot to ask about that, but have been meaning to, or is it holding for now ?
Thats a good memory. The one I "fixed" has held up for the past 500 or so miles. Brake works too lol.
But I am still on the hunt for one locally.
-
Something else I noticed, I am running spark plug DPR6EA-9 which is rated for cold climates.
The standard plug is rated for DPR7EA-9.
Don’t think this will make a difference but should I maybe switch plugs anyways and go with the standard?
-
14 minutes ago, Fishfiles said:I you use the correct name of the part and it might help you to understand how it works better , everyone calls it a choke , but it's real name is a " fuel enrichment valve " , air is just the form of transportation for the fuel
There fixed terminology. -
So, as some of you may know me from the “adjusted valves, now machine is a time bomb” thread, I’m back with some questions.
So as I’ve resolved my other issue(s) and didn’t want to clutter the old thread I decided to start this one. I was out last evening messing around with the choke to find the “sweet spot”. Here is my issue/dilemma.
If I mess around with the choke enough where the bike warms up a bit I can get it to a point I can’t start it again. Only way to start the bike, is completely pulling the enrichment valve out of the carb. Hit the start button, bike cranks and turns on - obviously running bad as now there is no enrichment valve anymore installed.
If I do a full cold start, with enrichment valve installed If feather the throttle, once I get it warm it idles good.
I am trying to understand what on the enrichment valve could be causing this issue with starting issue bud it’s obviously not as bad as previously. Am I getting lack of air? Because it appears to me if I pull the entire enrichment valve out, I get more air in the carb and bike starts? Am I understanding this correctly? So why wouldn’t it have the same effect if I pulled the choke knob out?
-
Now that things have settled a bit and the machine may be running half decent time to continue this thread.
While all the repairs were undergoing and I was waiting on parts. I ended up installed a 3rd Brake light. The machine was all pre-wired for it, the PO had removed the light I guess but the switches, wires and all was in place.
-
4
-
-
On 3/28/2021 at 7:32 AM, shadetree said:i wipe it all down with wd-40, been doing it this way for years.
That's it? It dont get rid of scratches tho?
-
What you do to get the plastic popping like that!
-
2 hours ago, jeepwm69 said:Pro tip, see if powersportsnation has a bolt bag for your model. $29.99 shipped, and you'll get a bag of bolts and odds and ends from when they dismantled a Foreman. Lug nuts, small bolts, big bolts, etc. Look at the individual listings for your model and pick the one that looks like it has the most stuff you would use/need. Some of them have more in them than others.
16 minutes ago, Fishfiles said:Power Sports Nation does have a 2000 450S bolt lot right now
https://www.powersportsnation.com/honda-foreman-450-s-00-bolts-misc-hardware-atv-26965.html
There are the same deals on e-bay
This is all good info boys, but dont forget I'm in the Cold North. They dont ship up here and even if they did it would be more hassle than its worth.
Got a 10.9 Bolt same size from the store, and I'll drill out my own collar from 3/4" round stock. $2. 😄
-
2
-
-
8 hours ago, Tim-ANC said:Maybe a new choke cable will help. Does it feel stiff or sticky?
I have a collection of bolts I've swept up over the years. What size do you need? 😁
Going to swing by the fastening store today and grab the bolt. Parts fiche calls for a 10x62mm flanged bolt, OEM $10, plus the Metal Collar ($10) that acts as a spacer. I have a hard plastic spacer I can make work just need a longer bolt as all I had was too short.

04 Foreman 450ES - Clean up, Repair, Maintenance & Enjoy
in Custom Builds - Restorations
Posted
Is it worth the hassle you think? My fan spins by hand but its not like it keeps spinning forever once I push it, know what I mean?
I still need to tackle your suggestion for the air cut of valve to see the whole carb issue still 🙂