Leaderboard


Popular Content
Showing content with the highest reputation on 07/01/2021 in Posts
-
6 pointsRepost of my old forum thread on prior website ______________________________________ Hey Guys! So as promised to @shadetree, I made a tutorial (as there is not one on this forum, or on the internet that I can find) in appreciation of him helping me figure out how to make this tool (much simpler then the plans i was making to remove it). So here we go! Quick video showing / Explaining how it works: Parts: 1) 1 1/2 x 1 1/2 in square metal tube 2) Metal file 3) Pipe Wrench Optional (only if need): 1) large Flat piece of metal 2) drill How to make it! Step 1) Take your metal tube and file around the tube gently so it is much smother (can also use sandpaper afterward if you want even smother) Step 2) Insert into the 60mm lock nut (P/N: 90244-HA0-000) and turn Counterclockwise Step 3)Remove the lock nut from differential housing, and pull out the pinion and bearing Step 3) This is the most important... Send me some money for beer!!! AND THERE YA GO! YOUR DONE! To install it, just literally do this in reverse! For the optional tool, all I can say is to do this: Step 1) Take a piece of cardboard. Place some grease on the tips of the 4 bolts sticking out of the differential, and press the cardboard to them to stain it were the bolts are. Step 2) Place the cardboard over the flat piece of metal, and drill out the 4 bolt holed through the cardboard. Step 3) Cut a 2" hole in the center of the 4 bolts on the flat metal Step 4) take a piece of scarp metal and weld it to the bottom of the flat metal so it can be placed in a vice And your done! If this helped please thumb up my video and say thanks! Happy Repairing guys! Edit: A tip on taking the pinion nut off: * this tip should allow to skip buying the pinion holder tool 07924-HA00001* Here is what i did. I took a vice (with rubber grips, but just put something like a few rubber bands in there so it wont get scratched up, and sticks better), and with the side panel off the differential (exposing the ring gear) i put part of the tube that comes out of the ring gear (were rear axle goes through) in the vice and clamped it down. That way the pinion wont rotate because the ring gearl is holding it stationary (if one turns, the other turn's). Now you can take that pinion bolt off freely without the need of that $120 tool !
-
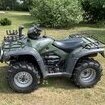
5 pointsHey yall! Orvis25 is back from the dead! after 5 years of not logging in to hondaATVforums, I found the community dead (in terms of the experienced people) and was re-directed here by JeepMW69 (thanks btw). Look forward to helping ya'll like I used to when i can, and getting help too. I might be transferring my old tutorial posts to this site, just to help draw more attention to this forum site, which is community run (instead of cooperate). So, look forward to that possibly if you care. Anyway, Good to be back! *salute* _____________ Update: Spent over 2 hours transferring all my older tutorials to this site. Check em out if you care! Hope they are as useful as they where on the old site. Update 2: Added an additional TWO, never seen before on the forums tutorials & how-to videos. Homemade TRX200SX Winch Mount: Trx300FW - LED Headlight upgrade Tutorial: Trx300fw - Homemade Differential Lock Nut removal Tool: How To Install SuperATV Front Disk Brake Conversion Kit (1994 TRX300FW): TRX300FW Fourtrax - Cheap Jerry Can Holder build: Trx300FW - How I Installed Tusk Digital ATV Heated Grips & Thumb Warmer: How I Installed the Cheap StreetRays 2" lift kit - TRX300FW:
-
3 points
-
3 pointsLaid down really nice! Had one hiccup with air cap on gun which I corrected. 3 coats 2k primer. 3 coats base, 2 coats clear. It’s really hot now but it’s evening out nice. No runs at all. But there is some orange peel. I’m VERY pleased with the way it came out. Now to let it set up, & on week end I’ll 2000grit wet sand & Polish with Meguiars. considering I’ve never actually sprayed I think I did really well considering it’s metallic paint too! 60-90hrs if YouTube sure helped. Learned how to properly set my paint gun ect. So huge shoot out to “Paint Society” & Urban Under Ground Paint King! There channels helped me immensely!!!! oh for the record.. rustoleum & acetone is a really bad mixture in my opining. That can I painted still smells brutal. That’s why I got super sick last winter!!! These fumes went away fast! No over spray either. Garage door remained open entire time too..
-
3 points"Same part different number: Appreciate it, That's what i figured, iv had this happen before. I just hate buying parts with different model numbers and trying to guess/hope it works as the other one that looks identical.
-
2 pointsbeen doing it for 29 yrs bossdady, if myself and jeep can do it ?, then surely you can !. heck, even bcs did it, with our help of coruse..lol. once you get a few under yer belt ?, its all down hill from there !.
-
2 pointshehe, hey got to start somewhere. That trx200sx video is over like 11 years old now i think. I feel so "immature" in it, and looking back, could have explained it so much more concisely with better the better knowledge i have now. Oh well... We all start somewhere.
-
2 pointsAlright ya'll. Just spent the last 2 hours transferring all my old tutorials, home made, and how-to's to this websites forums! Go check'em out if ya like, no major changes, Just wanted to make sure they got on here since I will be using this forum site now that the old one is kind of dead and all the "knowledgeable" people are now here.
-
2 pointsWell when people bring people like us carbs over and over again with "it doesn't work" I figure that's a good tutorial to show them on function!
-
2 points@Fishfiles u called it! U know how I am! I just sanded & re-sprayed with primer. BOYZ! I’m a goof. I didn’t mix the primer first yesterday!! I stored all the chunks up & it covered beautifully! Way better than before. Gave me practice with the gun & applying everything I learned off YouTube. Haha. Guns clean, base is going on! thanks guys. I’ll post back later!
-
2 pointsi see you painted a ton of dents in that milk can ?..lol. tail gate looks great !.
-
2 pointslol, what..you had to learn how a carb works ?..just when i thought i'd seen it all ?!..lol.
-
2 points
-
2 pointsi can tell you right now, buying oem parts for these old girls is unheard of right now !. honda has done away with the oem c.d.i.'s even for my '89 trx350D !.
-
1 pointWelcome to ATVHonda !! Glad you found your way from Death Valley ( HondaATV ) LOL
-
1 pointJust to clarify, when you say "one wheele will go dead" and "broke cv-shafts on the left side" Do you think that the mudding was primarily the issue? I don't see how getting the differential to engage more via the cone washer would would cause it to break CV-shafts in anyway they would not have already without them. I figure it would just allow it to operate more frequently under its normal 4x4 tolerances. In terms of you greasing all 3, whats the "life span" on the greese in the case? Do you ever "drain" the case per say and do a total replacement, or just keep injecting new stuff every so often until it ! out the breather hose?
-
1 pointI am still trying to figure out what that means ^^^^ i kind of was too..... no that's not fish, but he could pull that off blind folded, it's a defrent guy, just a video i happened up on, i think 1st posted in the old forums ? but I'm sure I'm not the 1st to post it.
-
1 pointOh, we are going to do it. The 2001 first then the 2004. Y'all get ready I'm going to need help.
-
1 pointyw, you should know, no one can keep a good honda mechanic away from honda's !..lol i tried to leave here awhile back, retro would not have any of it ?..hmmm..i guess he knows skill when he see's it ?..lol.
-
1 pointus ?..care ?..haha..no..really...we care you are here !..wb to our forums !.
-
1 point@Orvis25 ---- Looks to me that in 88 there were two numbers listed in the breakdown , the first number shows to only fit the 88 300 and the 350D and A -------- the second number superceeds the first number and is 42535-HC5-000 , it fits all the 300s 88-2000 , the 400s and the 450s , so either number would work for you , same part different number
-
1 pointOrvis welcome back from the dead...lol I was a member on the old forum for awhile before they went off the deep end but maybe not long enough to remember you. Sounds like you were pretty active over there so any advise and help here will be welcomed. I will take a look at your tutorials. Unlike the old site we have a chat area here that gets used by a few of us. Just click on the Chat title in the upper member bar and see if anyone is there, mostly we are around evenings and would like to see another active chatter. We talk about most anything including Honda ATV's...lol
-
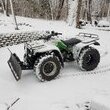
1 pointRepost of my old forum post from old website ___________________________ Hey guys I thought i should just share a video on how I made my own custom winch mount for my 86 TRX200sx as none (that i can find with hours of Google search) made a bracket for this ATV. The other video is of my TRX200SX plowing some snow using my modified plow, and my homemade winch mount. Note: The plow mount came with the ATV and is un-labeled, so I have no info on manufacture or origin. Please keep in mind I am not at all really into vehicle mechanic's and what not (Or tools) so this DIY project that i am trying to explain was like 95% trial and error with no help from my father aside from the welding. It took me 9 brackets to get one that worked. If anyone wants info on this project that is not said in the video let me know and I will try to get it for you as i never really drew this design out, i do not have a lot of specific information. Most of these parts I used were just scrap I was able to get for free, and bolts and stuff my father had in his mess of a basement (he is a pack rat). My Mount: Plowing:
-
1 pointUpdate 2 Also, as promised, here is a photo of my retrofit 18w led floodlight headlights at late dusk. Much better than stock.
-
1 pointhere yah go, also check out this thread credit goes to @Fishfiles
-
1 pointThanks, Yes I didn't want to "lock" the front diff, just get into engage 4x4 more often. Sometimes it only does 3x4 even when its stuck or under a traction situation. I'd lock it, but I cant get ahold of a 424 kit, mor would I want to dump that much cash in ($400 424 kit + $500 torq front diff locker) $17 in cone washers hopefully will "help" a bit.
-
1 pointThanks Jeep for the encouraging words.
-
1 pointYou need to pick up an extra engine, tear it down, and rebuild it. That way you can tinker without having a machine down. I did my first engine rebuild after buying an 06 500 that "needs a carb cleaning and a top end". Of course, the crank and 1st gear were both shot, so I had to do a full rebuild. It looks really intimidating, but now that we have the internet, @toodeep and a guy named Rich (Rich450ES on the old Foreman board) walked me through it. That got me brave enough to tear into a bunch of them and while I occasionally have a hiccup, once you see how they're laid out and work, they aren't too bad to work on.
-
1 pointAt this time I think I will do as Retro said and remove the gear reduction gears and install a sturdy foot shifter. I will still be in my comfort zone doing that. When I start on the 2004 shifting problems I will be way out of my comfort zone.
-
1 pointYah but if you look at the part that actually engages #11 they are the same size there. You just have a longer shaft that is supported by both the front cover, and then that thin part is also supported by the ES motor housing. #16 is the same for both, and both #10 and #30 are sturdy. What's different in the 450's is the actual transmission gears (looking at schematics). I haven't torn one down to see the exact difference, but if I had to guess they designed the ES gears to shift easier, similar to the 05-08 500 1st gear, which only had 4 dogs, which makes shifting easier, but then doesn't hold up to hard shifting so they updated that gear on the newer 500's to 6 dogs instead of 4. If I had a 450ES it would get converted to footshift, but I certainly wouldn't be hammering on it and being rough on it. I think if you didn't abuse it you would likely not have problems.
-
1 point
-
1 point
-
1 pointIf you really want to get picky on the mini dents, lightly mist some flat black over the primer and block wet sand the black off. You'll see the low spots. This ain't cheap since a block of wood may set you back a days wages😳😉
-
1 pointGot 2 coats of primer on. WOW even with a 1.7 tip it was super thin. Gonna be insane hot today. So my plan is just to sand the primer, & have it totally prepped for paint & clear. I had filled the two super small dents but can still see them a hair. Guess I sanded the bondo down too much. I even used guide coat. IF I can lay the rest of the paint down like the primer, I’ll be super happy! Not perfect but perfect for me!
-
1 pointuse heat, map gas, yellow bottles.
-
1 pointWhile the stuff is soaking. Over the last few days I; replaced one inner boot and regreased greased the tie rod boots drained front diff and refilled. *the fill plug is some weak on there** also painted the rear rack. Pretty much done visually at this point.
-
1 pointI'm back! Lol.. seen that I was mentioned in this. I'm really interested to see if you @Goober found out why your quad is fouling plugs? My 350 still seems like it runs a little rich but haven't bothered sorting it much.
-
1 pointif you have access to a shop press ?, i always use a small bar centered in the dip, and press them out. MAKE SURE YOU HAVE THE BACKING PLATE SUPPORTED FLAT UNDER THE PLATE !, then just press it out. DO NOT HAMMER ON IT !!!.
-
1 pointStill watching here! No ES machines around, but I'm super curious to know who done it! I'm still leaning towards a connector not making good contact. In that situation, unplugging the connector and checking wires will give good readings, but plugging the connector back together isn't making a good connection.
-
1 pointummm..i did not see 20 bucks in paypal ?..sooo..no..you failed..lol.
-
1 pointIf you can't get it to turn and come out with some good penetrating oil , like Areo-Kroil , Deep Creep , 3M 5 in One oil or what ever , and you are afraid to break it again , try soaking the whole backing plate in white vinegar , it will dissolve rust and corrosion ----- applying heat to aluminum can be risky , but if done right might help --- if it is extremely corroded , which it can be as the brake cam is steel and the backing plate is aluminum , which are dissimilar materials and will cause bad corrosion problems :
-
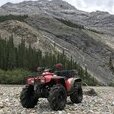
1 pointBetter video from a week or so ago, down where our land butts up against my buddy's ground. He has a license for some slightly more potent stuff, but most importantly, det cord and blasting caps, so he can push his charges waaaaaay down in the mud and then light a fuse. Same stuff though, he just has a lot better way of detonating it. And yes @shadetree, that's a snorkel sticking up in the video LOL farm.MOV
-
1 pointThis has to be one of if not the dirtiest saws i've ever seen. But the oil and filth really preserved all the paint on the exterior of the case. Whatever conglomeration of mix fuel that sat in the bottom of the case, not so much. It pitted the bottom end pretty bad but i'll just grind that out. Shouldn't hurt it any. The little bit I've got through the parts washer, have come out really nice.
-
1 pointupdate: here she is.all done for now, enjoy !.
-
1 pointI have heard , you can lead a horse to water , but you can't make him drink ---- thinking of a new saying , " you can ride a trail that leads to water , but some are scared to sink "
-
1 pointdream on !!..lol.
-
1 pointGoing to make a Mud'der out you yet !!!
-
1 pointupdate: got all my spacers made. still no word from my mail man ?. might have to just break down and buy all 4 new rims as well ?. here is some pics of the spacers on both front left, front right knuckle.
-
1 pointDe'Ja'Vue , check this thread out : the pic links to the SuperATV kit on the 350D have since expired , that was back in 2012 , maybe Lancer77 has some pics saved , I remember him Reading the end of this thread I realized one of my unfinished brake projects , rear brakes on the rear of a TRX250 Fourtrax/Big Red rear end , I got all the stuff in a gang box , all I needed to do to finish was weld the new flange onto the axle tube --- https://www.hondaatvforums.net/threads/87-foreman-350-brake-and-shock-swap.19600/
-
1 pointgot the front fender '' some what '' installed today..aghhh..what a time that was !.