Search the Community
Showing results for 'Ultrasonic'.
Found 32 results
-
Could you please share your experience with ultrasonic ATV engine parts cleaning solution ? Below are results of my experiments: - CLR (1:4 ditsilled watter) it works very well for alluminum cleaning from caked dirt and oil. Alluminum parts are failry bright and shiny (spotty sometimes). Unfortunetelly CLR makes damage to steel parts (bolts, polished surfaces, beraings, shaft ...etc). They bacome dull black, some of them even rust. - ZEP orange degresser (1:4 ditsilled watter) is not so destructive but makes aluminum dark and doesnt remove everything (caked dirt/oil). - Diesel fuel bath fairly cleans loose dirt and oil. Very well lubricastes and penetrates the part fr storage (stinks terrible for me) - Gasoline removes well any grease,drit, oil (sort of like carb cleaner). It doesnt work too effectively against baked oil and dirt. ( stinks, flamable) Dremel with brass wire brush or very soft steel wire is what brings in my case shine to alluminium parts. I would be more happy to use entirely chemical process. Please share your experience.
-
I recently bough an ultrasonic cleaner and used it for first time over the weekend. I was impressed with the results for sure. This is the cleaner I used. Northwest Enterprises brand on Amazon.
-
@riverc there is lots of good info on those old Keihin QA carbs on the 223 cycles site, 223cycles.net. The sell keyster carb kits that they claim are a step above the shindy kits as well as an add on kit with all new jis screws for the carb. I recently bought one of the carb and add on kits for my 250SX that i havent used yet but will soon and see how it goes. I also just bought a ultrasonic cleaner to see how that process works. Good luck!
-
I am in the process of rebuilding the carburetor on my bike. I've only had the bike since Sunday and I am sure that someone has had it apart before and from what I am seeing probably had no clue what they were doing. While dismantling the carb so I could put it in the ultrasonic cleaner I noticed that the TPS is mounted 180° to the way that it is shown in the picture of the manual. The picture in the manual shows the connector of the TPS pointing upwards towards the vacuum side of the carburetor, mine was installed pointing down towards the bowl. I can't decide if this would make any difference as long as the resistance was changing as the throttle moved. If there is anyone with an 05 TRX500FE can you have a look at your carb and see which way the TPS is mounted on your bike?
-
I picked it up at 2:00 from my buddy who had an ultrasonic cleaner, it's all together, 2.5 turns out on mixture screw, you said to find a clamp, I have the clamps at the farm sitting on the 300. I ordered the Red Kote that will be here monday. When I install that hose if it's bad after the old one is off do I have to glue it back on or not, but I'll see if it's cracked or not
-
is those ^^^ pics before or after ?, if before ?..you call that carb dirty ????..lol. thats clean from what i've had my hands on through the years !!..lol. if its after ?, i'd say its ok ?, but I get mine super clean, clean enough to eat off of !..lol. and this is without an ultrasonic cleaner, all by hand, and parts washer.
-
Walmart has Deep Creep and Berryman Chemtool I don’t soak my carbs or boil them. i spray them down with Deep Creep and brush off all the outside dirt. Don’t spray them with cleaner yet cause you could ruin some parts. Then i disassemble them—inspect condition of every part. Sometimes you will find the proBlem like incorrectly assembled pilot screw or chunks in jets. Also remove the primer pump. completely disassembled. Pour some Chemtool in your little plastic tub. Use as little cleaner as it takes to clean each part. Brush it clean with your brushes and pipe cleaners. keep dirt out of those passages important! This is why i do not soak my carbs in used fluid: Carb with the primer pumps have these little channels going thru the bowl and body, leading to a tiny orifice in the carb throat. Soaking in used fluid increases the likelihood that you’ll get debris in carb channels. Also, soaking for long periods allows a galvanic pathway between dissimilar metals on the carb for corrosion. I’m real particular and usually go thru some extra unnecessary steps, but i don’t do this for a living—it’s a labor of love. A thot about ultrasonics. My lab has a 2 gallon ultrasonic cleaner with a water bath—the manager puts parts in jars filled with cleaning agent (sometimes methanol) and runs the cycle—this allows cleaning under ultrasonic conditions without any cleaning agent off gassing into the lab.
-
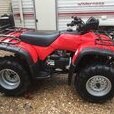
Hello again everyone! I have a 2005 Foreman 500 foot shift on the healing bench for my buddy. He just bought it for $1300 US as a non-running bike and was pulled from the weeds in field fresh condition! Previous owner described the issue as water in the carburetor and it had some sort of impact on the front. After pulling everything apart we have confirmed spark, compression and the carburetor has been in the ultrasonic. Tomorrow I'll be changing the oil and taking it for a first flight. I'm going to give it the light go over after getting back to running shape. He got an amazing deal if you ask me. Motor looks and sounds strong. All body panels are there and it still has most of the original parts. Thank you for looking!
-
Frustrating day with this thing... Started and ran perfect but left it sit for an hour or two while I was waiting on air filter oil to dry. When I came back it wouldn't run without choke so I pulled the carb apart and shot some air though the pilot jet but it's not running right. Going to fully disassemble and ultrasonic the carb but have a few appointments so will likely be a few days. Anyone know what the symptoms of the one-way clutch bearing going out on this will look/sound like? I think I've talked everyone out of wanting it for themselves so it's officially up for sale or trade.
-
If the machine has sat for a length of time plan on soaking it in a carb cleaner. I have an ultrasonic cleaner I use for them but I deal with a lot of them. Some think if a little stabilizer is good a lot is better. It makes me money. lol
-
It was a cheap kit off of eBay. I just used the gaskets from it. Everything else went into the ultrasonic cleaner then was blown with compressed air. It’s an original oem carb. I didn’t use the specs from the manual, I just put everything back exactly like it came out. It runs and sounds good for maybe 10 seconds then just slowly dies. Spraying starting fluid won’t keep it going.
-
My $0.02... Buy a cheap eBay carb and get it riding while you clean/rebuild the OEM carb and have it ready when this $40 one fails 😁 A lot of folks choose to get cheap carbs and have good luck with them, some certainly don't but if you prepare yourself for either you will be happy! A rebuild kit and a bath in ultrasonic can fix pretty much any OEM oh400ex (Edit: Did not see that the OEM had a die grinder taken to it)
-
I bought a used QA03A carb off fleabay. The carb appeared to be complete and the price was right. the seller performed an ultrasonic cleaning but it’s still dirty. So I’m posting this thread to more easily show how to clean these things. There are several members here who know these carbs better than me so I’ll look forward to providing them an opportunity to add to the discussion. here’s the disassembled carb—laid out in an exploded view orientation. The main problems with this carb is that the teeny pilot screw oring was missing and the other seals were flat and brittle. Oh yeah the piston was hanging up—i found a piece of glue or something on the side of the piston. Whiped clean and now moves freely you can see a pipe cleaner i used to show the enrichment circuit pathway.
-

2000 YAMAHA GRIZZLY 600 ELECTRICAL ISSUES
Brantley Foreman replied to Brantley Foreman's topic in Non Honda ATV
Yes, and I just did it again. It is at TDC Compression stroke, marks on the flywheel and camshaft are correct and the valves have correct lash adjustment. New spark plug, new coil, new stator, carb has been cleaned in ultrasonic cleaner, tank has been cleaned out and new non ethanol 93 gas. I don't know what else to do! Also compression is 110 PSI. -
I'm going get this one here. Good support, I called and got someone right away, so that carb rebuild may have to wait. https://www.sharpertek.com/ultrasonic-cleaner-sh180-6l.html
-
I'm wondering what size ultrasonic cleaners will work with a Honda 300 carb but that are cheap. Can you guys help me out? Honda 300 carb being the biggest thing I'd use one on, and the usual mower carbs.
-
Here are some photos so far not nor outside scrubbing, still gotta get it ultrasonic cleaned. The primer diaphram looks bad. Meter diaphram looks ok
-

2013 TRX420FPA No Spark, "-" flashing continuously on display
winchester replied to winchester's topic in Electronics
I took the valve body assembly off and soaked it in my ultrasonic cleaner and cleaned it out but I'm still getting the code 15. It looks like I'm only getting around 1.5 volts at the yellow/black wire at the shift solenoid when I attempt to shift and then it goes down to 1.1 volts. From what I've read online it is supposed to be getting around 5v-6v I think. Anyone know what could be causing that? It has thrown that code with 2 different pcms so I don't think that is the problem. I ran through all the checks in the fsm but there's no instructions on what to do if the voltage is low. -
Shindy 03-048 is the one you want I think. (Do a bit more checking before hitting the button) Ultrasonic your OEM carb and put that Shindy kit in. Like new again. Buy an ultrasonic if you don't have one, they aren't too expensive. China carb is great to get you by while rebuilding OEM but are definitely hit and miss. Orange ZEP from HD and put that in the cleaner if you don't already have something in mind.
-
You can't beat a good stick welder, I still prefer them for many things. I have a cheaper hobart wire feed that I use at home here (flux core). That will be updated someday when I get the shop either done or a new shop built. I have a POS miller at the business, I hate that expensive welder. The problem with having 2 shops, twice the tools needed. I got an ultrasonic cleaner a while back and I do like that for cleaning carbs. My way too small unfinished home shop.
-
Looks like $185 for that one @toodeep. Since you do it for a living makes sense to have one that size. How long have you had it? I don't mind paying up for good tools, as long as they'll last. https://www.amazon.com/VEVOR-Ultrasonic-Professional-Dentures-Instrument/dp/B07ZNT6QXQ?th=1
-
I order 96% of all the oem parts I buy from them. The other 4%? Those parts are either not made anymore or some of the few they don't have access to. Adding up the order history through them totals over $4k... over 6 years. I've never had a single problem with them and play to buy much more. If there was an issue is if you are use to overnight or 2 day shipping you will be disappointed. Think old school shipping. Not terrible, just slow. As for an ultrasonic cleaner for carbs.. they are amazing! And as for solution? Try good old fashioned pine sol. The original, not the enhanced with anything kind. But don't let it soak for any longer than 24 hours and rince thoroughly to remove any extra sol. Works amazing in an ultrasonic tub. Just be sure to remove any diaphragm or o-rings and hoses. Btw, after a water rinse dry thoroughly and spray any screws or other metal bits with some wd-40 or oil base to keep them from rusting. See pic. Bought this carb from ebay. Looked like it sat in a grove for 10 years full of rotten gas. Choke would even move. That pic was after 17 hours in pine sol in a ultrasonic cleaner. No brushes or anything was used. Wish I'd taken a pic of the before but I wanted to see what rusted. Took it all apart and threw it all in the soup (minus rubber parts of course). Normally I wouldn't wash all the screws and what not like this but I was curious.
-

Light Restoration | 2005 Foreman 500
oh400ex replied to oh400ex's topic in Custom Builds - Restorations
On the cam chain I am sure there is a proper procedure but short answer for me is sound. If it makes noise with the auto adjuster there is a problem. It sounds great but old chains tend to stretch after they get revived and on a 400ex there is no way I would run this bike again without changing the cam chain. Utility bikes are different beasts. Leaving it alone for now. Carb was in surprisingly good shape. Came very clean in the ultrasonic and the bike runs amazing. Sticky float... have had to tap the side a few time but a rebuild kit and a bit more attention to cleaning the seats is going to fix that. Definitely going to take off the skids and remove as much rust as possible from the bottom of the frame (etc) Usually use a rust converting paint and mask behind with cardboard. I don't spend too much time if it is not my machine but accomplish the main objective of hitting the high spots cosmetically and preventing rust. Will do as much taking you all through the process as possible but i'm working at my buddy's shop. Thank you again for your response! Edit: New petcock assembly as there was more rust on the on/res tube and the screen was gone. Surprisingly did not leak. -
Done with heart surgery. Ultrasonic with de-greaser for a few hours and a flush run with clean water. Only bottom half of carb body would fit in basket. Sprayed all parts with carb cleaner/WD-40 and air compressor to displace water. Going back in tomorrow to see how it runs.
-
To elaborate further on what I said above the ultrasonic cleaner is filled with a weak acid solution and degreaser. It cuts a lot of the rust off with acid and the cavitation like effect that the ultrasonic produces. Orange ZEP is a good commercial version of a solution you can make yourself. Citric acid is your active ingredient. What we are doing is stripping the metal of any oxides and then immediately introducing it to a hot and oil saturated environment to cure and for somewhat of a coating to form. That is where the black color came from. In a jar with WD and fresh motor oil they sat in ultrasonic hot bath again for 90 minutes. The finish that you see in the picture is the result of that process. Hot bluing is the best way to do this. If you want black metal parts that is the only way to go unless you are talking paint, powdercoat or cerakote Ill double down and say again that it looks better in the picture than in person. It is not perfect in the slightest. A great way to perfectly clean and semi-polish bolts is a vibratory tumbler filled with stones, ground glass and orange ZEP. It takes a while but they come out looking better than factory if you are going for a semi polished look. I don't have a plan for these bolts and the ultrasonic was already setup for doing other stuff so I just ran with it. There are better ways...